
Are you all ready for the upcoming holiday weekend? Based on what I see out my window I would guess said holiday would be Christmas....I would be wrong. Despite the temperatures lingering in the 20s/30s and the daily snowfall, we are actually coming up on Easter weekend. I always associate Easter with the start of Spring, flowers blooming, birds chirping, windows open and kids playing outside. Ahh.....this year I guess we'll all have to wait just a little bit longer. The dish I have for you today doesn't mind the weather. Nope, it's delicious any season for any reason! Carbo-licious, Cheesy-licious, with a teensy bit of healthy. That's how I would describe this dish. I've made this strata a few times over the past year and it's so indulgent that it just has to be saved for holidays around here! Health food this is NOT! This is a perfect dish to make for an Easter brunch because you need to prepare it the day before and bake it the next morning. Just toss it in the oven amid the Easter-morning chaos. It feeds at least 8 and looks quite impressive when brought to the table - which also makes it great for hosting overnight guests! Sometimes I add some roasted red peppers to it, which is great for Christmas morning since it adds an extra layer of flavor while upping the festive look to make it more Christmas-y. I have found that this monster of a casserole needs some extra lovin' time in the oven. We usually let it bake for 1 hour to 1 hour 15 minutes to make sure the eggs are cooked in the middle. Trust me, it's totally worth the wait! 
Spinach and Cheese Strata Serves 8-10 3 tablespoons unsalted butter 1 small onion, chopped 2 garlic cloves, minced 2 10-ounce packages frozen spinach, thawed and drained 1 teaspoon salt, divided 1/2 teaspoon ground black pepper, divided 8 cups ciabatta bread, cut into 1-inch cubes 6 ounces Gruyere cheese, grated 1 cup sharp cheddar cheese, grated 9 large eggs 2 3/4 cups milk Melt the butter in a large saute pan, over medium heat. Add the onions and cook until translucent, about 5 minutes. Add the garlic, 1/2 teaspoon salt and 1/4 teaspoon black pepper and cook for another minute. Add the spinach and cook until heated through, about another 2-3 minutes. Set aside to cool slightly. Combine cheese in a medium bowl. Set aside. Coat a 2 1/2 quart casserole dish with nonstick cooking spray. Place 1/3 of the bread cubes in the bottom of the dish. Top bread cubes with 1/3 of the spinach mixture. Top spinach mixture with 1/3 of the cheese mixture. Repeat the layering 2 more times, finishing with a layer of cheese on top. In a medium bowl place eggs, milk, 1/2 teaspoon salt and 1/4 teaspoon black pepper. Whisk to combine. Pour egg/milk mixture evenly over top of entire casserole. Cover and refrigerate overnight. Preheat oven to 350° F. While the oven is pre-heating, allow the strata to sit at room temperature. Bake uncovered for 60-75 minutes or until strata is no longer runny in the middle. 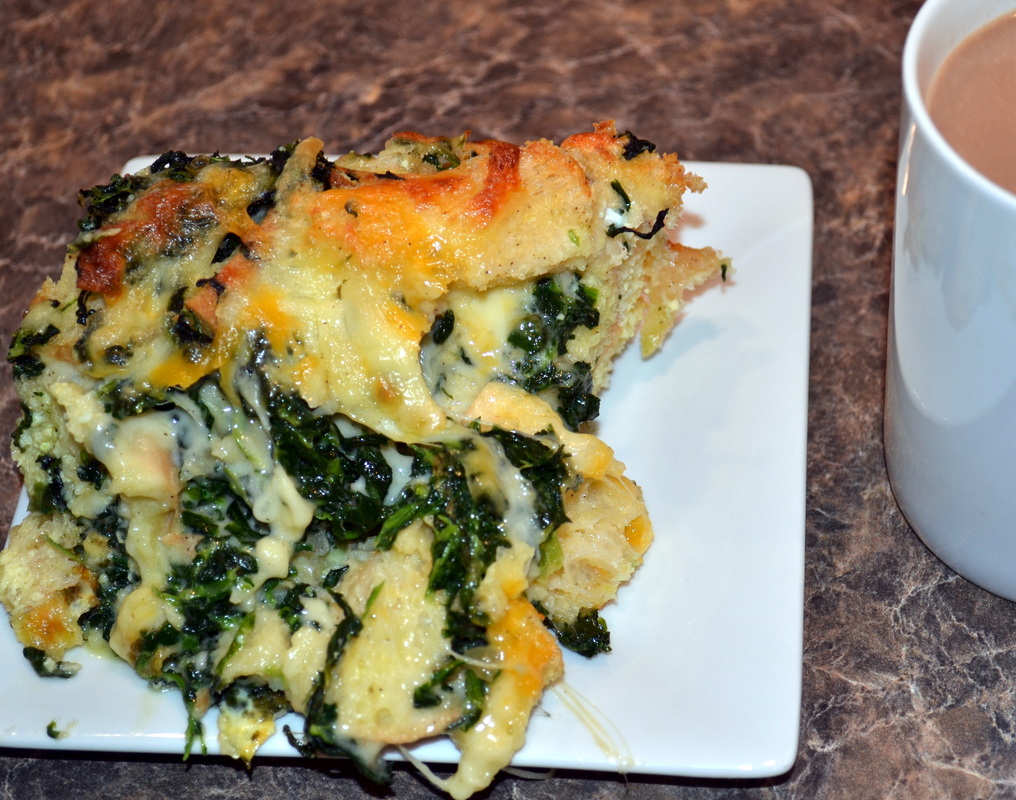
Source:
Adapted from The Curvy Carrot, via Annie's Eats, as seen on Smitten Kitchen, originally from Gourmet, February 2003.
2 Comments
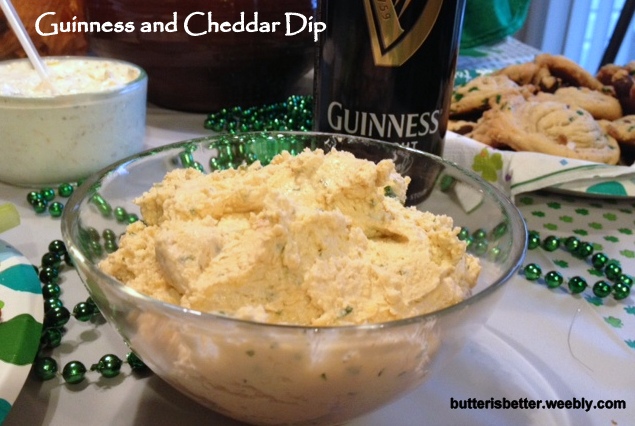
How was your St. Patty’s Day? Did you celebrate with green beer? Or Irish food? Or a local parade? How about all three?? I didn’t indulge in any green beer this year and (sadly) didn’t make it to Pittsburgh’s awesome St. Patty’s Day parade. I DID, however, attend a fun St. Patty’s Day party and enjoyed some good Irish food! My contribution to the party was this Guinness and Cheddar Dip. Come to think of it, I may have brought this exact same dip to last year’s party….hmmm…no one seemed to mind! I’ve actually made this dip several times over the past year and it’s always quite popular! I’ve tweaked the original recipe a little so that the Guinness flavor really stands out. I like to serve it with hearty crackers or some veggies. So, even though the celebrations are over for this year, please don’t wait until 2014 to give this recipe a try!! 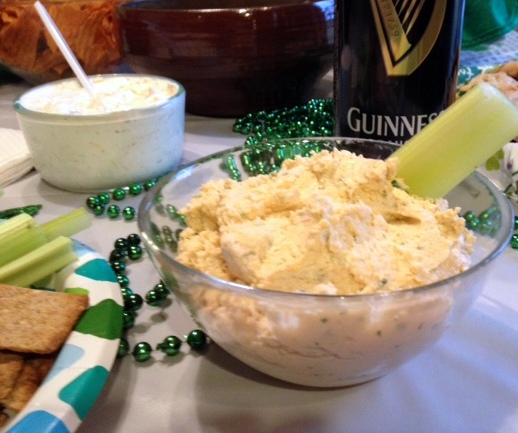
Guinness and Cheddar Dip 8 ounces cream cheese, at room temperature 2 1/2 cups sharp cheddar cheese, grated 1 teaspoon Dijon mustard 2 tablespoons half-and-half 1/4 cup Guinness 1 scallion, greens and whites, chopped 2 tablespoons parsley, chopped Salt and pepper to taste In the bowl of a food processor, combine cream cheese, cheddar cheese, mustard and half-and-half. Blend until smooth. With the food processor running, slowly pour the Guinness through the pour spout and blend until combined. Add the scallions and parsley and pulse a few more times to combine. Adjust flavor by adding salt and pepper to taste. Transfer to a bowl and cover. Chill at least one hour before serving. Serve with crackers, pretzels or veggies. 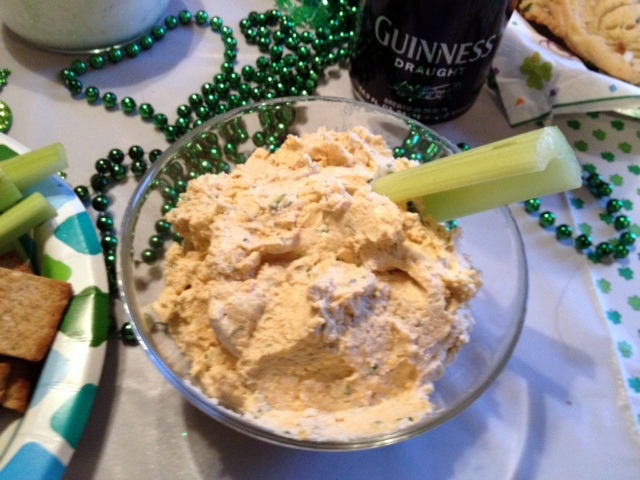
Source:
Adapted from The Curvy Carrot. Originally seen on Wisconsin Cheese Talk via The Parsley Thief 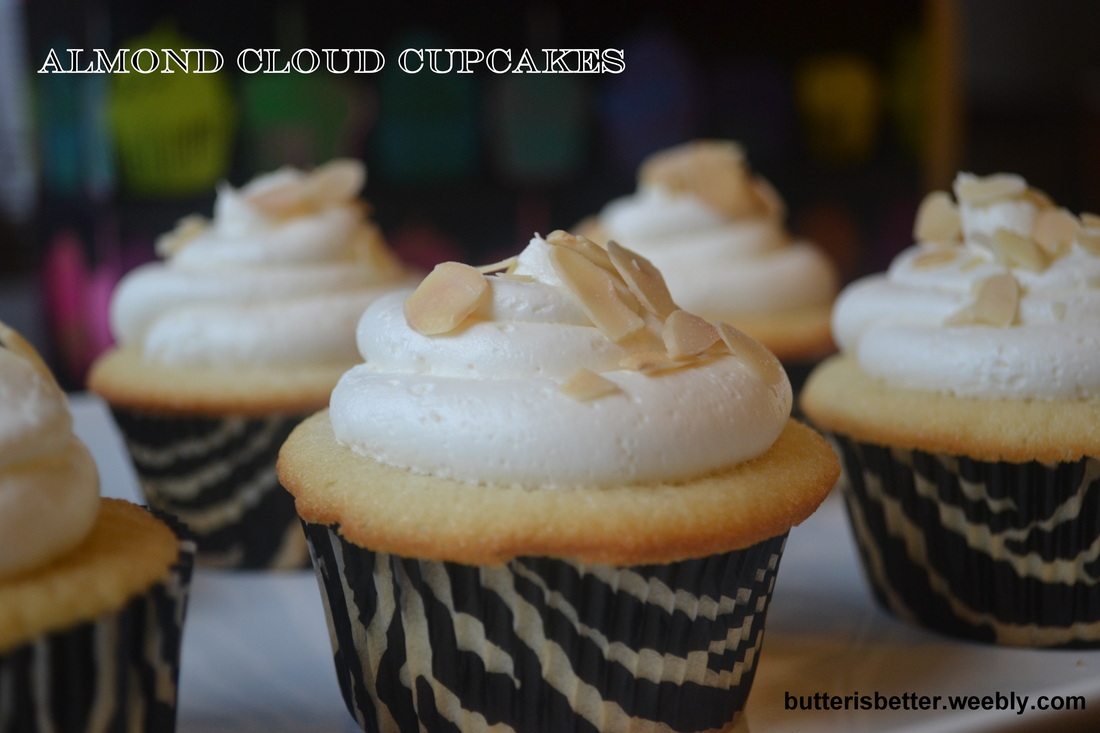
This past weekend I celebrated my 39th birthday. 39....a number that doesn't scare me or depress me, but rather baffles me. How? When? Wasn't I just 26 yesterday? I wonder where all the years have gone and think back to when my parents were 39 - I remember that time vividly. Am I really as grown-up now as they were then? Wow...I guess so? I have a home, a family and responsibilities so I guess that means I've been a grown-up for some time now. But...39? I guess the best part about turning 39 is not feeling 39! I feel happier and healthier than I ever have in my life before! Part of that is due to me trying to find inner peace and life and in parenting (that's a biggie). I attribute the other part to my dedication to fitness and exercise. I've always enjoyed exercising, but in my younger days I felt like it was a chore...something to check off of my To Do list. The last few years I've embraced exercise (especially running) as a way to have some time to myself or time with friends. A time to really push my body to its limits and a little bit farther. A time to work on achieving goals I could only dream about a decade ago. With all that being said, I'm working on a Birthday Resolution of sorts - I'm trying to stop worrying about the number on my scale and start paying attention to how good and strong my body feels when I treat it right! I plan to hit 40 happier and healthier than I hit 39!! BUT, before we do all that....LET'S EAT SOME CUPCAKES!! I, unapologetically, decided to bake myself cupcakes for my birthday again this year since I enjoyed last year's cupcakes so much. I had no plans on a party or a small gathering, I just wanted to enjoy baking my own birthday (cup)cake and eating more cupcakes than I want or need. I looked through lots of blogs and cookbooks trying to find this year's perfect cupcake. I ended up settling on this Almond Cloud Cupcake I had at a cooking class I took many years ago at Crate Cooking School. This was the perfect choice because it is a rather simple recipe - ie, I had most of the ingredients on hand and would be enjoying cupcake satisfaction in a very short amount of time. The cake itself is light and airy with a hint of almond flavor - the almond flavor really comes through in the icing. I decided to top it off with some toasted, slivered almonds which gives the perfect amount of crunch. 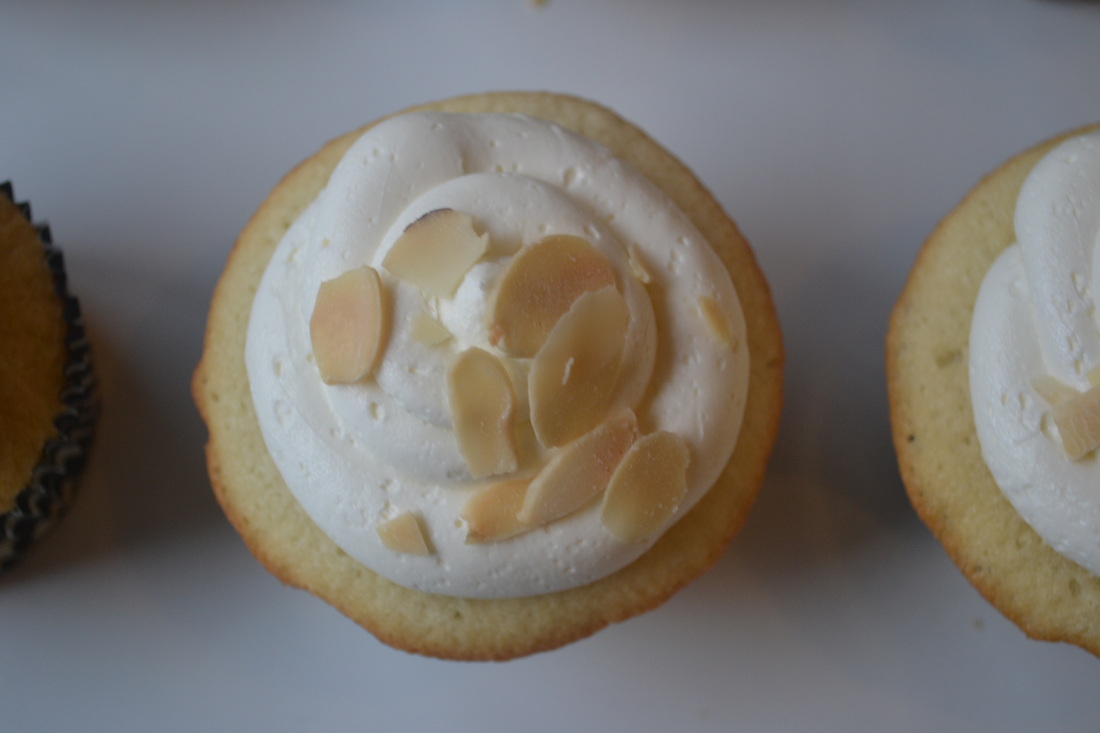
Almond Cloud Cupcakes Makes about 24 cupcakes For the cupcakes 2 1/4 cups all-purpose flour 1 2/3 cups granulated sugar 3 1/2 teaspoons baking powder 1 teaspoon salt 1 1/4 cups 2% milk 2/3 cup unsalted butter, at room temperature 1 teaspoon almond extract 5 egg whites Preheat the oven to 350° F. Line 2 standard cupcake pans with liners. Set aside. In the bowl of a stand mixer fitted with a paddle attachment add flour, sugar, baking powder, salt, milk, butter and almond extract. Beat on low sped for about 30 seconds to combine. Adjust the speed to medium-high and beat another 2 minutes, scraping the bowl as necessary. Add egg whites and beat on medium-high for another 2 minutes. Scoop the batter into the prepared liners, filling about 2/3 full. Bake for 18-22 minutes until a toothpick inserted in the center comes out clean. Allow cupcakes to cool in pans for about 5 minutes before transferring to a wire rack to cool completely. For the Almond Buttercream 16 tablespoons unsalted butter, at room temperature (I prefer Plugra, European butter) 4 cups confectioners' sugar, sifted 1 teaspoon almond extract 2 1/2 tablespoons cold water Place the butter in the bowl of a stand mixer fitted with a paddle attachment. Cream the butter for 1-2 minutes. Add 2 cups of confectioner's sugar and mix on low until well combined. Add almond extract and water, mixing for about 30 seconds. Add the remaining 2 cups of confectioner's sugar and mix until just incorporated. Increase mixer speed to medium-high and beat until light and fluffy, about 5-7 minutes. Transfer buttercream to a pastry bag fitted with a wide tip and frost cupcakes. Top with toasted, slivered almonds, if desired. 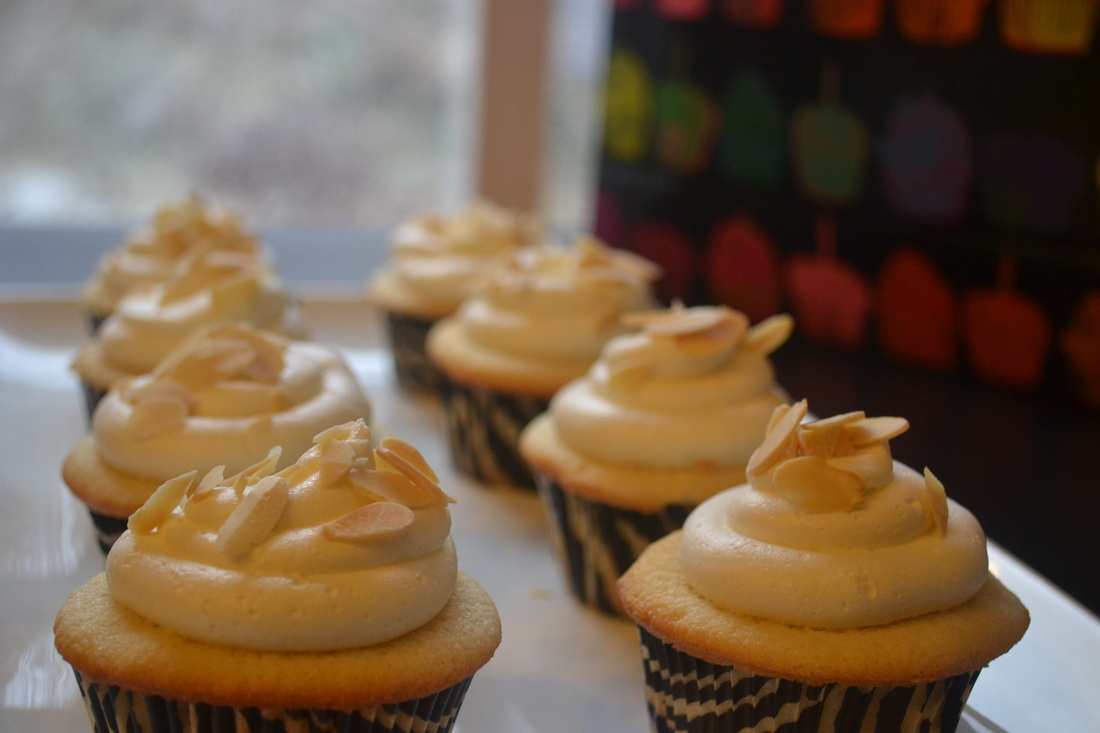
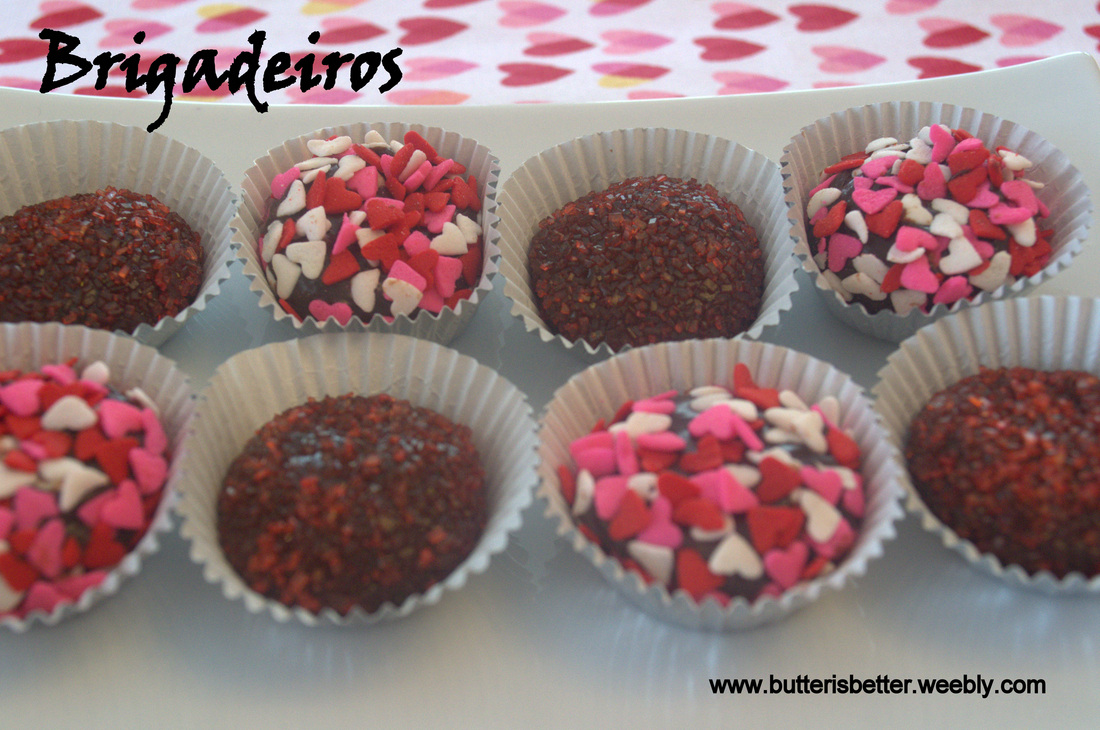
Brigadeiros. Ever heard of them before? Me either until very recently. A few months ago I was watching Unique Sweets on Cooking Channel when I first heard of these and I was intrigued by them. They look like a truffle, all small and chocolatey and decorated up cute as can be. But they aren't a truffle. Hmmm...what ARE they??? According to a quick search on Wikipedia, brigadeiros are a Brazilian truffle made with sweetened condensed milk, butter and cocoa powder, unlike traditional truffles that are made with melted chocolate and heavy cream. They are a very popular candy in Brazil and Portugal and are often served at children's birthday parties. Ok, I'm even more intrigued. I would love to try them but I have no plans of going to Brazil anytime soon (though my passport is aching to be used again!) Imagine my excitement when I opened the new America's Test Kitchen DIY Cookbook and found a recipe for brigadeiros!! These were a MUST MAKE! So, last weekend I gave them a try and found them to be ridiculously easy to make! You basically stir, stir and stir some more. Then you chill the mixture for a while before rolling into balls and decorating with the coatings of your choice. They are rich and delicious with a taste somewhere between raw brownie batter and hot fudge sauce! Yum! I found that crystallized sugar was my family's favorite topping to give them that extra little crunch. If you are still looking for a sweet treat to make for your valentine this week, you should definitely give these little gems a try!! 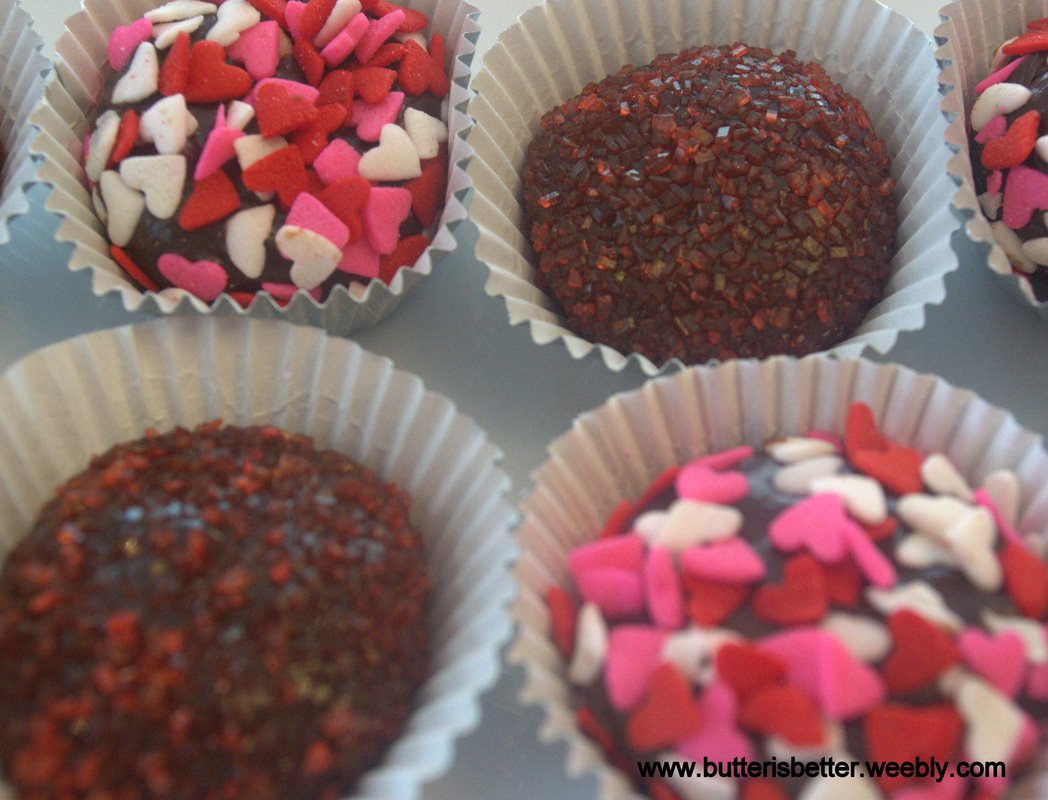
Brigadeiros
Makes about 30 1 14-ounce can sweetened, condensed milk 1/2 cup (1 1/2 ounces) Dutch-processed cocoa powder 2 tablespoons unsalted butter Sprinkles, crystallized sugar, cocoa powder, etc for topping Grease and 8-inch square baking dish. Set aside. Combine sweetened condensed milk, cocoa powder and butter in a medium saucepan. Cook over low heat, stirring frequently, until the mixture is very thick. When you run a rubber spatula over the bottom of the pan it should leave a distinct trail. This will take about 20-25 minutes. Do not be tempted to turn the heat up - keep it on low or it will burn. Once the mixture has thickened, pour into prepared baking dish. Refrigerate until cool, at least 30 minutes or up to 24 hours. If leaving the dish in the refrigerator overnight, cover with foil or plastic wrap. Pinch or scrape the chocolate into 1 tablespoon-sized pieces. Place the chocolates on a cookie sheet lined with a silicon baking mat or parchment paper. Place the chocolates back in the refrigerator to chill before rolling. After about 30 minutes take the pan out of the refrigerator and roll inch 1-inch balls. My candies got very soft during this process so I placed them back on the cookie sheet for another 30 minutes. Once they chill again, roll them in your desired toppings. Store in the refrigerator up to 2 weeks. Source: Adapted from The America's Test Kitchen DIY Cookbook 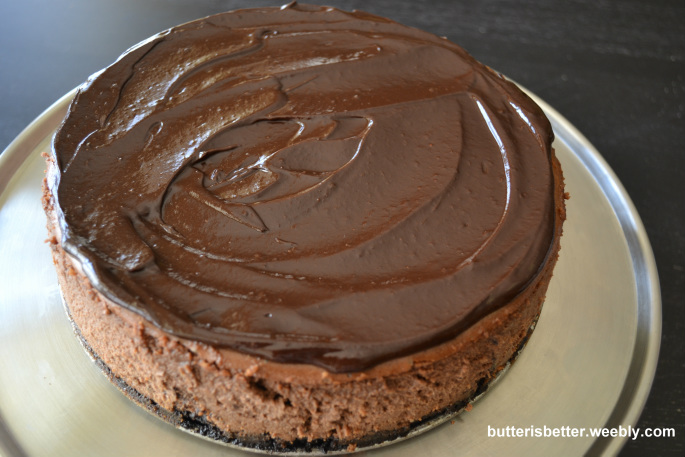 Summer birthdays run high in my family. My little Bean's was 2 weeks ago and hubby's was a few days ago (along with my not-so-little-nephew 200 miles away...happy birthday buddy!). Since most of my family has lost all interest in my cupcakes (*sniff*) I am branching out to find other decadent desserts to celebrate their special day. My hubby has a strong affection with chocolate, which seems to be growing stronger with each passing year. So obviously, my inspiration for his cake was easy - chocolate-chocolate-chocolate! I haven't had a good cheesecake in a while so when I came across this recipe for Triple Chocolate Cheesecake I knew I had to try it. Wow! This cake was insane! It's rich with chocolate, but the creaminess of the cheese cuts it back a bit. It's just, *sigh*, PERFECT! Because this cake is baked the night before, the active prep time is actually pretty quick and the results are simply amazing! 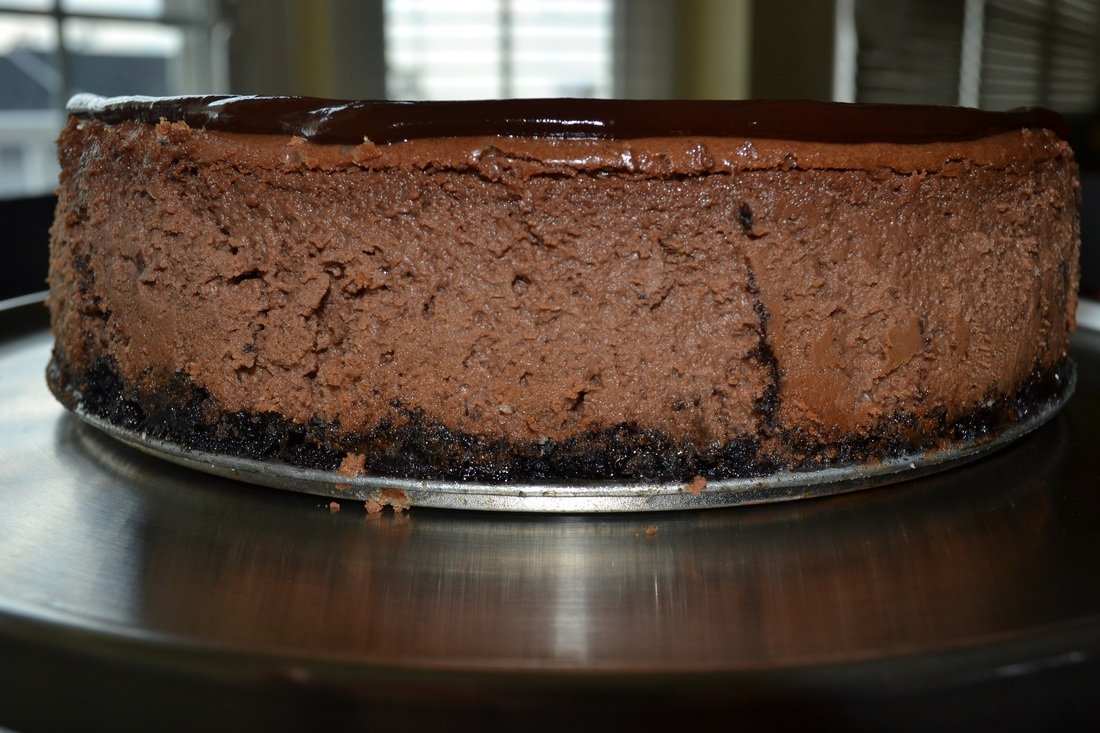 Look at all those layers of chocolate! Triple Chocolate Cheesecake Serves 12 For the Cheesecake 9 ounces chocolate sandwich cookies, such as Oreo 6 tbsp unsalted butter, melted 32 ounces (4 x 8 ounce bars) cream cheese, at room temperature 1 1/2 cups sugar 1/2 tsp salt 4 large eggs 1 cup sour cream 8 ounces semisweet chocolate, melted For the Chocolate Ganache 1/4 cup heavy cream 4 ounces semisweet chocolate, chopped Preheat the oven to 325 degrees. Line the bottom of a 9-inch springform pan with parchment paper. Set aside. In the bowl of a food processor, pulse chocolate cookies until finely ground. Add melted butter and pulse to moisten. Transfer to prepared springform pan and press the mixture evenly into the bottom of the pan. Place the pan on a rimmed baking sheet and bake for 10 minutes. Remove from oven. Set aside to cool. Wipe out the bowl of the food processor. Combine cream cheese, sugar and salt. Blend until smooth. With the motor running add the eggs, one at a time, mixing well after each addition. Keeping the motor running add the sour cream and melted chocolate. Blend until smooth, scraping down the sides of the bowl as necessary. Pour mixture onto prepared crust. Bake for 1 hour, until just set. Turn off the oven and leave the cheesecake in the oven with the door closed for 1 additional hour. This will help prevent cracking. Remove from the oven and run a thin knife around the edges of the cake. This also will help prevent cracking. Once the cake is cooled, cover loosely with plastic wrap and place in the refrigerator for at least 6 hours, or overnight. When ready to serve, prepare the ganache. In a small saucepan, bring cream to a boil. Remove from heat and add chocolate. Stir until melted. Set aside until thickened, about 2-5 minutes. Carefully unmold the cheesecake from the springform pan and pour the chocolate ganache over top. 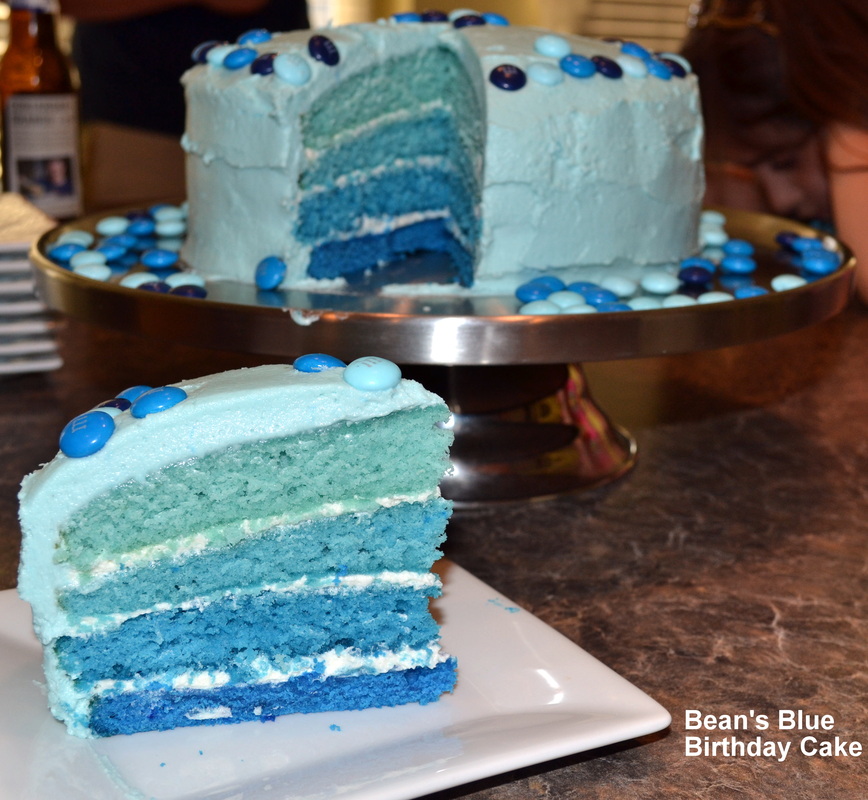
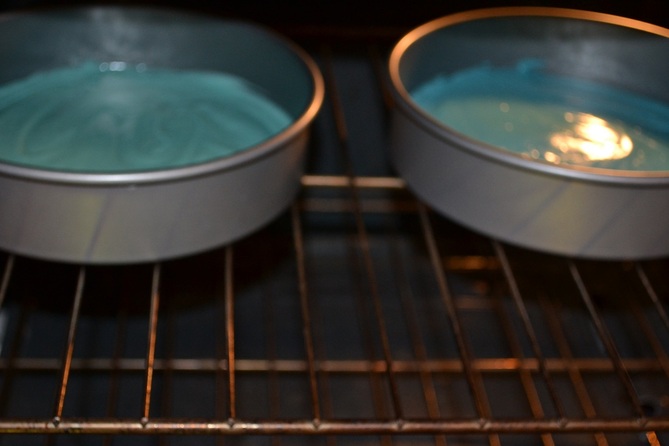
Yesterday my baby girl, Brecken, turned 4 years old. I can't believe my baby is 4 already!! Brecken had a bit of a tough start to life. Lots of visits to Children's Hospital in the first few years...lots of visits with therapists....and lots of hard work. Yesterday on her 4th birthday we celebrated no longer needing to thicken her liquids for fear of aspiration, a huge advancement in her speech and finally being potty-trained! Yes, our little Bean has come a long way and we are so proud of her! One of Brecken's favorite things in life is the color blue (much to her purple-loving-sister's disapproval). Her other favorite thing is M&M's (big sister approves of those!) To that end, I decided an over-the-top blue and M&M cake was perfect for her! I have seen these multi-colored layer cakes all over the blogosphere and thought I'd give it a try. I think it came out pretty well, though I did learn a lot through this process - I'll share my tips with you on the way through the tutorial I've created for you. The first thing I did was make a batch of my favorite vanilla cupcake batter. 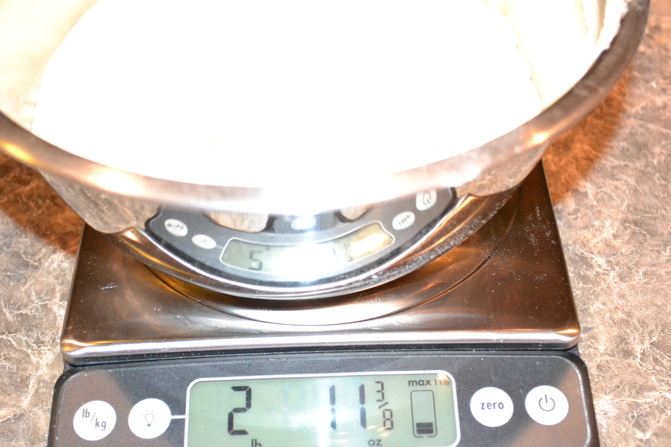 Weigh the total batter amount. 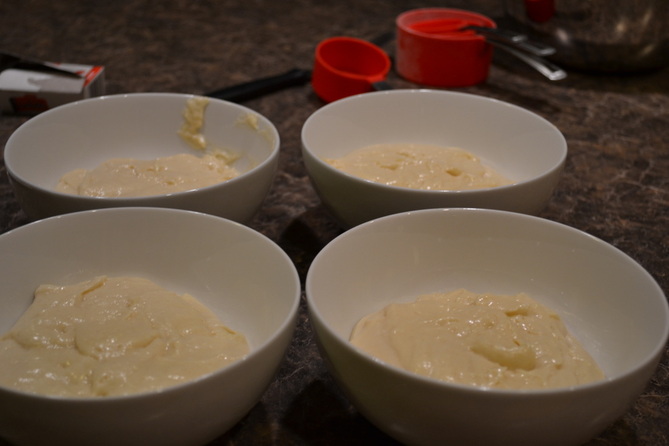 Next, I divided the batter evenly into 4 smaller bowls. This is where the kitchen scales comes in very handy. This is also where I learned I need to invest in some nice mixing bowls! 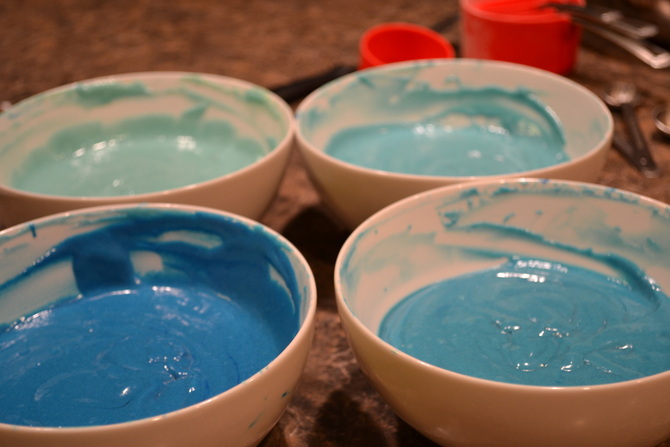 Then, using Wilton Food Coloring Gels I colored each of the bowls of batter different shades of blue. The lightest one used 3 toothpicks worth, the next one was 4 toothpicks, then it was 5 and I think we used about 7 on the last one. Just keep adding gel until you reach your desired color. 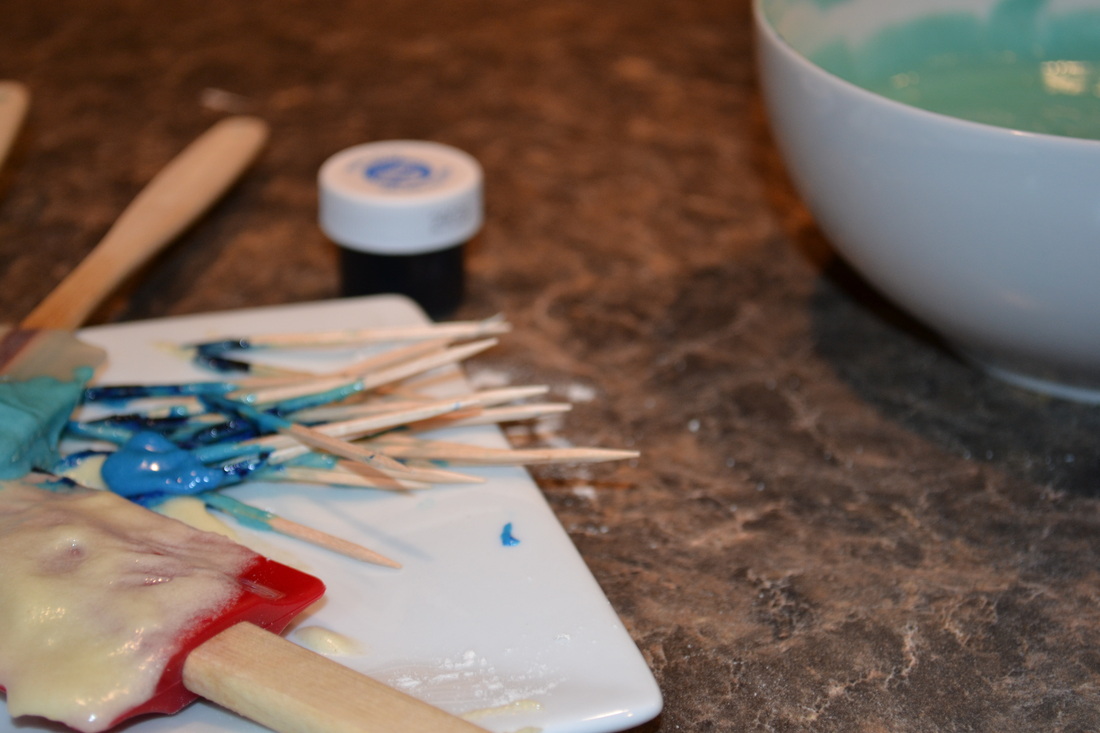
 Place two of the batters into 8-inch round cake pans lined with parchment paper. Bake at 350 for about 14 minutes, or when a toothpick inserted in the middle comes out clean. When the first two were baked and cooled slightly I removed them from the pans and placed them on a cooling rack to cool completely. Bake the last two colors as instructed above. 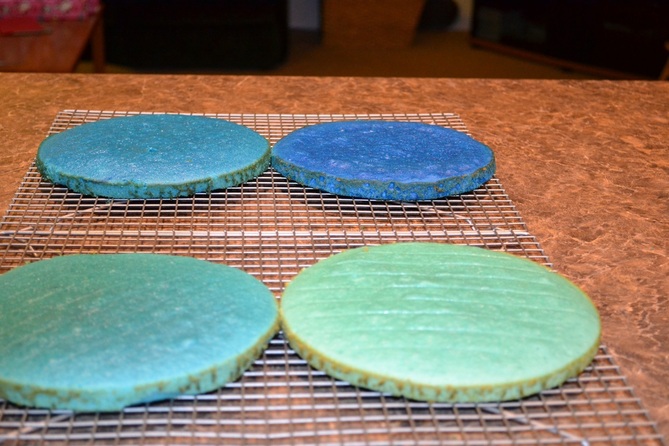 You should end up with 4 thin cake layers. I baked my cakes the night before so I wrapped each layer tightly in plastic wrap and set them out at room temperature until I was ready to use them. Before assembling the cake make a batch of basic vanilla buttercream. I used this recipe: 3 sticks of unsalted butter, softened (I use Plugra) 6 cups of powdered sugar 1/4 tsp kosher salt 6 Tbsp heavy cream 2 Tbsp vanilla extract In the bowl of a stand mixer fitted with a paddle attachment, cream the butter for 3-4 minutes, until light and fluffy. Add the salt to the confectioner's sugar, whisk together. On low speed, slowly add 1/2 of the confectioner's sugar to the mixing bowl. Slowly add the heavy cream and vanilla. Once incorporated, add the remaining confectioner's sugar, stopping the scrape down the bowl if necessary. When all the ingredients are fully combined turn the mixer on medium-high speed and beat for 5-7 minutes until the frosting is light and fluffy. 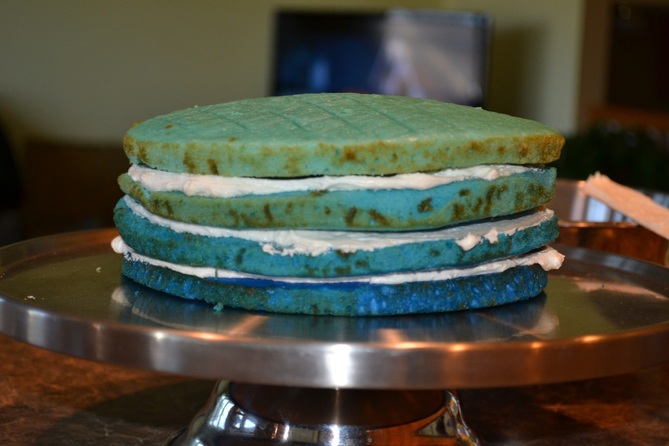 When ready to assemble your cake, place the darkest color on the bottom and spread a layer of frosting on top. Continue to layer cake and frosting until you have 3 layers of frosting in between the 4 layers of cake. Here's where I started to figure out what to do better next time. First of all, I would probably assemble the cake on a cake board and a piece of parchment. This would allow to easily clean up the excess frosting and transfer the cake to the cake stand when ready to serve. Second, I was worried that I would have enough frosting so I went a little thin on each layer. In the end this recipe had MORE than enough so I would have put a good amount more frosting between each layer. Third, I would have used a knife to even out the top layer. It didn't look too crooked to me at this point but I later learned it really was! 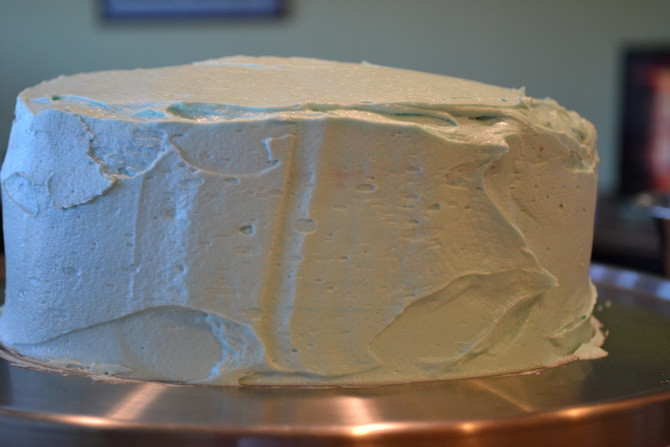 At this point what I did was use my blue food gel coloring again to tint the frosting to the shade of blue I wanted. I proceeded to frost the cake. In the future what I will do is put a 'crumb coat' on my cake first. To do this you simply spread a thin layer of frosting (white or colored) on your cake - it's ok if there are crumbs in the frosting. Place the cake in the refrigerator for about 30 minutes until the frosting is set. After 30 minutes you can proceed to frost your cake. From what I've read online this makes a huge difference and I wish I'd done it. All in all, my cake came out ok. But I'm really excited to use the tricks I've learned along the way on my next cake!  The last thing I did was decorate the cake with lots of M&Ms! 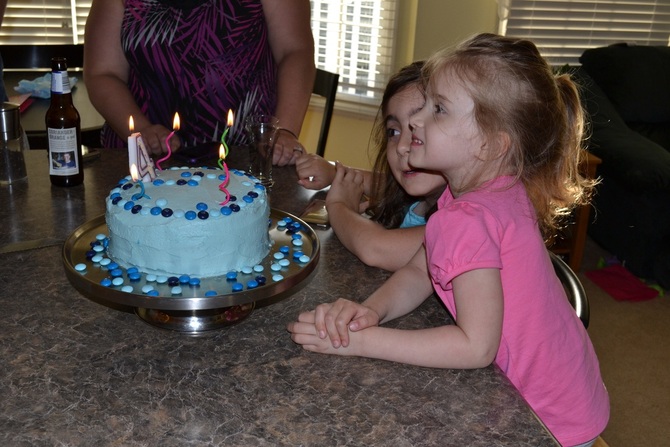 The birthday girl in all her blue glory! 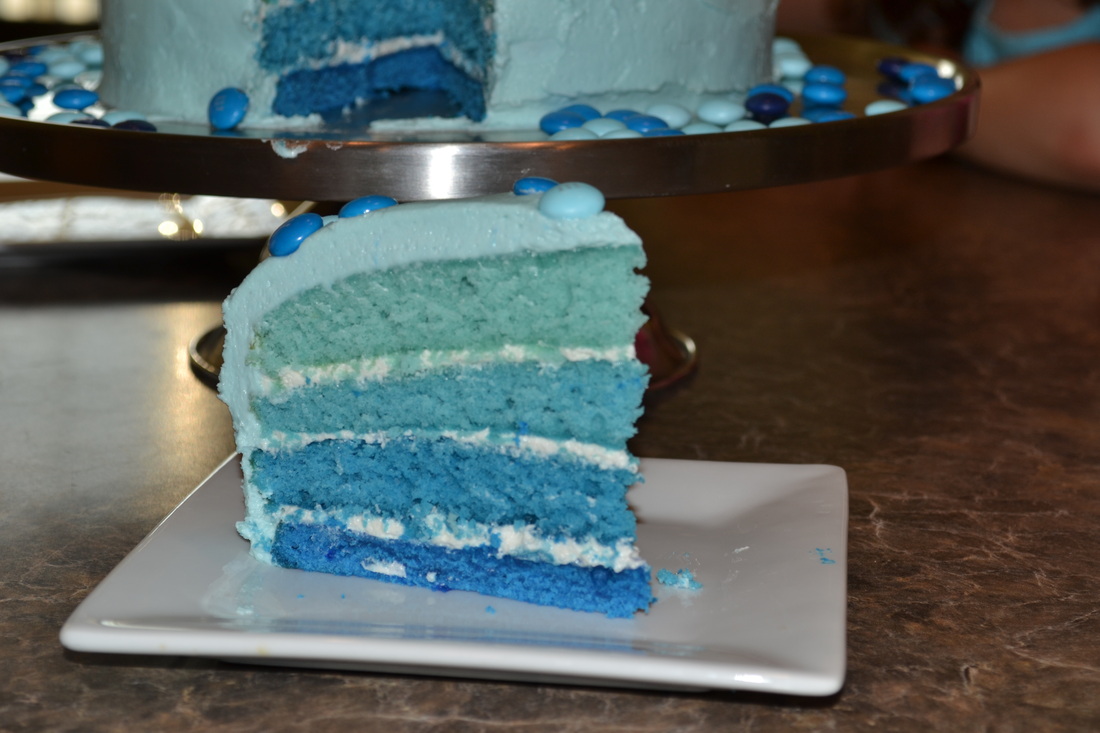
Thank you all for allowing me to practice my cake decorating (and photography!) on you!
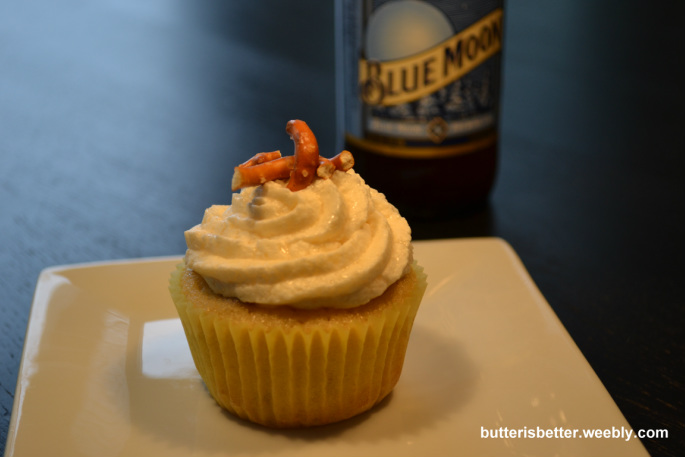 Hi there! Remember me? I'm the poor, lonely, neglected food blog. I've been pushed to the side in favor of needy little ones, PTA meetings, house showings and cupcake orders. However, I have never been forgotten! I'm back today to share with you a fun cupcake recipe (really though, aren't all cupcakes fun?) that I made for my dad's 63rd birthday a few weeks ago. When deciding what flavor cupcakes to make for my dad the first thing I came up with was coconut. Sure, coconut is an easy choice - Dad loves it. But isn't that a bit too predictable? So I asked myself, what else does Dad love? Well, BEER, obviously! And what goes with beer? PRETZELS, of course! So I took my favorite vanilla cupcake recipe and jazzed it up with some Blue Moon Beer and pretzel bits and here's what you get!! The Blue Moon is subtle but noticeable in the vanilla cupcake and the crushed pretzel pieces add a nice bit of saltiness to the cake. The pretzels in the cupcake will get soggy once baked, so I added crushed pretzels to the top of the frosting right before serving. Waiting til the last minute gives you that nice crunch you are looking for. 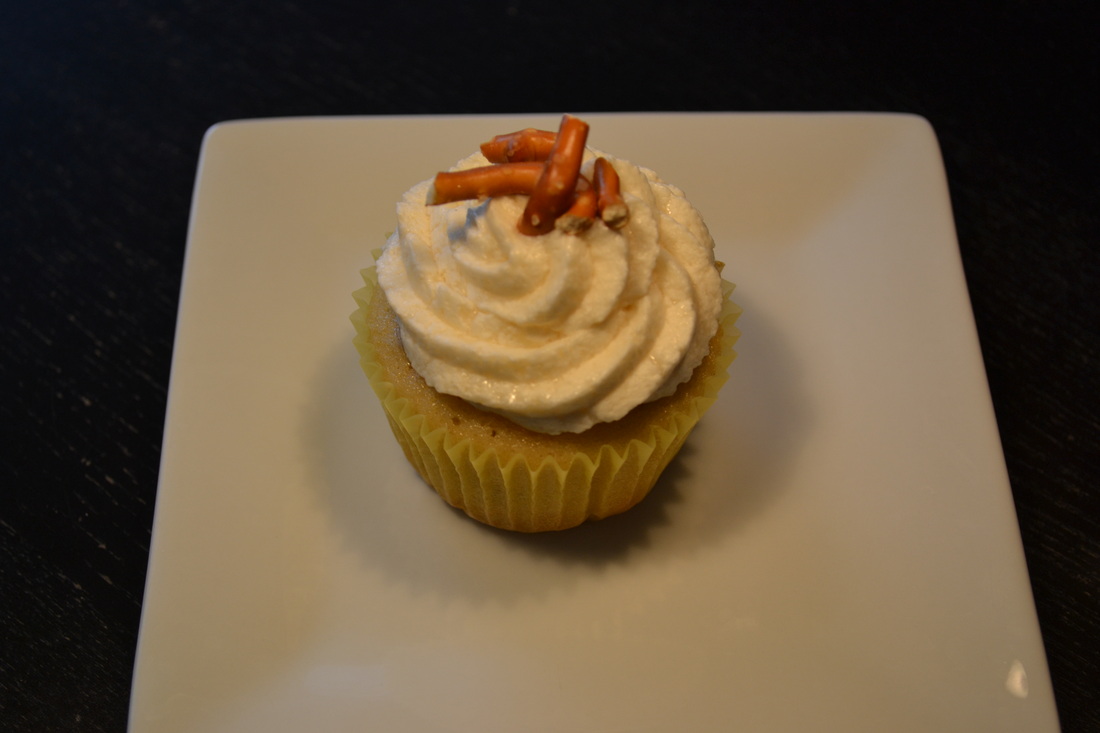 Blue Moon Cupcakes
Makes about 24 cupcakes For the cupcakes 2 1/2 cups all-purpose flour 2 1/2 teaspoons baking powder 1/4 teaspoon salt 8 tablespoons unsalted butter, at room temperature 1 3/4 cups sugar 2 eggs, at room temperature 2 1/2 teaspoons vanilla extract 1 1/4 cups Blue Moon Beer, at room temperature 1 cup crushed pretzels Preheat oven to 350. Line a standard cupcake pan with 24 liners. Set aside. In a medium bowl, sift together flour, baking powder and salt. Set aside. In the bowl of a stand mixer cream the butter and sugar together for about 3-5 minutes, until light and fluffy. Add the eggs, one at a time, mixing slowly after each addition. Add the vanilla extract to the Blue Moon in a large measuring cup. With the mixer on low add 1/3 of the flour mixture, followed by 1/2 of the Blue Moon/vanilla mixture. Add another 1/2 of the flour, followed by the rest of the liquid. Finally, add the last of the flour, mixing until just combined. Gently fold in the crushed pretzels until well incorporated. Fill the cupcake liners about 2/3 full. Bake for 18-20 minutes until a toothpick inserted in the middle comes out clean. Allow cupcakes to cool in the pan 5-10 minutes. Place on a cooling rack to continue to cool completely. For the frosting 16 tablespoons unsalted butter, at room temperature, I prefer European butter like Plugra 4 cups confectioner's sugar, sifted 1/8 teaspoon kosher salt 1 teaspoon vanilla extract 1 teaspoon whole milk 1/2 cup Blue Moon In the bowl of a stand mixer fitted with a paddle attachment, cream the butter for 1-2 minutes, until light and fluffy. Add the salt to the confectioner's sugar, whisk together. On low speed, slowly add 1/2 of the confectioner's sugar to the mixing bowl. Slowly add the vanilla, milk and Blue Moon. Once incorporated, add the remaining confectioner's sugar, stopping the scrape down the bowl if necessary. When all the ingredients are fully combined turn the mixer on medium-high speed and beat for 5-7 minutes until the frosting is light and fluffy. Transfer the frosting to a pastry bag and swirl onto cupcakes. Source: Adapted from The Cupcake Diaries 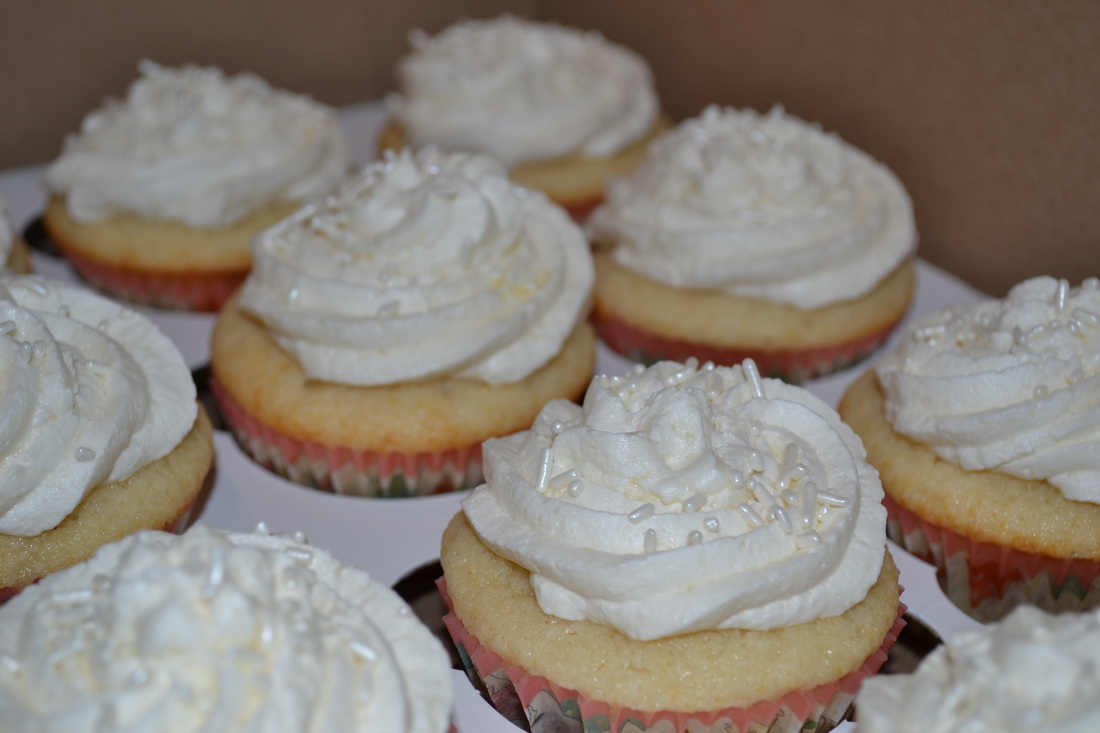 Strawberries and champagne. Is there a more perfect combination of flavors that say love and romance? I don't think so! I was so excited when my friend asked me to bake up a batch of these yummy, romantic cupcakes to present to his wife on Valentine's Day. Would I be able to do it? Yes! What an honor! This recipe is another one from The Cupcake Diaries by the sisters from Georgetown Cupcake. I got this book as a Christmas gift from my mother-in-law and I was really excited to make this recipe for our New Year's Eve celebration. I followed the recipe and made these in mini-form. Though they were ok, I wasn't completely happy with them. This time around I made these in the standard cupcake pan and tweaked the frosting just a bit - I kept the ingredients exactly the same but added them in the same order/technique that I usually do. One thing I found a bit odd about the cupcake recipe directions is that it called for room temperature eggs and milk, but not butter. I did as directed and used cold butter and this batch came out amazing! I was so proud to present these to my friends! They were a hit all-around and a perfect little treat on Valentine's Day! 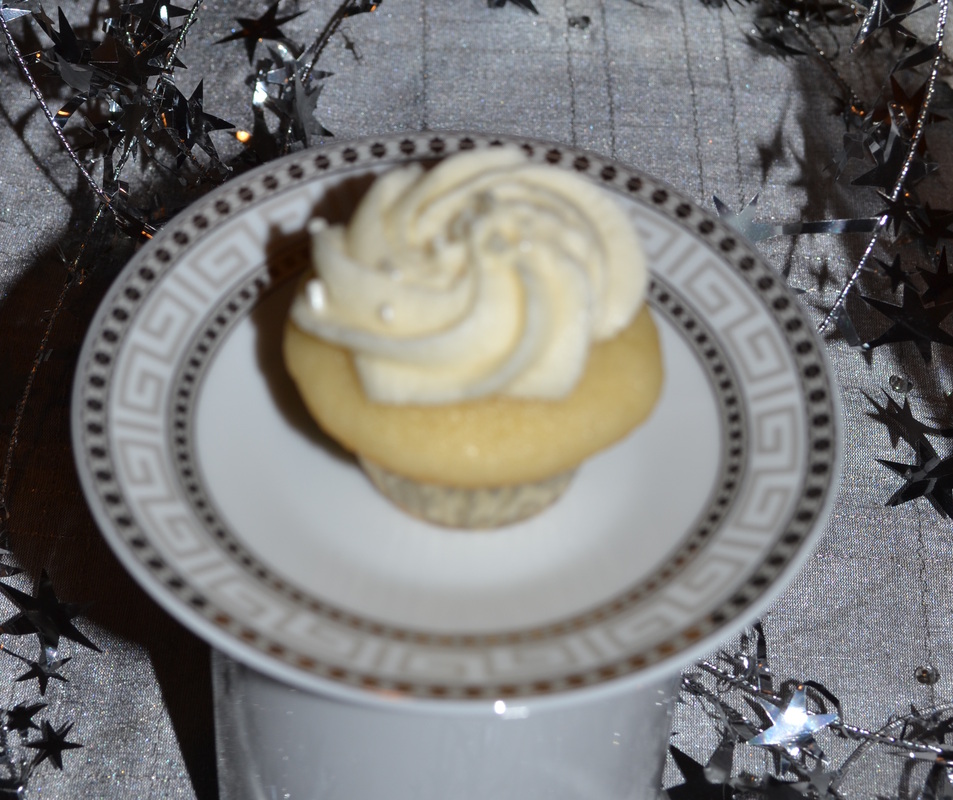 Here is a picture of the adorable mini cupcakes I made for New Year's Eve! Strawberry Champagne Cupcakes with Champagne Buttercream Makes 20-24 cupcakes For the cupcakes 1/2 cup fresh strawberries, diced 1/2 cup good champagne 2 1/2 cups all-purpose flour ** 2 1/2 teaspoons baking powder 1/4 teaspoon salt 8 tablespoons unsalted butter 1 3/4 cups sugar 2 large eggs, at room temperature 2 1/2 teaspoons vanilla extract 1 1/4 cups whole milk, at room temperature Preheat the oven to 350. Line 2 standard cupcake pans with liners. Set aside. Soak the strawberries in the champagne. Set aside. In a medium bowl sift together the flour, baking powder and salt. Set aside. Place the butter in the bowl of a stand mixer fitted with a paddle attachment. Cream the butter for about 1 minute. Add the sugar and beat on medium speed until well incorporated. Add the eggs, one at a time, mixing slowing after each addition. Add the vanilla extract to the milk in a liquid measuring cup. Reduce the mixer speed to low, then gradually add one third of the flour mixture, followed by one third of the milk mixture, beating until well incorporated. Add another third of the flour mixture, followed by another third of the milk mixture. Stop to scrape down the bowl, as needed. Add the remaining flour mixture followed by the remaining milk mixture and mix until just combined. Drain the strawberries of the excess champagne and gently fold the strawberries into the batter, just until incorporated. Scoop the batter into the liners, filling about 2/3 full. Bake for 18-22 minutes until a toothpick inserted in the center comes out clean. Allow cupcakes to cool in pans for about 5 minutes before transferring to a wire rack to cool completely. ** These cupcakes can be made Gluten Free by using 2 1/2 cups high-quality Gluten Free Flour Mix. I use Gluuteny Basic Flour Mix from Gluuteny. For the Champagne Buttercream
16 tablespoons unsalted butter, at room temperature (I prefer European butter, such as Plugra) 4 cups confectioner's sugar, sifted 1 teaspoon vanilla extract 1 teaspoon whole milk 1/8 teaspoon salt (I use kosher) 1/2 cup good champagne Place the butter in the bowl of a stand mixer fitted with a paddle attachment. Cream the butter for about 1 minute. Add 2 cups of confectioner's sugar and mix on low until well combined. Add vanilla, milk, salt and champagne, mixing for about 30 seconds. Add the remaining 2 cups of confectioner's sugar and mix until just incorporated. Increase mixer speed to medium-high and beat until light and fluffy, about 5-7 minutes. Transfer frosting to a large pastry bag fitted with a large tip. Swirl frosting onto cupcake and enjoy! Source: Slightly adapted from The Cupcake Diaries |
AuthorPittsburgh area mom striving to provide clean, healthy, REAL food for her family! Categories
All
Archives
September 2014
|
 RSS Feed
