|
Wow! Where has the time gone??? I can't believe it's been over TWO WEEKS since finishing the 10 Day Pledge (aka - the last time I blogged.) My girls went back to school last week and....well...you know! Since finishing the Pledge my family has had good days and we've had really, really bad days. One thing is for sure, my husband and I agree that most food we've eaten in restaurants since finishing the Pledge was not good - not good at all. This caused us to be: 1) Frustrated because sometimes you want a night off from cooking 2) Angry because we spent good money on these meals 3) But mostly we feel PROUD because we've successfully changed our taste buds and curbed our cravings for junky, processed foods! It amazed me how my favorite dish from my favorite restaurant now tastes like Chef Boyardee to me :) One thing we splurged on over the past two weeks was a visit to Jeni's Splendid Ice Creams while in Columbus, Ohio. I'd heard about Jeni's from Food Network, but wondered if it was worth all the hype. Let me say this - IT WAS! Every. Single. Bite! Oh my! Now, I can't eat Jeni's on a regular basis (which is probably a good thing!) but I CAN make my own wholesome, clean ice cream at home anytime I want! This ice cream is a basic vanilla, but by using high quality ingredients the vanilla and honey flavors really shine through. I used Orange Blossom honey from a local farmer, but imagine the possibilities by changing up the honey flavor! I feel fairly confident that you could serve this to unknowing guests and they'd never guess it was 'clean'! 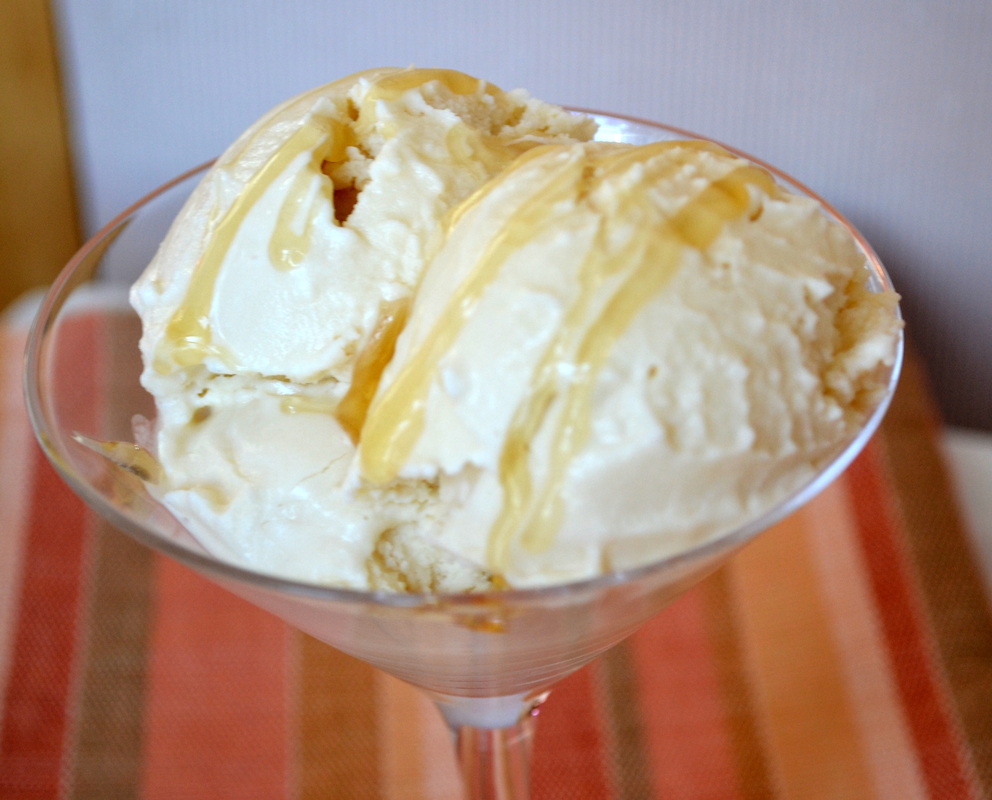
Honey Vanilla Ice Cream 2 1/2 cups heavy cream 1 1/2 cups whole milk, grass-fed organic if possible 1/2 cup good quality honey, local if possible 2 teaspoons vanilla extract (homemade or pure) In a medium saucepan combine cream, milk and honey over medium heat. Bring the mixture to just boiling, while stirring frequently (this prevents the mixture from burning). As soon as the mixture boils, turn off the heat and stir in the vanilla extract. Cover the saucepan and let sit at room temperature for 1 hour. After 1 hour, place the saucepan in the refrigerator until completely cool. **I usually make the mixture after dinner and place it in the refrigerator overnight. Once the mixture is completely cool, give it a quick whisk to break up any large lumps that may have formed. Don't worry about getting it completely smooth - the little chunks will taste great in the finished product! Pour the mixture into your ice cream maker and follow the manufacturer's directions. Once the mixture becomes soft-serve ice cream, transfer it to a freezer-safe container and place in the freezer. I've found that these long, shallow containers seem to provide the most even freezing and allow for easier scooping. After 1 hour in the freezer, take out the ice cream and give it a stir. Place it back in the freezer for another 4-6 hours before serving. If you add a bit of honey to your serving it hardens a little and tastes like a little bite of caramel! Yum! 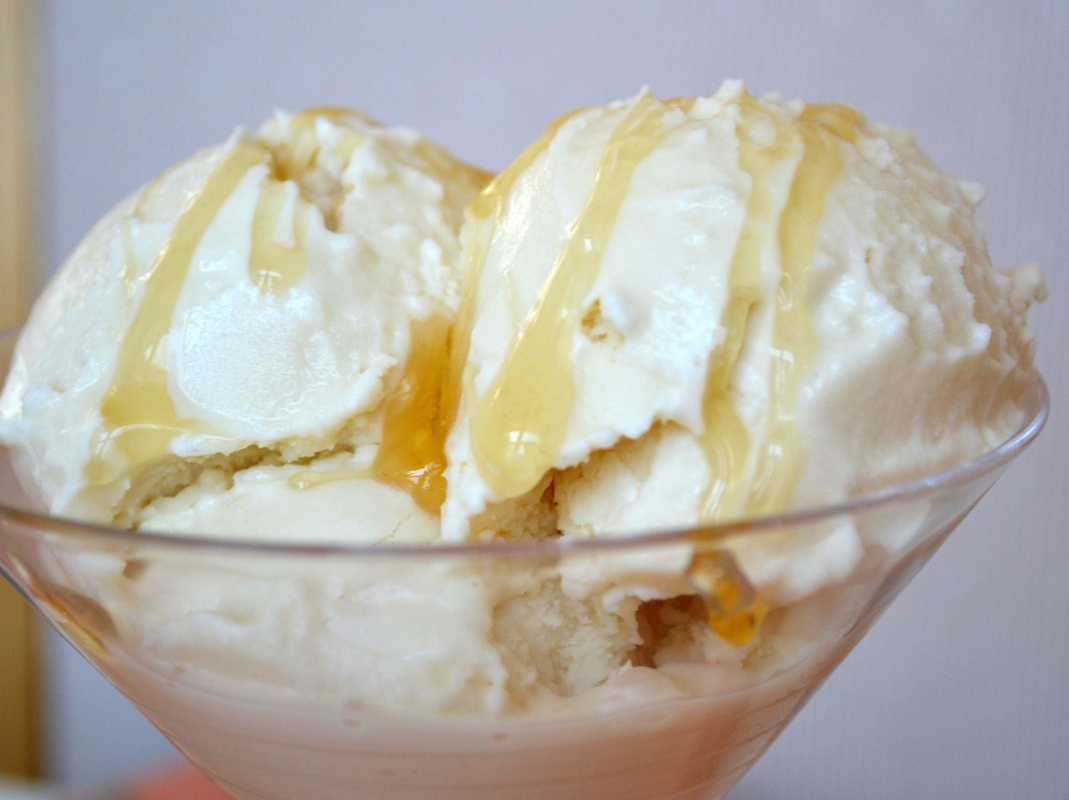
Source:
Adapted from Thank Heavens
0 Comments

I didn't want to go the entire 10 days of the Pledge without sharing a new recipe with you! I thought this one would be perfect for any weekend entertaining or movie nights you may have planned. These Whole Wheat Pretzel Bites are the product of a slightly modified recipe from King Arthur Flour. For most of my baking I use KAF's White Whole Wheat Flour, but for these pretzel bites I really love using the darker, red Whole Wheat Flour. Feel free to use whatever you like or whatever you have on hand. When I typically make these we wind up 'sampling' quite a few before they make it to the freezer. For the ones that do make it to freezer bags, I've eaten them several different ways:
I have often heated up a few Pretzel Bites and added them to my lunch. Here I had them with a salad and some red pepper slices. On my 'To Try' list is finding a good, clean cheese dip to serve with these yummy nuggets! 
Whole Wheat Pretzel Bites Makes about 6 dozen Dough 10 1/2 ounces (about 2 1/2 cups) Whole Wheat Flour 1 teaspoon kosher salt 1 teaspoon honey 7/8 - 1 cup warm water* *Use the greater amount in the winter, the lesser amount in the summer and somewhere in the middle in the spring and fall. Topping 1 cup boiling water 2 tablespoons baking soda Coarse salt - I use kosher salt and some black salt from the bulk section of my grocery store 2 tablespoons unsalted butter, melted Place all dough ingredients in the bowl of a stand mixer and mix until combined. Switch the mixer to the dough hook and knead for 5 minutes. Place the dough in a large, lightly oiled bowl and cover with plastic wrap. Allow to sit at room temperature for about 30 minutes. While the dough is rising, combine the boiling water and baking soda and stir until the baking soda is dissolved. Pour into a 13x9 brownie pan and allow to cool to room temperature. Preheat the oven to 400° F. Line a baking sheet with a silicon making mat or parchment paper and set aside. Transfer the dough to a large cutting board and divide into 6 equal pieces. Roll the pieces into 12" to 15" ropes. Cut each rope into 12-15 equal-sized nuggets. Once all the bites are cut, place them in the baking soda solution and 'swish' the nuggets around so they are evenly covered. Allow to sit in the solution for 3-4 minutes. Remove the nuggets from the solution (draining slightly) and place on the prepared baking sheet. Sprinkle with salt. 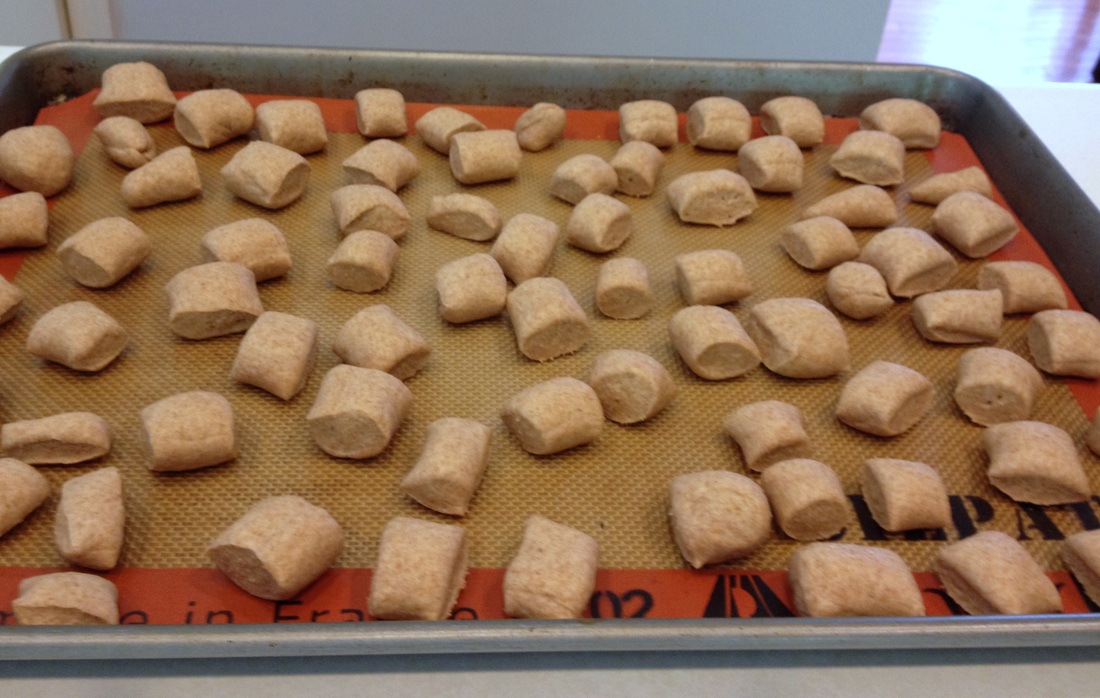
Bake for 12-15 minutes, until golden brown. Remove from the oven and brush with the melted butter. After a few minutes, transfer the pretzels to a cooling rack. Store in an airtight container for 2-3 days or in the freezer in freezer-safe bags. Reheat in the oven for a few minutes or enjoy thawed from the freezer at room temperature. Source:
Adapted from King Arthur's Flour 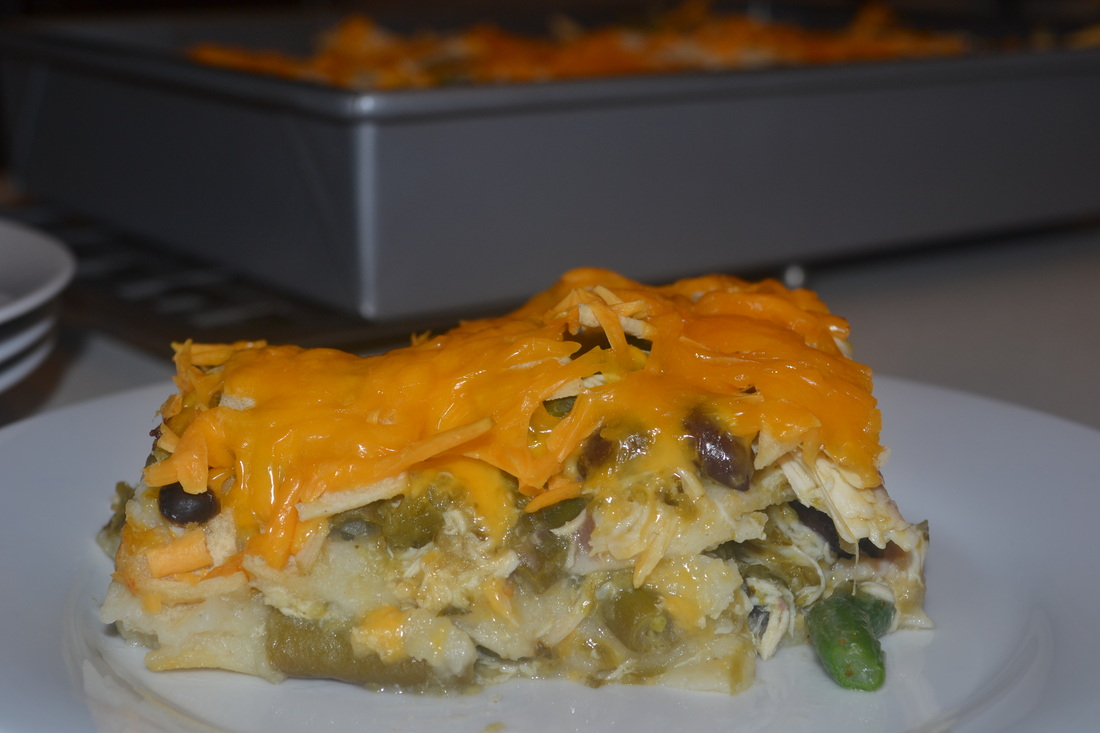
As I've said a few times before, life in my house has gotten pretty chaotic over the past month. Sometimes I have so much fun creating my little DIY projects like almond butter and blueberry jam that I run out of time and totally bonk on dinner! Not good! I know casseroles can be a great time saver but I rarely find any that I like enough to make more than once. That all changed when I came across this chicken casserole from Weight Watchers. I first made this back in January for a Monday night dinner. Monday night is the night when my 2nd grader has CCD at the exact same time that my 4-year-old has gymnastics on opposites sides of town. Fun, right? A quick, easy and healthy dinner is a must on these nights and this casserole makes everyone happy! A few things about this casserole: the recipe calls for green beans as the veggie. I know corn might sound more logical in here (and you can certainly use it), but give the green beans a try! They are lower in calories and actually complement the dish very well. Also, you can totally use a rotisserie chicken from the grocery store, but I prefer to bake my own ahead of time and shred it in the Kitchen-Aid. If you haven't heard about this trick - well, it's mind blowing! I normally prepare the casserole a day before eating it and store it in the refrigerator, but you can also freeze it. I found two things when I froze it and baked it straight from the freezer: First of all, the cheese topping kind of got messed up. Next time I'll freeze the casserole without the cheese and add it just before baking. Second, I don't know why, but the frozen casserole seemed much spicier than the refrigerated ones. Not so spicy that it was inedible, just spicy enough that you had to add a little extra sour cream - fine by me! 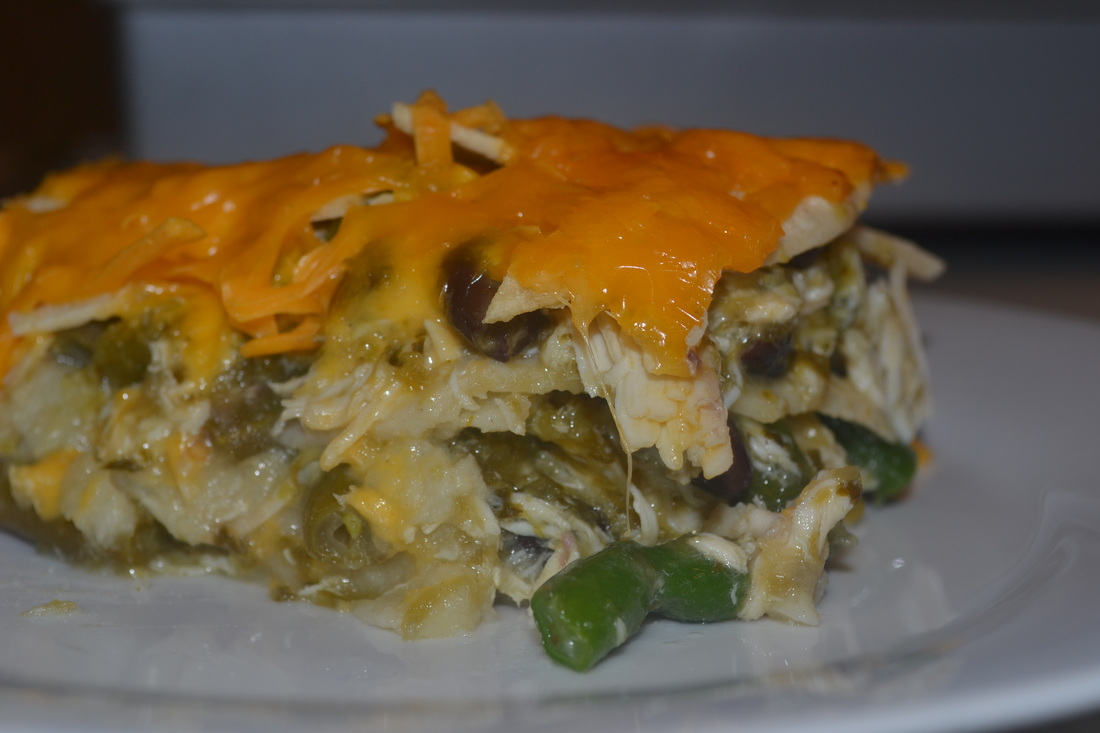
Southwestern Chicken Casserole
Serves 12 1 pound cooked, shredded chicken breast 35-36 ounces salsa verde 16 ounces frozen, chopped green beans 1 15.5 ounce black beans, drained and rinsed 16 6-inch corn tortillas, shredded or thinly sliced 8 ounces reduced-fat cheddar cheese, shredded In a large bowl mix together chicken, salsa, green beans and black beans. Spread 1/3 of the corn tortillas on the bottom of a 9 x 13 baking dish. Top with 1/2 of the chicken mixture. Spread another 1/3 of the tortillas on top of the chicken, then add the remaining chicken mixture. Top with the remaining tortillas. Sprinkle evenly with shredded cheese. Cover with aluminum foil. Store in the refrigerator for up to 2 days. (Freezer for up to 4 months.) When ready to bake, preheat the oven to 350° F. Bake for 20 minutes covered (30 minutes covered if baking from freezer). Remove aluminum foil and bake for another 30 minutes until bubbly and brown (45 more minutes if baking from freezer.) Allow to cool for about 10 minutes before serving. Source: Adapted from Weight Watchers 
In continuing on with my healthy/citrus craving lately, today I'm sharing with you Orange Cranberry Muffins. When I was on Weight Watchers back in 2011 I had an urge to bake something (shocking, I know!) so I went searching through their website for something healthy, convenient and practical. I came across these muffins and just loved them! They are filled with dried cranberries and have a nice orange flavor. They are topped off with granulated sugar, which gives them the texture of a nice cake doughnut. The top is definitely my favorite part! I make a full batch of these and usually enjoy one fresh from the oven and freeze the rest. Once they are frozen I'll either grab one to go (they thaw out in about a half hour or so) or throw one in the microwave for 20-30 seconds. A muffin and some hot coffee - a perfect start to my day! Orange Cranberry Muffins Makes approximately 15 standard-sized muffins 2 cups all-purpose flour 2/3 cup granulated sugar, divided 1/2 cup sweetened, dried cranberries 2 teaspoons orange zest 2 teaspoons baking powder 1 teaspoon pumpkin pie spice 1/2 teaspoon baking soda 1/4 teaspoon salt 1 cup low-fat (1%) buttermilk ** 2 tablespoons salted butter, melted 1 egg, lightly beaten **If you don't have buttermilk on hand you can make a quick substitution by putting 1 tablespoon of acid (lemon juice, white vinegar, cider vinegar or white wine vinegar) in a measuring cup. Fill the rest of the cup with 1% or skim milk to make 1 full cup of liquid. Let sit 5 minutes. Stir and proceed to use in the recipe. Preheat oven to 400° F. Spray 15 muffin cups with nonstick cooking spray. Set aside.
Combine flour, 1/2 cup of sugar, cranberries, orange zest, baking powder, pumpkin pie spice, baking soda and salt in a large bowl. Whisk to combine. In a separate bowl mix together buttermilk, melted butter and egg. Add wet ingredients to the dry ingredients and mix until just combined. Spoon batter in prepared muffin tins. Sprinkle the remaining sugar over the tops of the muffins. Bake for 15 minutes, or until a toothpick inserted in the center comes out clean. Allow to cool in the pans a few minutes before transferring to a wire rack to cool completely. Source Weight Watchers 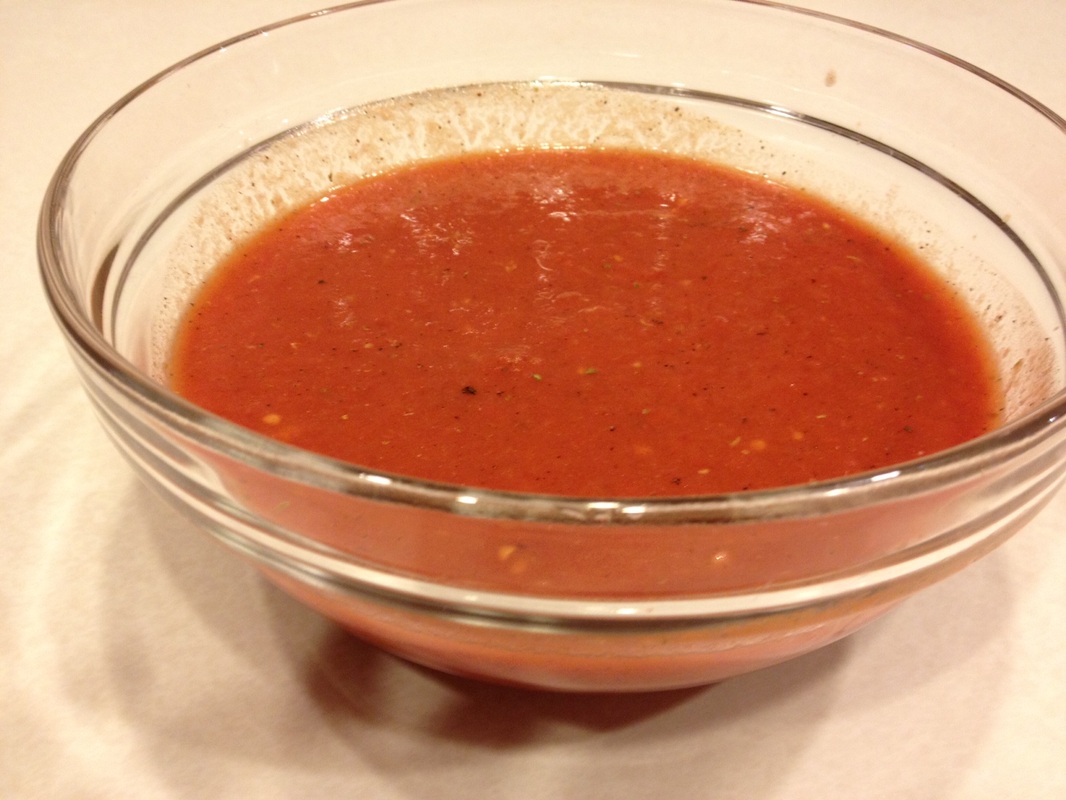
So, I've been making my own pizza for years - sometimes with a pre-baked crust from the store, sometimes with one of those refrigerated pizza crusts and sometimes with my own dough. Through the goods and the bads of pizza dough I always found one consistently bad thing - the sauce! I am not a fan of the store bought pizza sauces that come in jars and bottles, so I've tried half-heartedly to make my own pizza sauce time and time again. Sometimes I would use straight marinara sauce - didn't quite cut it. The next time I'd doctor-up my marinara sauce with a little oregano - still not quite right. To my surprise, internet searches for a pizza sauce recipe yielded nothing! In the end I'd resort to going back to store bought sauce because I just couldn't 'get it'. FINALLY, about a year ago I came across this recipe on Annie's Eats (I know I've said it before, but this girl's blog has seriously changed my life!) and it happened - I finally 'GOT IT'! This pizza sauce is ridiculously easy to make! If you have 5 minutes and a food processor you can probably whip up a batch out of your pantry right now! I find that this recipe makes enough to cover at least two pizzas. When I make a batch I usually use half and freeze the other half for another time. When using from frozen I suggest you reheat it gently on the stove for a few minutes to thicken it up a bit. The sauce tends to be a bit watery when defrosted from frozen.
Give this one a try! I promise - you'll never buy store bought pizza sauce again!! DIY Pizza Sauce 28 ounce can whole peeled tomatoes, drained 1 tablespoon extra virgin olive oil 1 teaspoon red wine vinegar 1 teaspoon kosher salt 1 teaspoon dried oregano 1/4 teaspoon ground black pepper Combine all ingredients in a food processor and blend until smooth, about 30 seconds. Transfer to a bowl. Refrigerate (or freeze) until ready to use. Source: Adapted from Annie's Eats  Last Spring made a delicious Shaved Asparagus Pizza and I promised all of you that I would share the pizza dough recipe with you. Well, life happened, a move happened and...well, I'm sharing it with you now! Homemade pizza dough is nothing new to our kitchen. My husband has been our main "Pizza Dough Maker" for years. He seasoned his dough very well and the pizza always came out nicely. The only thing lacking was the crust - I mean, it was OK as a vehicle to deliver the delicious toppings to your mouth, but when the toppings were gone, I never really wanted to eat the crust. All that changed when I found this recipe from Annie's Eats. The crust is so amazing! There is never a time when a crust hits the garbage can - it's all devoured right along with all the other pizza yumminess! I've been making this recipe for about a year now and I've come a long way with my pizza making skills. Take a look at Annie's awesome pizza tips for some great pointers on how to get the best pizza ever! I've incorporated many of these tips into my own pizza making, however, currently I'm using a metal pizza pan instead of a stone. I've had stones for years and years but lately we keep breaking them! We can't figure out what we're doing wrong, so for now, a metal pizza pan it is! If you've never made your own pizza dough, I beg you to give it a try! It's really not that hard! Basic Pizza Dough 1/2 cup warm water (about 110° F) 1 envelope (2 1/4 tsp) instant yeast 1 1/4 cups water, room temperature 2 tbsp extra virgin olive oil 22 ounces (approximately 4 cups) bread flour, plus more for dusting 1 1/2 tsp kosher salt olive oil or nonstick cooking spray Place the warm water in a medium bowl, sprinkle the yeast over the warm water and let sit for about 5 minutes to allow the yeast to swell. Add the room temperature water and the olive oil. Set aside. Place the flour and kosher salt in the bowl of a stand mixer fitted with a paddle attachment. Mix briefly to combine. With the mixer on low speed, slowly add the water/yeast/olive oil mixture. Once all ingredients have come together, switch over to the dough hook and knead on medium speed until the dough is smooth and elastic, about 5 minutes. Form the dough into a ball and place in a deep, lightly oil bowl. Cover with plastic wrap and set in a warm place until the dough has doubled in size, about 1 1/2 to 2 hours. 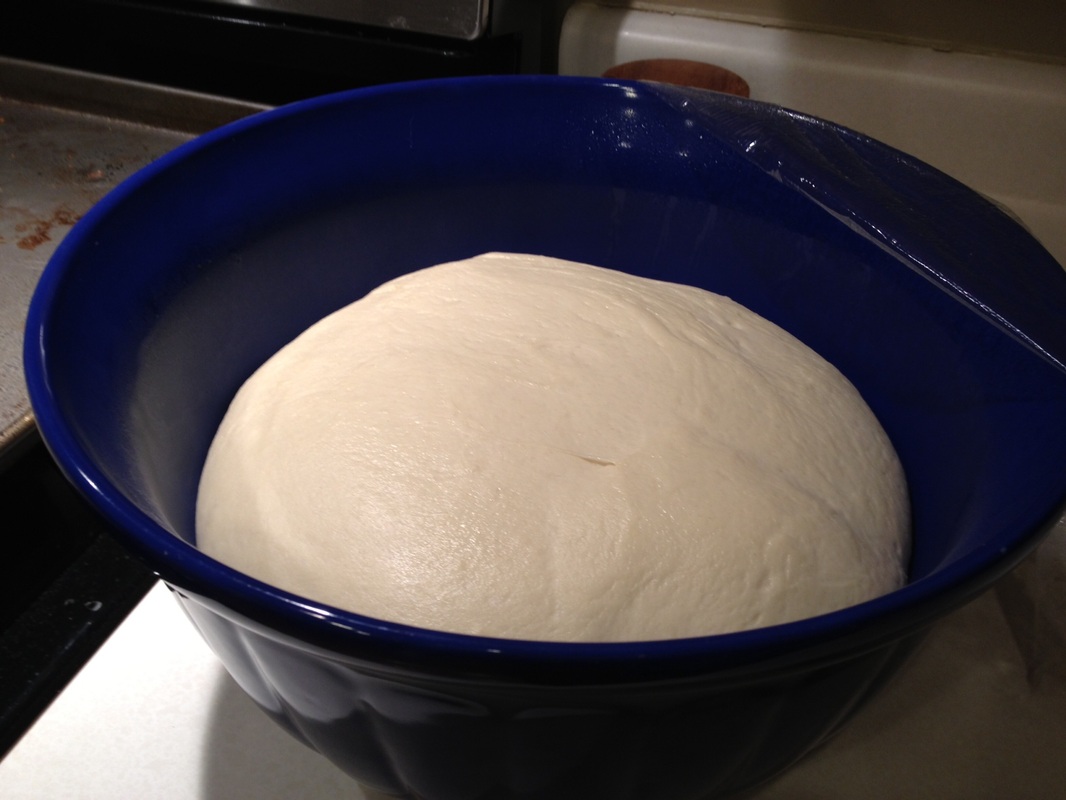 Punch down the dough and divide into 2 equal balls of dough. If you want to freeze the dough for future use, wrap in plastic wrap, then place in a freezer safe bag. When you are ready to use the frozen dough, defrost it in the refrigerator for 1 day prior to using it. On the day you are going to use it, let the dough come up to room temperature before shaping it. 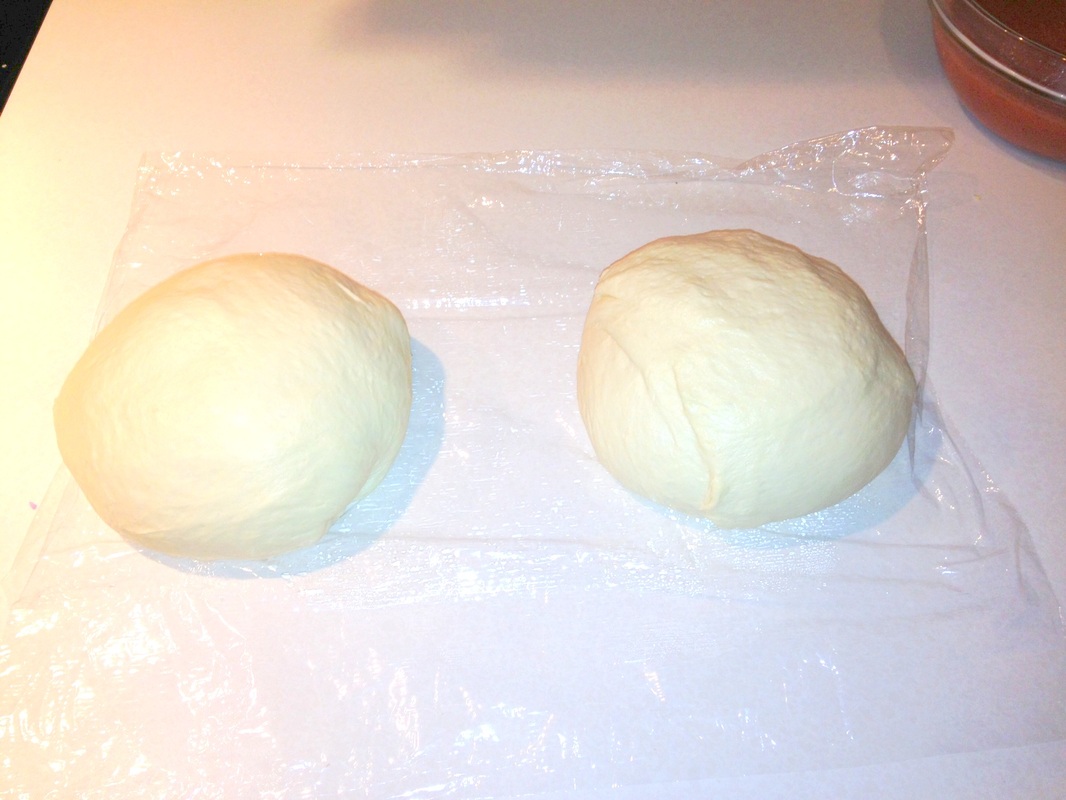 If making a pizza, shape your dough to fit your pan, or pizza peel if using a stone. (I know you aren't really supposed to use a rolling pin when forming pizza dough, but I just haven't perfected my stretching technique yet!) You could also use the dough to make these crowd-pleasing pizza bites! 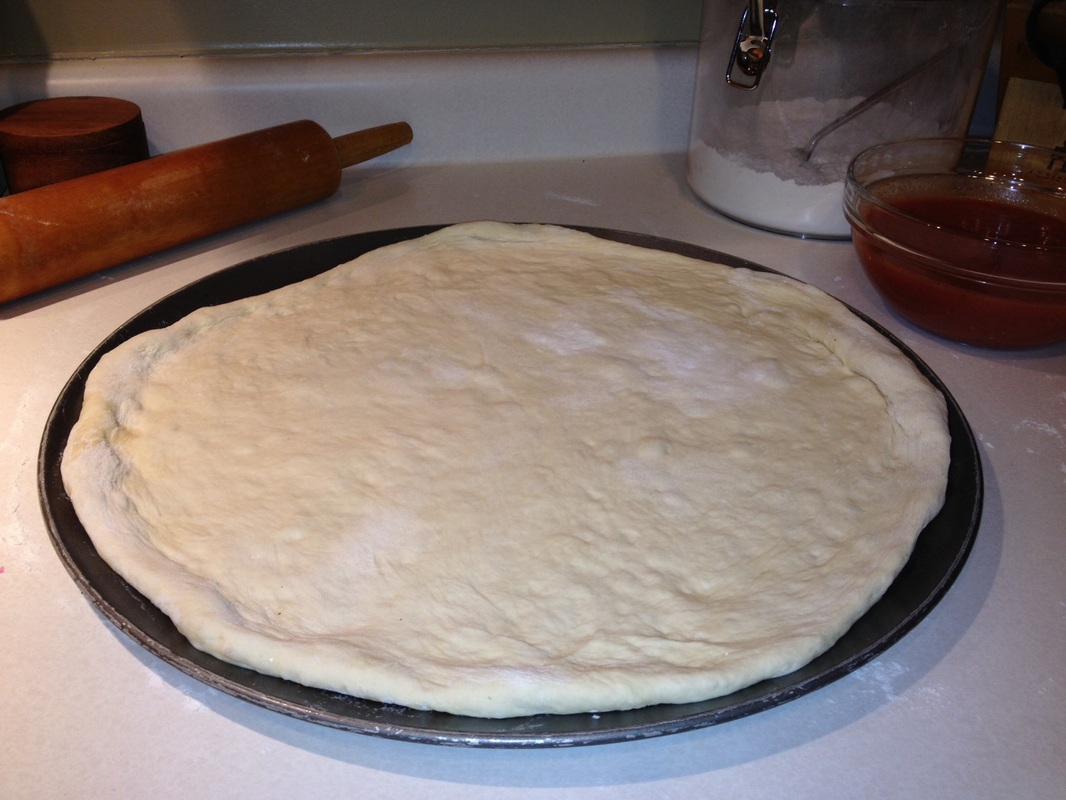 From here you can add your toppings and bake your pizza according to your own recipe. I like to cook mine at 450° F for about 10-12 minutes or until the crust is golden brown. Oh, see that sauce in the background? Best. Pizza. Sauce. Ever. Will share that soon!
Give it a try! Good luck! Source: Adapted from Annie's Eats  It seems these days my Kitchen-Aid stand mixer and my oven are pretty much always in use. I've been baking ALOT this year. As I've said before, I love baking cupcakes and sweets, but I need to get my baking 'fix' by finding more diverse recipes. I've already started making my own hamburger buns and sandwich bread and recently I've discovered scones. Scones are my new best friend at breakfast time! The neat thing about scones is that you can whip up a batch and freeze them. Then when you have a scone craving just pop a frozen one in the oven and about 20 minutes later you have a fresh, flaky, hot breakfast! I've made sweet scones before and they are great too, but with the bacon and cheese these savory ones just scream 'breakfast' to me! As with most scone recipes, I divide the dough into two disks and cut 16 smaller ones instead of 8 regular-sized ones. This lets me enjoy one on a weekday morning (translated: post-run) with a piece of fruit and not feel like I just negated all my efforts on the trail!  Bacon Cheddar Chive Scones
Makes 8 scones (or 16 mini scones) 2 cups all-purpose flour 1 tsp kosher salt 1 tbsp baking powder 2 tsp sugar 4 tbsp cold butter, diced 1 cup cheddar cheese, diced 1/3 cup chives, minced 6 slices of bacon, cooked and crumbled 1 cup, plus 2 tbsp heavy cream, divided Preheat oven to 425. Line a baking sheet with a silicone baking mat. Set aside. In the bowl of a food processor, combine flour, salt, baking powder and sugar. Pulse a few times to combine. Add cold butter to food processor and pulse a few more times. Do not over-mix. You want the mixture to be unevenly crumbly. Transfer the flour mixture to a large bowl. Add cheese, chives and crumbled bacon, tossing to combine. Try to work quickly, as you don't want the butter to start melting. Add heavy cream. Using your hands, gently mix to combine all ingredients evenly. Turn the mixture out onto a well-floured work surface. Pat the shaggy dough into a smooth disk - about 7" wide and 3/4" thick. Transfer disk to the prepared baking sheet. Using a knife or bench knife, cut the disk into 8 wedges. Spread them out a bit on the pan. **If freezing, place the unbaked scones on a baking sheet (small enough to fit in your freezer) and freeze for approximately 30 minutes. Once frozen, wrap each scone in plastic wrap and place in a freezer-safe bag. Bake time should be about the same. Brush some heavy cream on top of the scones to help them brown. Bake for 22-24 minutes until they are browned on top. Remove from oven and cool on the pan. Serve warm or at room temperature. 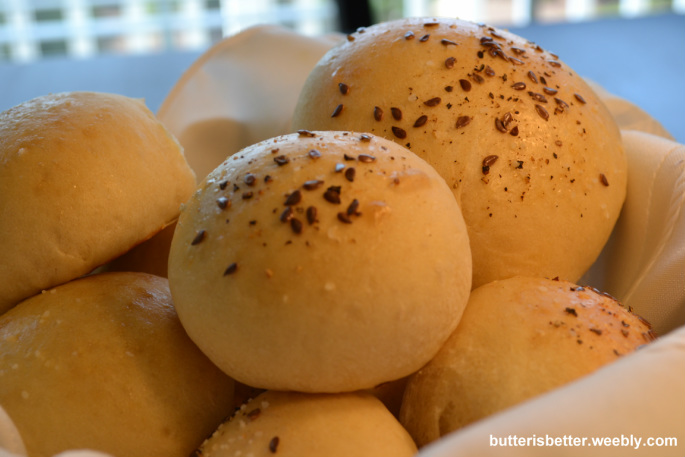 When I first started delving into the world of DIY-ing it in the kitchen I came across this recipe for hamburger buns. At first I thought it was strange to make your own hamburger buns when you can get a wide variety at the local grocery store for relatively cheap. But, since hubby bought me a brand new Kitchen-Aid Pro for Christmas I thought I'd give bread and rolls a try. After all, a family can't survive on cupcakes alone! So, I set out to expand my baking knowledge. I've made bread before, but nothing to write home about. These rolls changed all that! They are a family favorite and you can almost always find some in my freezer. In fact, I haven't bought a hamburger/sandwich bun in all of 2012! These are so light and tasty and perfect for both burgers and sandwiches. I've made these numerous times this year and sometimes I make 'slider buns' just by dividing the batch into 16 smaller rolls instead of 8 regular-sized ones. It's best to either eat these the same day you bake them or freeze them and eat them later. If you freeze them, just pop them in the microwave for about 15 seconds to give them a quick defrost. I encourage you to give these a try....you won't be sorry! Hint: This recipe doubles very nicely! 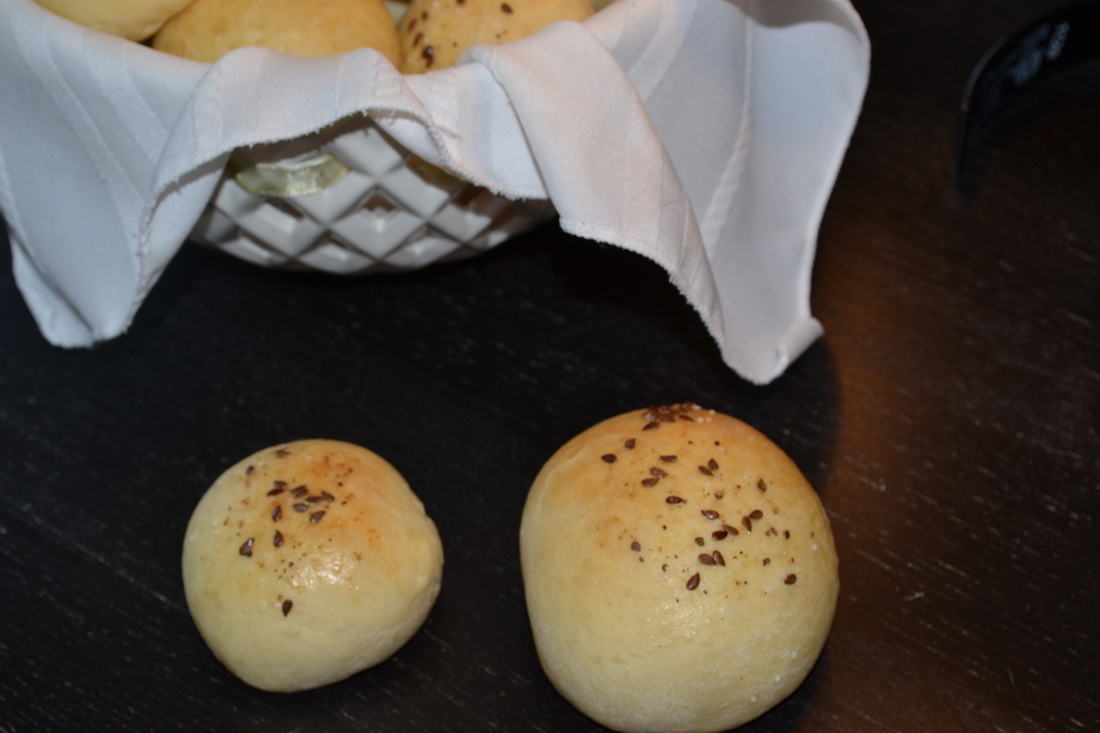 The black seeds you see on top are flax seeds! Light Brioche Buns
Makes 8 regular-sized buns or 16 slider-sized buns 3 tbsp warm milk (about 110 degrees F) 1 cup warm water (about 110 degrees F) 2 tsp instant yeast (not active-dry yeast) 2 tbsp honey **Edited 8/22/14 to be clean 1 1/2 tsp kosher salt 1 egg 3 1/3 cups white whole wheat flour **Edited 8/22/14 to be clean 2 1/2 tbsp unsalted butter, softened For the topping 1 large egg, beaten with 1 tbsp water Flax seeds, fresh ground pepper, kosher salt In the bowl of a mixer fitted with a paddle attachment, combine the milk, water, yeast, honey, salt and egg. Mix briefly to combine. Add the flour to the bowl and mix until incorporated. Mix in the softened butter. Once incorporated, switch over to a dough hook and knead on low speed for about 6-8 minutes until the dough forms a mass. If the dough sticks to the side of the bowl add a very tiny amount of flour, 1 tablespoon at a time, until the mass forms. Do not add too much flour or the buns will be tough. Transfer dough to a lightly oiled bowl. Cover with plastic wrap. Let rise in a warm place until doubled in size - about 1-2 hours. Line a baking sheet with a silicon baking mat. Divide the dough into 8 equal portions. For consistency I use a kitchen scale to ensure all 8 rolls are the same size. Place them on the baking sheet about 2-3 inches apart. Cover with plastic wrap sprayed with cooking spray. Allow to rise in a warm place until doubled in size - another 1-2 hours. Fill a metal baking pan halfway full with water. Set it on the lowest rack of the oven and preheat the oven to 400. At this point the rolls are usually spread into each other. Reform the rolls into their original size. Brush the tops with egg wash and sprinkle with flax seeds, fresh ground pepper and some kosher salt. Bake for 18-20 minutes until the tops are golden brown. Transfer to a baking rack to cool completely.  Finally! I'm finally sharing this crowd-pleasing recipe with you! I first made these taquitos a few months ago for a Super Bowl party because I wanted to try something fun and festive but I wanted to steer away from my all-too-common chip/dip combo. These taquitos were amazing! They were crispy and cheesy and a little bit spicy. This adaptation makes a double-batch (about 24-26). It takes a little bit of time to make the filling and roll each one, but it's totally worth it to have a freezer full of these little gems! I usually cook a few of them immediately for dinner and freeze a majority of them. They make for a fantastic last-minute snack for guests and even a quick dinner when you are parenting solo, as I have been this past week!  Creamy Chicken Taquitos
Makes 24-26 2 cups shredded, cooked chicken 8 ounces cream cheese, softened 1/2 cup salsa 2 tbsp freshly squeezed lime juice 2 tsp chili powder 1 tsp cumin 1 tsp onion powder 3 garlic cloves, minced 6 tbsp cilantro, chopped 1 cup frozen corn kernels, defrosted 1 cup cheddar cheese, shredded 1 cup pepper jack cheese, shredded 24-26 6-inch flour tortillas Cooking spray Kosher salt Preheat oven to 425 F. Line a baking sheet with a silicone baking mat or parchment paper. In a large bowl combine shredded chicken, cream cheese, salsa, lime juice, chili powder, cumin, onion powder, garlic, cilantro, corn and cheeses. Mix until well combined. Briefly heat the tortillas in the microwave so they roll easier (about 10 seconds per 10 tortillas). Place a tortilla on a work surface. Spoon about 2 tablespoons of filling onto the top 1/3 of the tortilla. Fold the top part of the tortilla over the filling and towards you. Continue to roll tightly until you have a taquito. Repeat with the remaining tortillas until you have used all of the filling. If you are baking immediately, place the taquito seam-side-down on the prepared baking sheet. Spray lightly with cooking spray and sprinkle with a bit of kosher salt. Baked about 15-20 minutes until crisp and golden brown. If you are freezing for later use, place the taquito seam-side-down on a freezer safe plate that is small enough to fit in your freezer. I use a quarter sheet jelly roll pan. Spray lightly with cooking spray and sprinkle with kosher salt. Freeze for about 30 minutes. Transfer to a freezer safe bag. When ready to eat, bake at 425 F for 15-20 minutes until crisp and golden brown. Serve with sour cream, salsa or guacamole. **Tip - when making Freezer Meals I always write down the name of the item, the date and any cooking instructions, ie, 425 F for 15-20 mins. |
AuthorPittsburgh area mom striving to provide clean, healthy, REAL food for her family! Categories
All
Archives
September 2014
|
 RSS Feed
