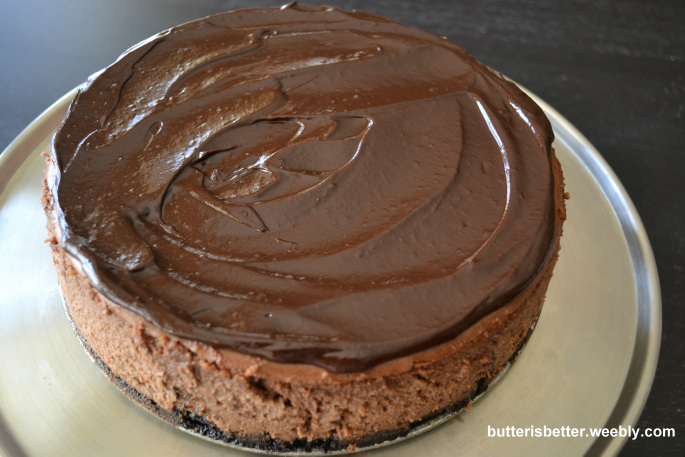
 Summer birthdays run high in my family. My little Bean's was 2 weeks ago and hubby's was a few days ago (along with my not-so-little-nephew 200 miles away...happy birthday buddy!). Since most of my family has lost all interest in my cupcakes (*sniff*) I am branching out to find other decadent desserts to celebrate their special day. My hubby has a strong affection with chocolate, which seems to be growing stronger with each passing year. So obviously, my inspiration for his cake was easy - chocolate-chocolate-chocolate! I haven't had a good cheesecake in a while so when I came across this recipe for Triple Chocolate Cheesecake I knew I had to try it. Wow! This cake was insane! It's rich with chocolate, but the creaminess of the cheese cuts it back a bit. It's just, *sigh*, PERFECT! Because this cake is baked the night before, the active prep time is actually pretty quick and the results are simply amazing!  Look at all those layers of chocolate! Triple Chocolate Cheesecake Serves 12 For the Cheesecake 9 ounces chocolate sandwich cookies, such as Oreo 6 tbsp unsalted butter, melted 32 ounces (4 x 8 ounce bars) cream cheese, at room temperature 1 1/2 cups sugar 1/2 tsp salt 4 large eggs 1 cup sour cream 8 ounces semisweet chocolate, melted For the Chocolate Ganache 1/4 cup heavy cream 4 ounces semisweet chocolate, chopped Preheat the oven to 325 degrees. Line the bottom of a 9-inch springform pan with parchment paper. Set aside. In the bowl of a food processor, pulse chocolate cookies until finely ground. Add melted butter and pulse to moisten. Transfer to prepared springform pan and press the mixture evenly into the bottom of the pan. Place the pan on a rimmed baking sheet and bake for 10 minutes. Remove from oven. Set aside to cool. Wipe out the bowl of the food processor. Combine cream cheese, sugar and salt. Blend until smooth. With the motor running add the eggs, one at a time, mixing well after each addition. Keeping the motor running add the sour cream and melted chocolate. Blend until smooth, scraping down the sides of the bowl as necessary. Pour mixture onto prepared crust. Bake for 1 hour, until just set. Turn off the oven and leave the cheesecake in the oven with the door closed for 1 additional hour. This will help prevent cracking. Remove from the oven and run a thin knife around the edges of the cake. This also will help prevent cracking. Once the cake is cooled, cover loosely with plastic wrap and place in the refrigerator for at least 6 hours, or overnight. When ready to serve, prepare the ganache. In a small saucepan, bring cream to a boil. Remove from heat and add chocolate. Stir until melted. Set aside until thickened, about 2-5 minutes. Carefully unmold the cheesecake from the springform pan and pour the chocolate ganache over top.
0 Comments
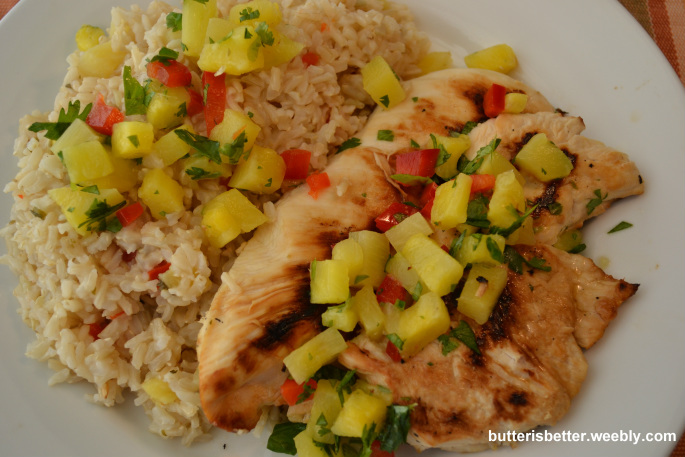 A few days ago it finally hit me. I finally figured out why I'm a less-inspired cook during the summer months. I'm not a huge fan of grilling. It's not that I don't LIKE grilled food, it's just that in our current living situation grilling in inconvenient, at best. Our grill actually ran out of propane in March and neither hubby or I are in a rush to refill it! In lieu of that we have a cast iron grill pan we use to sort of simulate real, outside grilling. It actually does a really nice job with the food (clean-up, on the other hand, is a whole different story!). The other day I had some chicken defrosted in the fridge and I was scouring the internet for a healthy, summer dish to use it in. I came across this recipe for Island Chicken on allrecipes and I had some of the ingredients on hand, but not all. So, let the improvising begin! I used fresh/frozen pineapple instead of canned, but you can use whatever you have on hand. I also skipped the hot peppers and replaced them with sweet red bell peppers and made a few other adaptations. It was a family pleaser for sure! We will definitely have this on the menu again. As for the rice, I honestly had no idea how much my kiddos love rice! I took some basic cooking techniques and developed the rice recipe right here in the Butter Is Better Test Kitchen. Enjoy! 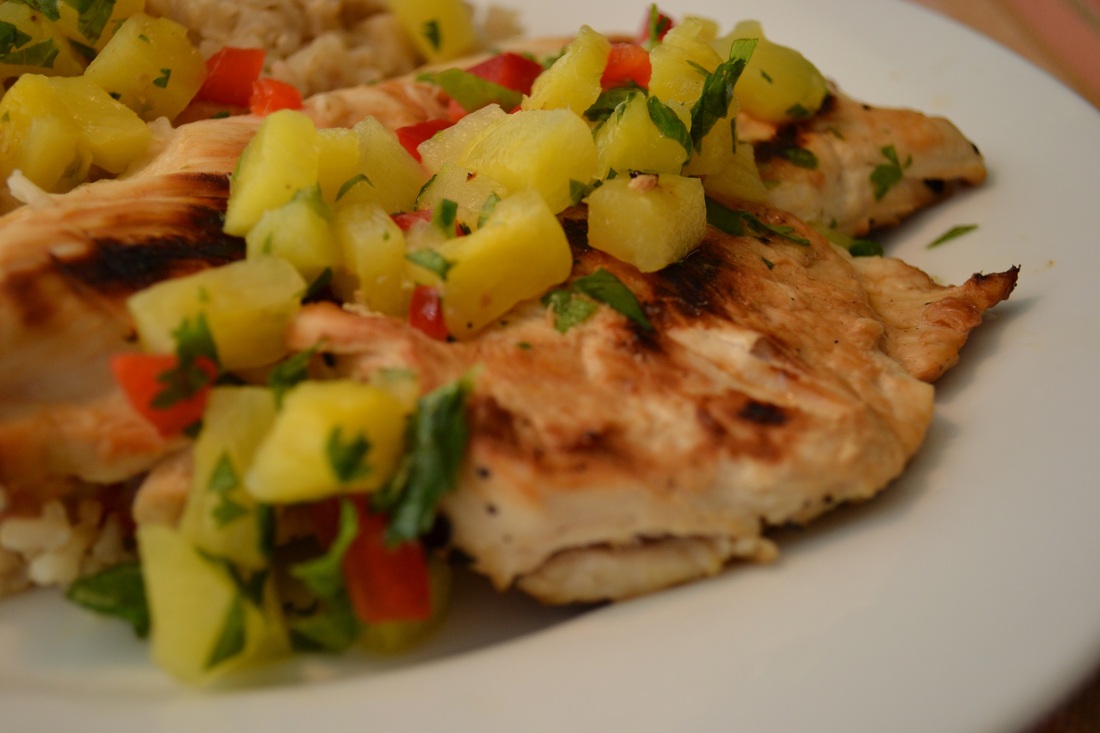 For the Chicken & Salsa Makes 4 servings 2 cups diced pineapple 1/4 cup reserved pineapple juice 1/2 cup diced red bell pepper Juice of 1 lemon - about 1/4 cup Juice of 1 orange - about 1/2 cup 1/3 cup chopped cilantro 1/4 spiced rum 1 pound chicken breasts (this would also be great with boneless, skinless, chicken thighs) In a bowl, combine pineapple, reserved pineapple juice, bell pepper, lemon juice, orange juice, cilantro and rum. Let stand for one hour to allow flavors to meld. After one hour, strain the juice from the salsa. Set the salsa aside for the rice. Place chicken and juice in a bowl to marinate. Cover with plastic wrap and refrigerate 2-6 hours. Preheat grill or grill pan. Grill chicken until juice run clear or internal temperature reaches 165 F. Remember to flip the chicken about halfway through - I apologize - I didn't keep track of time when doing this! Discard the marinade. Do not use it again! Once the chicken is done, serve it with Island Rice (see below)  For the Island Rice
1 cup brown rice 1 3/4 cups water 1/2 cup pineapple salsa (see recipe above) 1 tsp kosher salt Combine all ingredients in a medium saucepan. Bring the water to a boil. Once the water boils, stir the mixture once, reduce the heat to a simmer and cover with a tightly fitting lid. Simmer for 50-55 minutes until the water is absorbed and the rice is nice and fluffy. Don't lift the lid or stir the rice until the timer goes off.  It seems these days my Kitchen-Aid stand mixer and my oven are pretty much always in use. I've been baking ALOT this year. As I've said before, I love baking cupcakes and sweets, but I need to get my baking 'fix' by finding more diverse recipes. I've already started making my own hamburger buns and sandwich bread and recently I've discovered scones. Scones are my new best friend at breakfast time! The neat thing about scones is that you can whip up a batch and freeze them. Then when you have a scone craving just pop a frozen one in the oven and about 20 minutes later you have a fresh, flaky, hot breakfast! I've made sweet scones before and they are great too, but with the bacon and cheese these savory ones just scream 'breakfast' to me! As with most scone recipes, I divide the dough into two disks and cut 16 smaller ones instead of 8 regular-sized ones. This lets me enjoy one on a weekday morning (translated: post-run) with a piece of fruit and not feel like I just negated all my efforts on the trail! 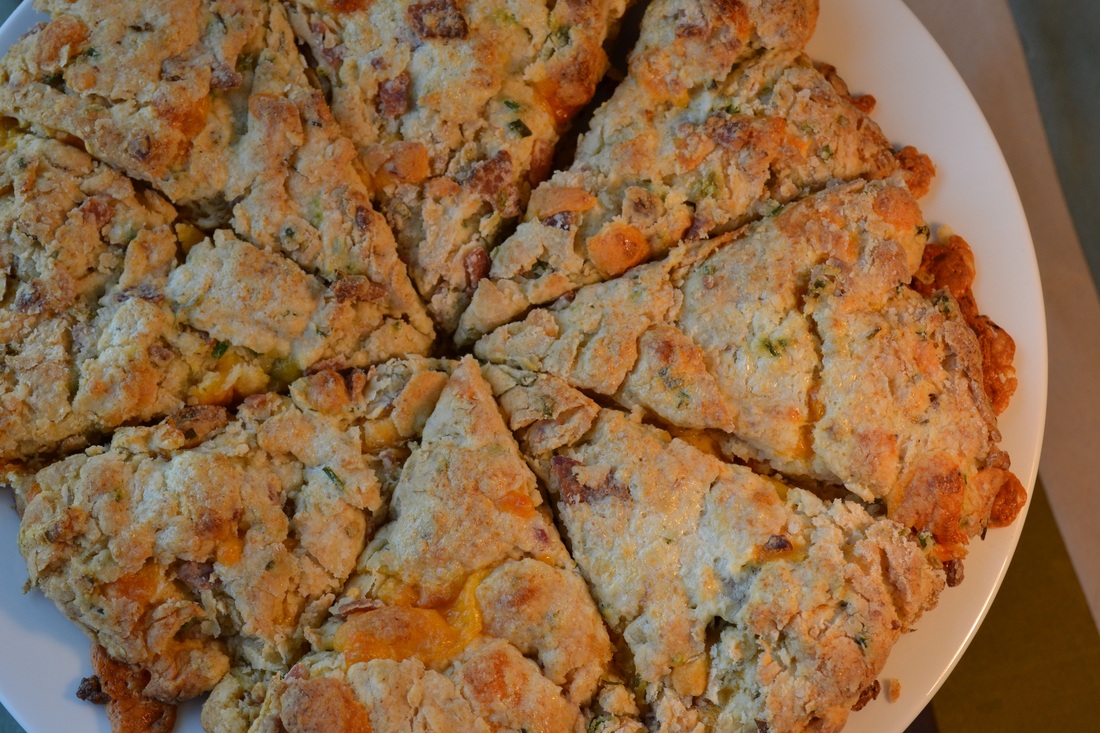 Bacon Cheddar Chive Scones
Makes 8 scones (or 16 mini scones) 2 cups all-purpose flour 1 tsp kosher salt 1 tbsp baking powder 2 tsp sugar 4 tbsp cold butter, diced 1 cup cheddar cheese, diced 1/3 cup chives, minced 6 slices of bacon, cooked and crumbled 1 cup, plus 2 tbsp heavy cream, divided Preheat oven to 425. Line a baking sheet with a silicone baking mat. Set aside. In the bowl of a food processor, combine flour, salt, baking powder and sugar. Pulse a few times to combine. Add cold butter to food processor and pulse a few more times. Do not over-mix. You want the mixture to be unevenly crumbly. Transfer the flour mixture to a large bowl. Add cheese, chives and crumbled bacon, tossing to combine. Try to work quickly, as you don't want the butter to start melting. Add heavy cream. Using your hands, gently mix to combine all ingredients evenly. Turn the mixture out onto a well-floured work surface. Pat the shaggy dough into a smooth disk - about 7" wide and 3/4" thick. Transfer disk to the prepared baking sheet. Using a knife or bench knife, cut the disk into 8 wedges. Spread them out a bit on the pan. **If freezing, place the unbaked scones on a baking sheet (small enough to fit in your freezer) and freeze for approximately 30 minutes. Once frozen, wrap each scone in plastic wrap and place in a freezer-safe bag. Bake time should be about the same. Brush some heavy cream on top of the scones to help them brown. Bake for 22-24 minutes until they are browned on top. Remove from oven and cool on the pan. Serve warm or at room temperature. 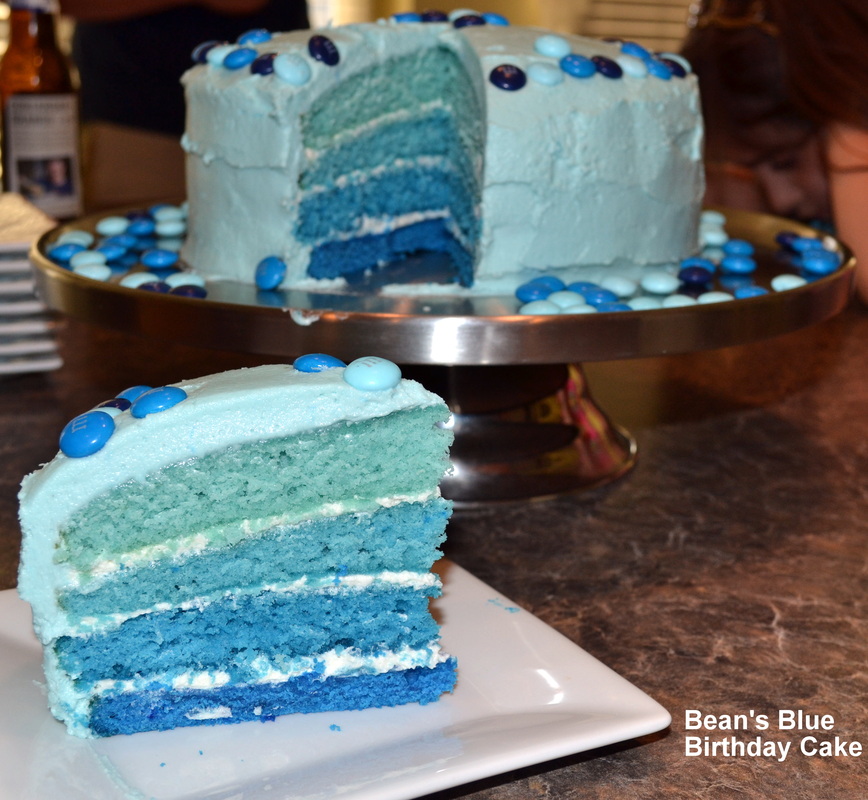
Yesterday my baby girl, Brecken, turned 4 years old. I can't believe my baby is 4 already!! Brecken had a bit of a tough start to life. Lots of visits to Children's Hospital in the first few years...lots of visits with therapists....and lots of hard work. Yesterday on her 4th birthday we celebrated no longer needing to thicken her liquids for fear of aspiration, a huge advancement in her speech and finally being potty-trained! Yes, our little Bean has come a long way and we are so proud of her! One of Brecken's favorite things in life is the color blue (much to her purple-loving-sister's disapproval). Her other favorite thing is M&M's (big sister approves of those!) To that end, I decided an over-the-top blue and M&M cake was perfect for her! I have seen these multi-colored layer cakes all over the blogosphere and thought I'd give it a try. I think it came out pretty well, though I did learn a lot through this process - I'll share my tips with you on the way through the tutorial I've created for you. The first thing I did was make a batch of my favorite vanilla cupcake batter. 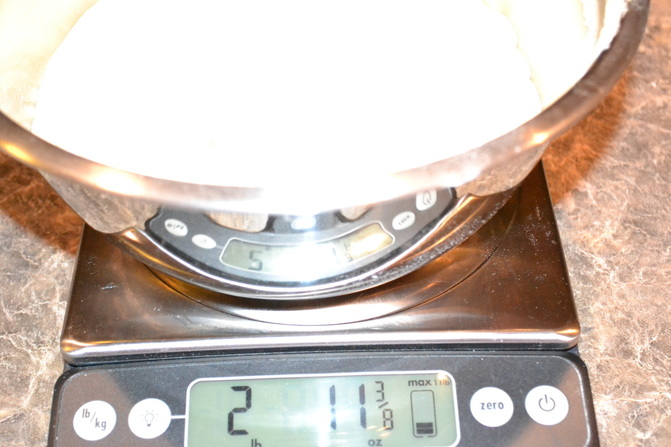 Weigh the total batter amount. 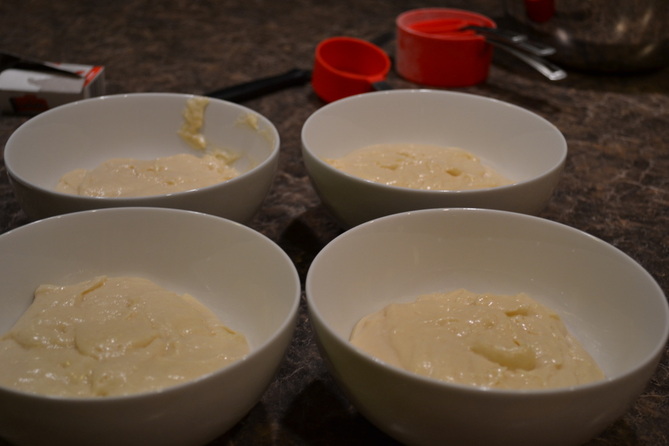 Next, I divided the batter evenly into 4 smaller bowls. This is where the kitchen scales comes in very handy. This is also where I learned I need to invest in some nice mixing bowls! 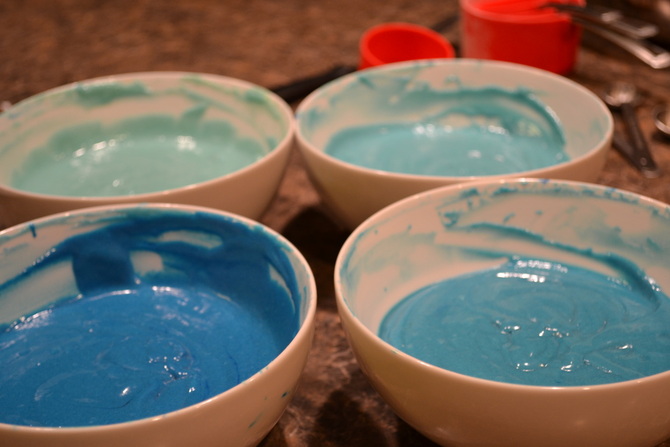 Then, using Wilton Food Coloring Gels I colored each of the bowls of batter different shades of blue. The lightest one used 3 toothpicks worth, the next one was 4 toothpicks, then it was 5 and I think we used about 7 on the last one. Just keep adding gel until you reach your desired color. 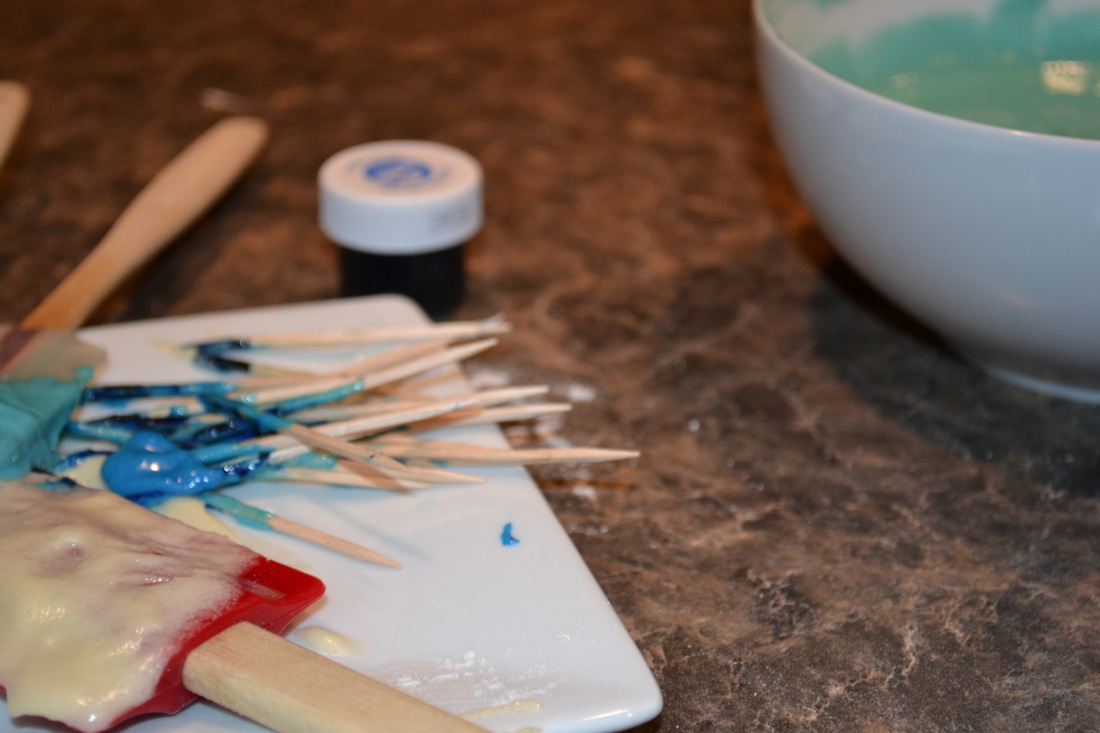
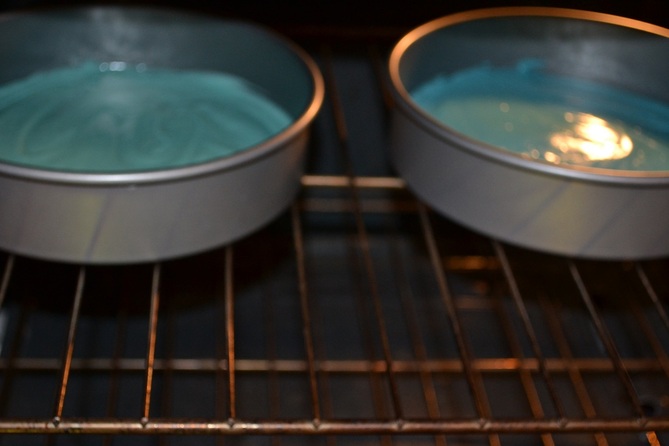 Place two of the batters into 8-inch round cake pans lined with parchment paper. Bake at 350 for about 14 minutes, or when a toothpick inserted in the middle comes out clean. When the first two were baked and cooled slightly I removed them from the pans and placed them on a cooling rack to cool completely. Bake the last two colors as instructed above.  You should end up with 4 thin cake layers. I baked my cakes the night before so I wrapped each layer tightly in plastic wrap and set them out at room temperature until I was ready to use them. Before assembling the cake make a batch of basic vanilla buttercream. I used this recipe: 3 sticks of unsalted butter, softened (I use Plugra) 6 cups of powdered sugar 1/4 tsp kosher salt 6 Tbsp heavy cream 2 Tbsp vanilla extract In the bowl of a stand mixer fitted with a paddle attachment, cream the butter for 3-4 minutes, until light and fluffy. Add the salt to the confectioner's sugar, whisk together. On low speed, slowly add 1/2 of the confectioner's sugar to the mixing bowl. Slowly add the heavy cream and vanilla. Once incorporated, add the remaining confectioner's sugar, stopping the scrape down the bowl if necessary. When all the ingredients are fully combined turn the mixer on medium-high speed and beat for 5-7 minutes until the frosting is light and fluffy. 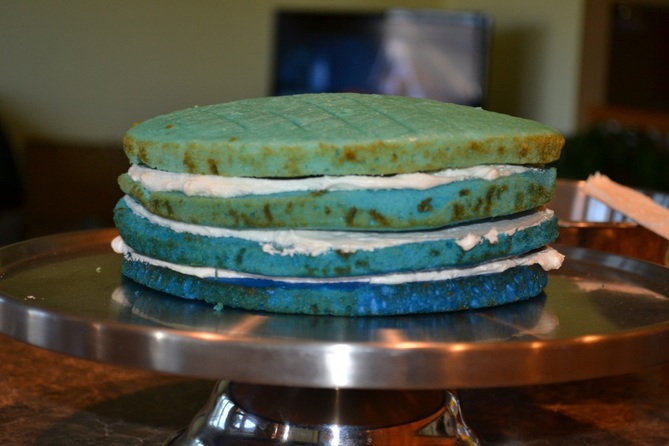 When ready to assemble your cake, place the darkest color on the bottom and spread a layer of frosting on top. Continue to layer cake and frosting until you have 3 layers of frosting in between the 4 layers of cake. Here's where I started to figure out what to do better next time. First of all, I would probably assemble the cake on a cake board and a piece of parchment. This would allow to easily clean up the excess frosting and transfer the cake to the cake stand when ready to serve. Second, I was worried that I would have enough frosting so I went a little thin on each layer. In the end this recipe had MORE than enough so I would have put a good amount more frosting between each layer. Third, I would have used a knife to even out the top layer. It didn't look too crooked to me at this point but I later learned it really was!  At this point what I did was use my blue food gel coloring again to tint the frosting to the shade of blue I wanted. I proceeded to frost the cake. In the future what I will do is put a 'crumb coat' on my cake first. To do this you simply spread a thin layer of frosting (white or colored) on your cake - it's ok if there are crumbs in the frosting. Place the cake in the refrigerator for about 30 minutes until the frosting is set. After 30 minutes you can proceed to frost your cake. From what I've read online this makes a huge difference and I wish I'd done it. All in all, my cake came out ok. But I'm really excited to use the tricks I've learned along the way on my next cake! 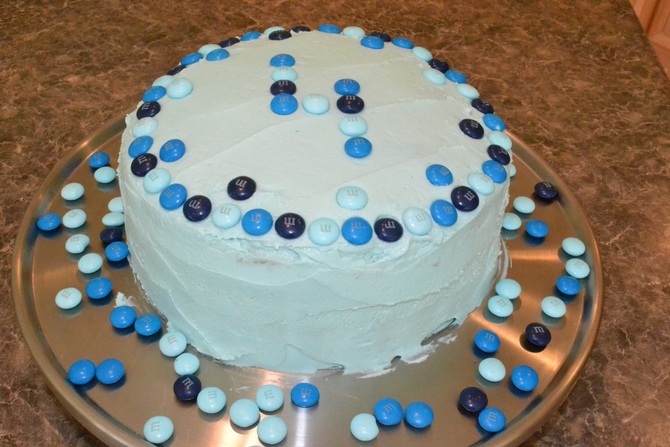 The last thing I did was decorate the cake with lots of M&Ms! 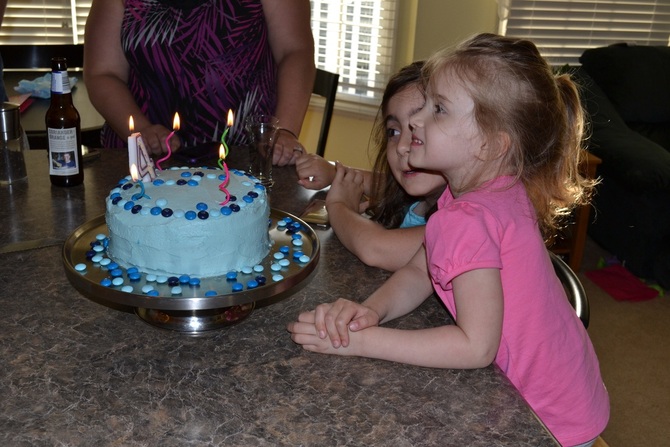 The birthday girl in all her blue glory! 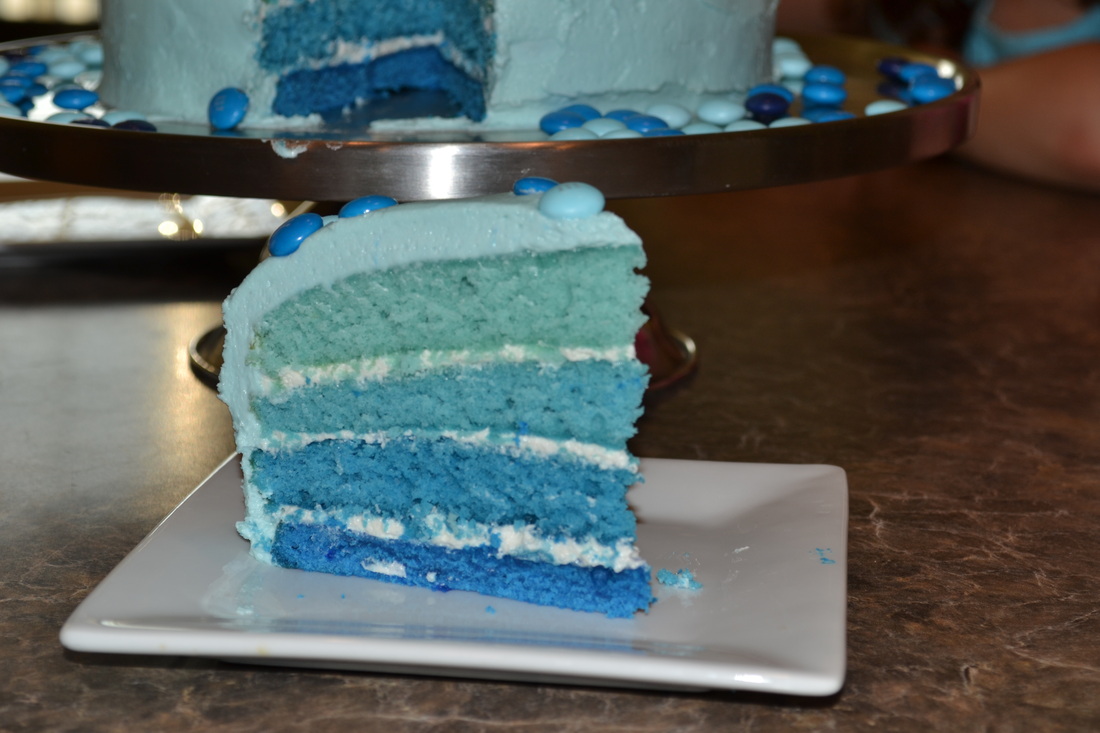
Thank you all for allowing me to practice my cake decorating (and photography!) on you!
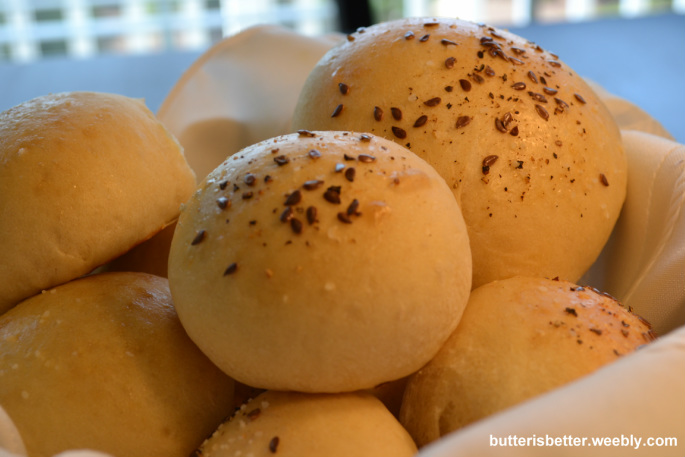 When I first started delving into the world of DIY-ing it in the kitchen I came across this recipe for hamburger buns. At first I thought it was strange to make your own hamburger buns when you can get a wide variety at the local grocery store for relatively cheap. But, since hubby bought me a brand new Kitchen-Aid Pro for Christmas I thought I'd give bread and rolls a try. After all, a family can't survive on cupcakes alone! So, I set out to expand my baking knowledge. I've made bread before, but nothing to write home about. These rolls changed all that! They are a family favorite and you can almost always find some in my freezer. In fact, I haven't bought a hamburger/sandwich bun in all of 2012! These are so light and tasty and perfect for both burgers and sandwiches. I've made these numerous times this year and sometimes I make 'slider buns' just by dividing the batch into 16 smaller rolls instead of 8 regular-sized ones. It's best to either eat these the same day you bake them or freeze them and eat them later. If you freeze them, just pop them in the microwave for about 15 seconds to give them a quick defrost. I encourage you to give these a try....you won't be sorry! Hint: This recipe doubles very nicely! 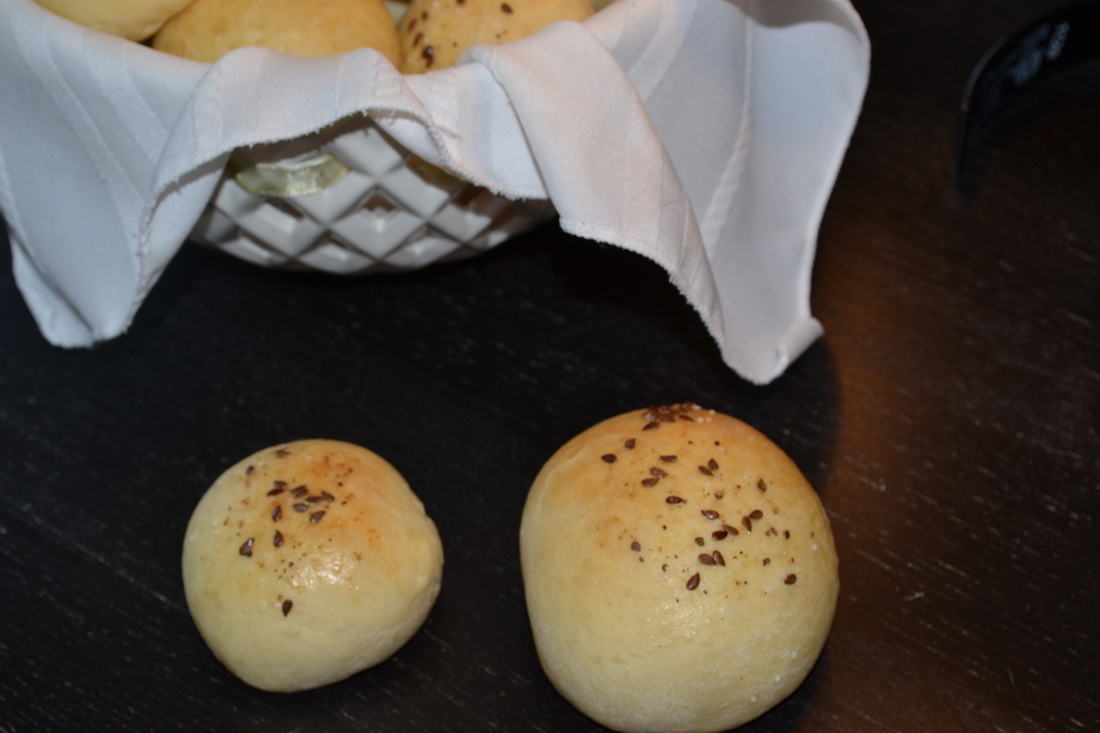 The black seeds you see on top are flax seeds! Light Brioche Buns
Makes 8 regular-sized buns or 16 slider-sized buns 3 tbsp warm milk (about 110 degrees F) 1 cup warm water (about 110 degrees F) 2 tsp instant yeast (not active-dry yeast) 2 tbsp honey **Edited 8/22/14 to be clean 1 1/2 tsp kosher salt 1 egg 3 1/3 cups white whole wheat flour **Edited 8/22/14 to be clean 2 1/2 tbsp unsalted butter, softened For the topping 1 large egg, beaten with 1 tbsp water Flax seeds, fresh ground pepper, kosher salt In the bowl of a mixer fitted with a paddle attachment, combine the milk, water, yeast, honey, salt and egg. Mix briefly to combine. Add the flour to the bowl and mix until incorporated. Mix in the softened butter. Once incorporated, switch over to a dough hook and knead on low speed for about 6-8 minutes until the dough forms a mass. If the dough sticks to the side of the bowl add a very tiny amount of flour, 1 tablespoon at a time, until the mass forms. Do not add too much flour or the buns will be tough. Transfer dough to a lightly oiled bowl. Cover with plastic wrap. Let rise in a warm place until doubled in size - about 1-2 hours. Line a baking sheet with a silicon baking mat. Divide the dough into 8 equal portions. For consistency I use a kitchen scale to ensure all 8 rolls are the same size. Place them on the baking sheet about 2-3 inches apart. Cover with plastic wrap sprayed with cooking spray. Allow to rise in a warm place until doubled in size - another 1-2 hours. Fill a metal baking pan halfway full with water. Set it on the lowest rack of the oven and preheat the oven to 400. At this point the rolls are usually spread into each other. Reform the rolls into their original size. Brush the tops with egg wash and sprinkle with flax seeds, fresh ground pepper and some kosher salt. Bake for 18-20 minutes until the tops are golden brown. Transfer to a baking rack to cool completely. 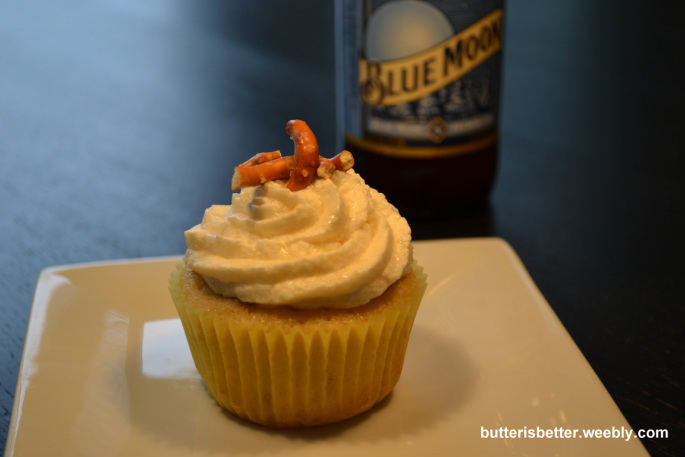 Hi there! Remember me? I'm the poor, lonely, neglected food blog. I've been pushed to the side in favor of needy little ones, PTA meetings, house showings and cupcake orders. However, I have never been forgotten! I'm back today to share with you a fun cupcake recipe (really though, aren't all cupcakes fun?) that I made for my dad's 63rd birthday a few weeks ago. When deciding what flavor cupcakes to make for my dad the first thing I came up with was coconut. Sure, coconut is an easy choice - Dad loves it. But isn't that a bit too predictable? So I asked myself, what else does Dad love? Well, BEER, obviously! And what goes with beer? PRETZELS, of course! So I took my favorite vanilla cupcake recipe and jazzed it up with some Blue Moon Beer and pretzel bits and here's what you get!! The Blue Moon is subtle but noticeable in the vanilla cupcake and the crushed pretzel pieces add a nice bit of saltiness to the cake. The pretzels in the cupcake will get soggy once baked, so I added crushed pretzels to the top of the frosting right before serving. Waiting til the last minute gives you that nice crunch you are looking for.  Blue Moon Cupcakes
Makes about 24 cupcakes For the cupcakes 2 1/2 cups all-purpose flour 2 1/2 teaspoons baking powder 1/4 teaspoon salt 8 tablespoons unsalted butter, at room temperature 1 3/4 cups sugar 2 eggs, at room temperature 2 1/2 teaspoons vanilla extract 1 1/4 cups Blue Moon Beer, at room temperature 1 cup crushed pretzels Preheat oven to 350. Line a standard cupcake pan with 24 liners. Set aside. In a medium bowl, sift together flour, baking powder and salt. Set aside. In the bowl of a stand mixer cream the butter and sugar together for about 3-5 minutes, until light and fluffy. Add the eggs, one at a time, mixing slowly after each addition. Add the vanilla extract to the Blue Moon in a large measuring cup. With the mixer on low add 1/3 of the flour mixture, followed by 1/2 of the Blue Moon/vanilla mixture. Add another 1/2 of the flour, followed by the rest of the liquid. Finally, add the last of the flour, mixing until just combined. Gently fold in the crushed pretzels until well incorporated. Fill the cupcake liners about 2/3 full. Bake for 18-20 minutes until a toothpick inserted in the middle comes out clean. Allow cupcakes to cool in the pan 5-10 minutes. Place on a cooling rack to continue to cool completely. For the frosting 16 tablespoons unsalted butter, at room temperature, I prefer European butter like Plugra 4 cups confectioner's sugar, sifted 1/8 teaspoon kosher salt 1 teaspoon vanilla extract 1 teaspoon whole milk 1/2 cup Blue Moon In the bowl of a stand mixer fitted with a paddle attachment, cream the butter for 1-2 minutes, until light and fluffy. Add the salt to the confectioner's sugar, whisk together. On low speed, slowly add 1/2 of the confectioner's sugar to the mixing bowl. Slowly add the vanilla, milk and Blue Moon. Once incorporated, add the remaining confectioner's sugar, stopping the scrape down the bowl if necessary. When all the ingredients are fully combined turn the mixer on medium-high speed and beat for 5-7 minutes until the frosting is light and fluffy. Transfer the frosting to a pastry bag and swirl onto cupcakes. Source: Adapted from The Cupcake Diaries |
AuthorPittsburgh area mom striving to provide clean, healthy, REAL food for her family! Categories
All
Archives
September 2014
|
 RSS Feed
