|
Today was the first day of my family's 10 Day Pledge to eat Real Food. I think it went pretty well! My husband and I agree that we weren't really tempted by any food that didn't follow The Rules. My daughters did great also! I'm super proud of them for saying 'No, thank you' when they were offered Goldfish Crackers! Way to go, girls!! That being said, I have the feeling the novelty is going to wear off and it's going to be a looong 10 days for them! We shall see! I thought it would be fun to document every meal and snack that I eat during my 10 Day Pledge. I'm feeling very accountable like back in my Weight Watchers days! I'm finding myself skipping that spoonful of almond butter out of the jar because I just don't want to take a picture of it! I definitely found myself snacking less today, but I didn't find that I ever really got hungry at any point. That tells me that I eat too much during most days. Out of boredom? Habit? Fun? I'm not sure, but oftentimes it's not out of true hunger. Definitely something I need to work on and I'm hoping this 10 Day Pledge helps with that. So here you go - here's what I ate on Day 1: 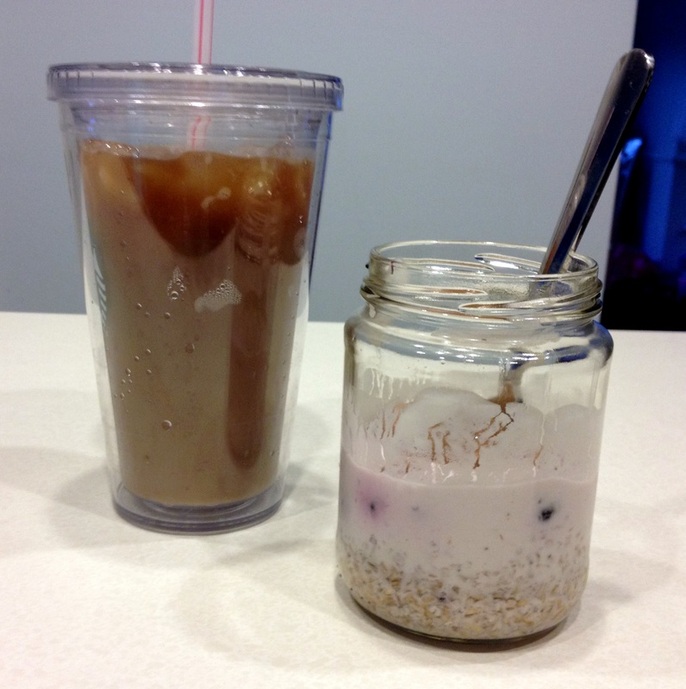 Breakfast was my normal Iced Coffee with whole milk and Overnight Oats with a tablespoon of Almond Butter.  Lunch was a homemade whole wheat tortilla filled with sauteed peppers, onions and Monterrey Jack cheese with some Ground Cherries on the side. Have you had these things before? We have them in our garden and they are Ah...Mazing! They are actually a tiny little tomato that grows in a husk, like a tomatillo. I've never had them before and I just can't get enough! 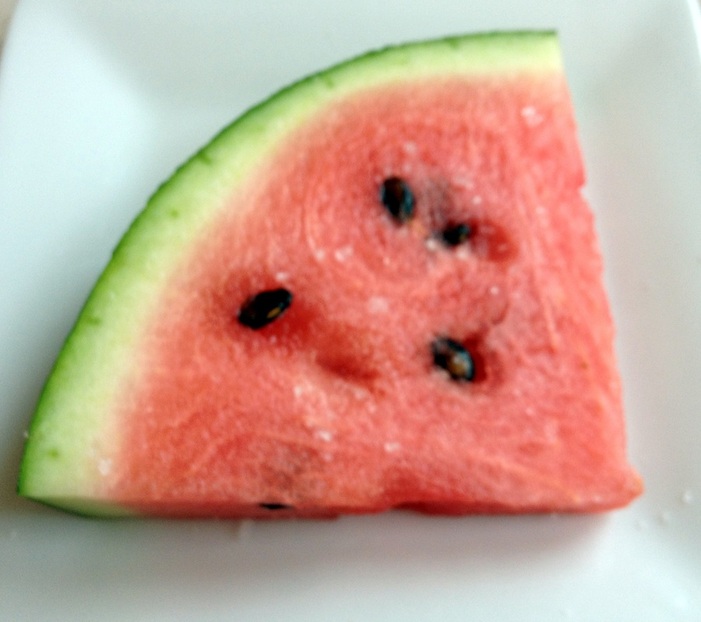 My afternoon snack was a slice of watermelon with some sea salt. I usually buy seedless watermelons but the farmer convinced me that the seeded watermelons are the ones that Mother Nature made so I bought a seeded one instead. I have to say, I didn't find the flavor to be superior and the seeds were such a nuisance. Anyone out there have any knowledge on the matter? Were seedless watermelons created by a scientist and born in a lab? 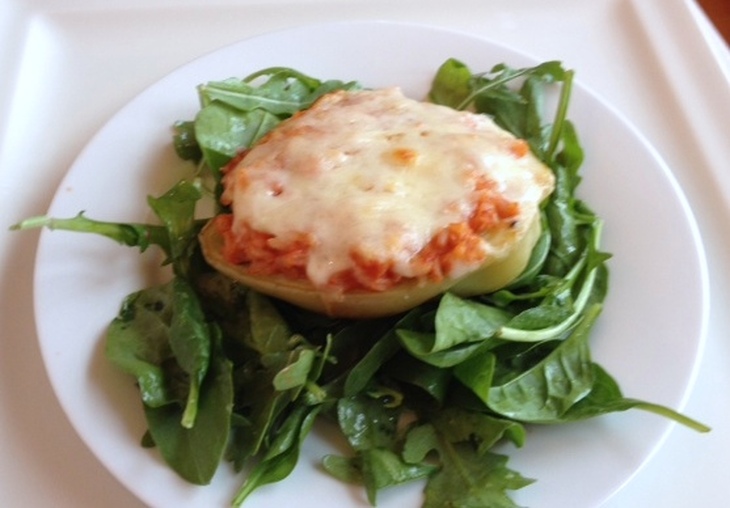 Dinner was a Pizza Stuffed Pepper (stuffed with brown rice, sauce and cheese) served over a bed of arugula & spinach drizzled with extra virgin olive oil.
I didn't officially have dessert tonight but I did lots of 'sampling' of the Honey Vanilla Ice Cream I'm working on for tomorrow! I can't wait to try it tomorrow night!
0 Comments
Confession time: I had a piece of my daughter's birthday cake today. I was really looking forward to it. It looked great and smelled sinfully sweet. So after singing Happy Birthday to my sweet 9-year-old I indulged in my first piece of (store bought) birthday cake in quite some time. It was fine...maybe even good, but so sweet. Sickeningly sweet actually. So sweet that I actually have no desire to have a second piece. In no way am I complaining about the cake or feeling guilty for eating it, but rather I'm feeling victorious that I just may have (finally!!) kicked my sugar addiction! The 'old me' would have eaten at least 3 pieces of cake...per day...til it was gone. Yaaay me! Now that I've got that off my chest and out of my system, I'm ready to start the 10 Days of Real Food Pledge tomorrow! If you have decided to join me, don't forget to sign up on Lisa Leake's website so you can earn your free prize too! One of my go-to Real Food breakfasts is Overnight Oatmeal. I've had Overnight Oatmeal for breakfast most mornings for more than a year now. I expected myself not to want it during the long, cold (very cold in PA!) winter months but I ended up craving it just as much in February as I do in July! It's super easy to make, portable, versatile, filling, healthy....it's pretty much the perfect breakfast! 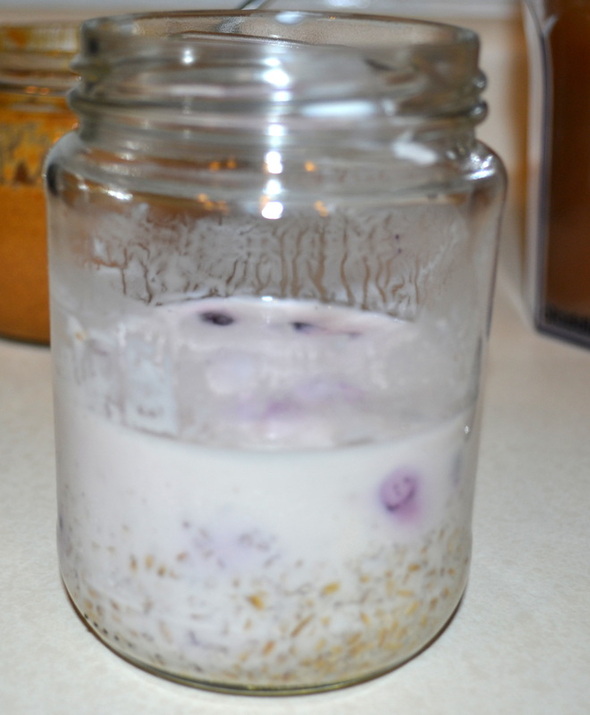
Overnight Oatmeal Serves 1 1/4 cup steel cut oats 1/4 cup whole milk 1/4 cup plain, whole milk yogurt 1/4 cup berries 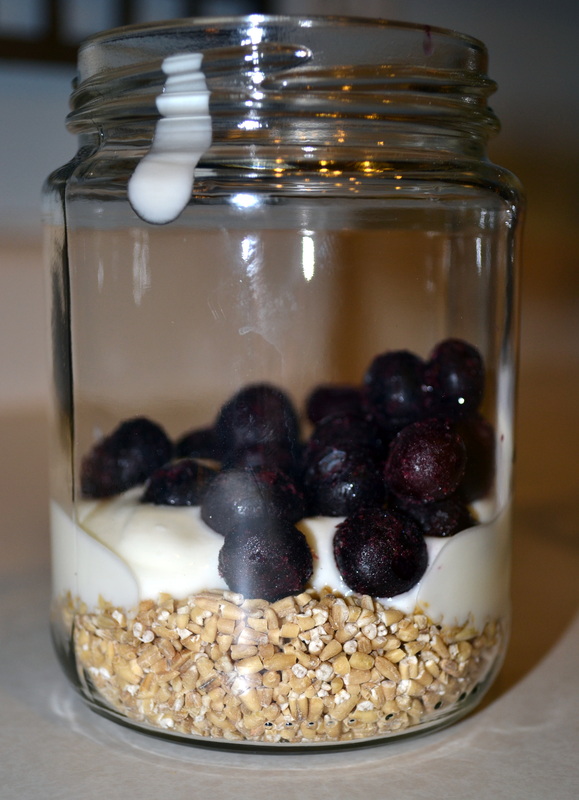
Place all ingredients in a bowl or jar. Stir until combined. 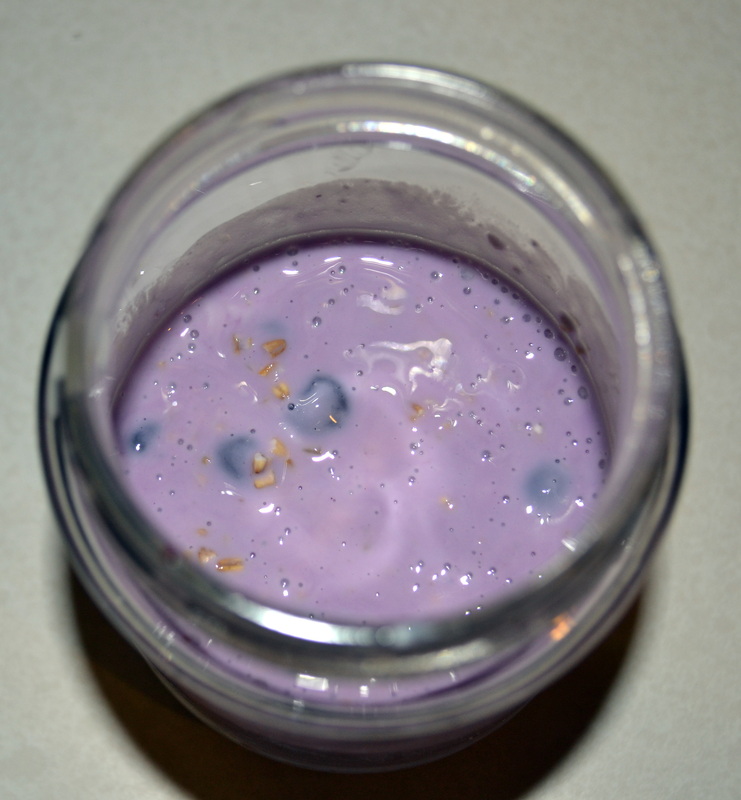
Cover and refrigerate overnight. Eat within 2-3 days for best quality. Top with a dollop of almond butter or other nut/seed butter. 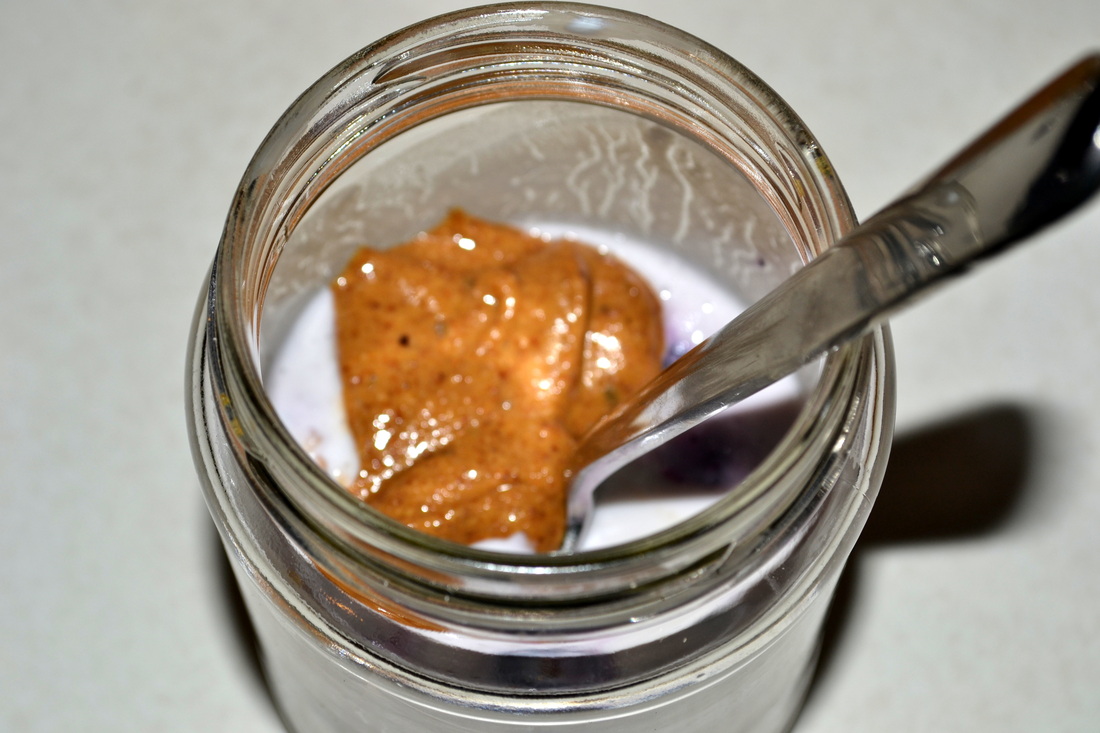
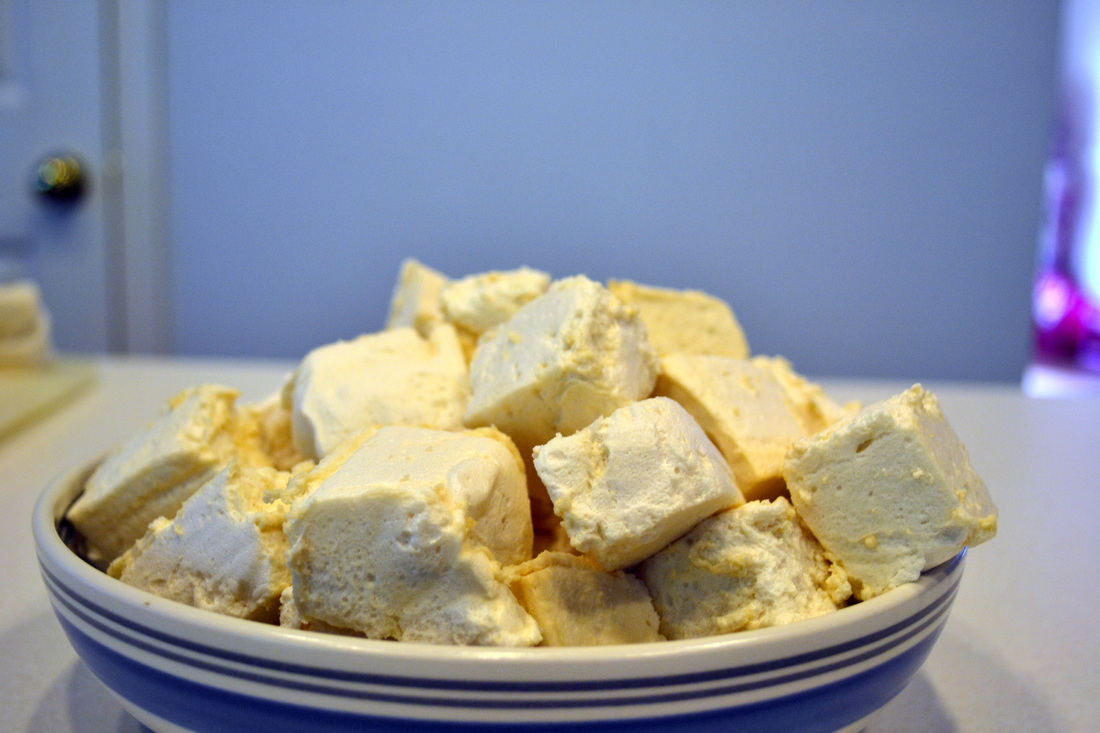
It seems like sugar has been all over the news lately. We are learning each day about more and more dangers associated with a high sugar diet. Personally, I have known I should cut back on my sugar intake for awhile, but I've never been able to commit to it (see all the cupcake recipes on the old blog) and for very good reason: sugar is addictive! Fortunately for me, my sugar 'addiction' has never manifested into any health issues, but too much sugar can lead to diabetes, obesity, food cravings, heart disease and behavior issues in children. In my opinion, one of the biggest issues with sugar today is that we aren't finding our sugar in our nightly after-dinner bowl of ice cream. No, today we're finding loads of it in our morning breakfast cereal, in that mid-morning granola bar or the soup/sandwich combo at lunch. Simply put, once you start reading the labels, you see that sugar is in nearly everything we eat. Trying to cut it out is so very, very hard. For that reason, I was super excited to find this brownie recipe that uses honey instead of white sugar! One of my passions is teaching my young daughters how to choose healthy foods or even crave them. My older daughter is definitely my bigger challenge. She loves sweets! And lucky for her, some sort of sweet is provided to her nearly every day. She has been offered (and usually accepted) cookies/lollipops/candy/mints at more places than I can even count - school (this is a big one!), the grocery store, restaurants, CCD, story time at the book store and even boutique shops! I don't want to be the parent who always says 'NO' but I want my girls to understand that those things should be thought of as a 'sometimes treat'. If I can't control what is going on 'out there' at least I can control what I am doing 'in here'. We recently went camping and s'mores were a requirement for my daughters. I found a more wholesome option for the chocolate and graham crackers we used to buy, but when it came down to finding better marshmallows, they just didn't exist. I did find vegan marshmallows, but they too had sugar listed as the first ingredient. What to do? Find a recipe without sugar and make them myself! This recipe uses honey to sweeten the marshmallows. Honey has been found to have more nutrients than white sugar so it is slightly healthier, but it raises the blood sugar and is quite dense in calories so it should still be consumed in moderation. I, personally, prefer honey over sugar because it is less processed and in a more natural state than sugar. These marshmallows were extremely well received by my two toughest critics - Jordan and Brecken! They melted nicely over the campfire and oozed out of the graham cracker just like they were supposed to! The honey flavor is very predominant, so you can have a lot of fun with different flavors of honey - orange blossom would be amazing!! 
DIY (Sugar-Free) Marshmallows 1 cup water 4 tablespoons unflavored gelatin 1 cup honey 2 teaspoons vanilla 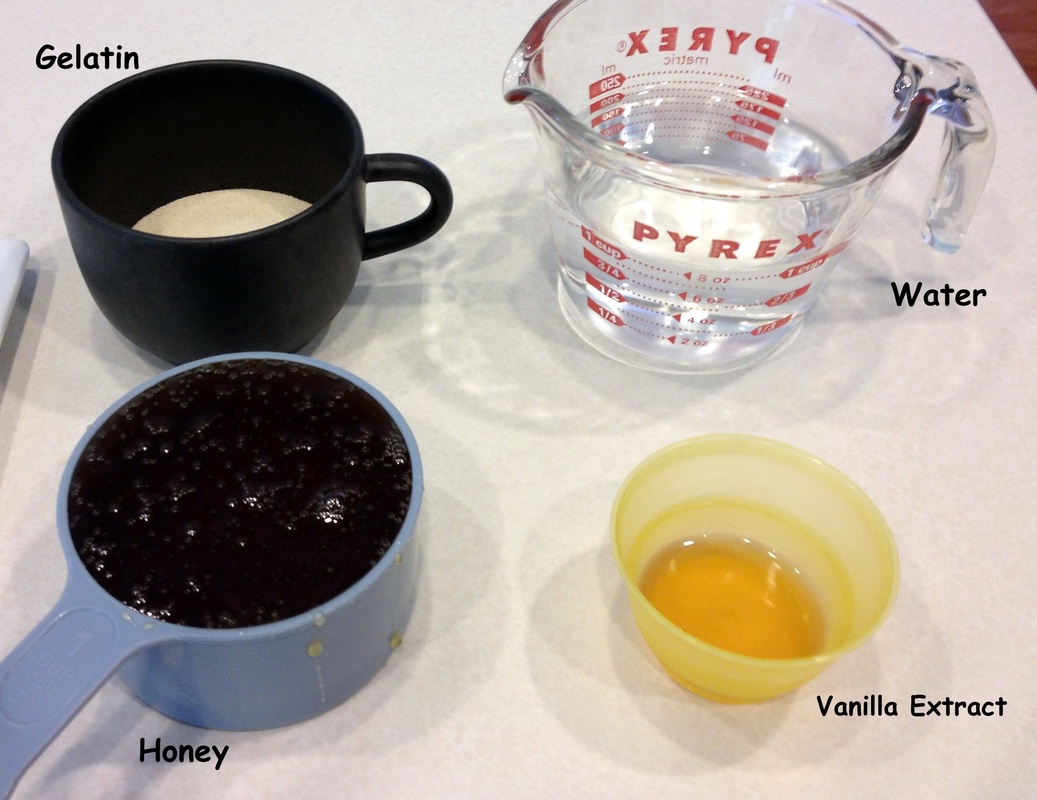
Pour 1/2 cup of the water into the bowl of a stand mixer. Sprinkle the gelatin on top of the water. Whisk until combined. Pour the other 1/2 cup of water into a small saucepan with the honey. Heat the mixture over medium heat until a thermometer registers 230° F - don't stir the mixture! Keep the heat at medium and 'swirl' the pan if necessary. This step could take a few minutes. 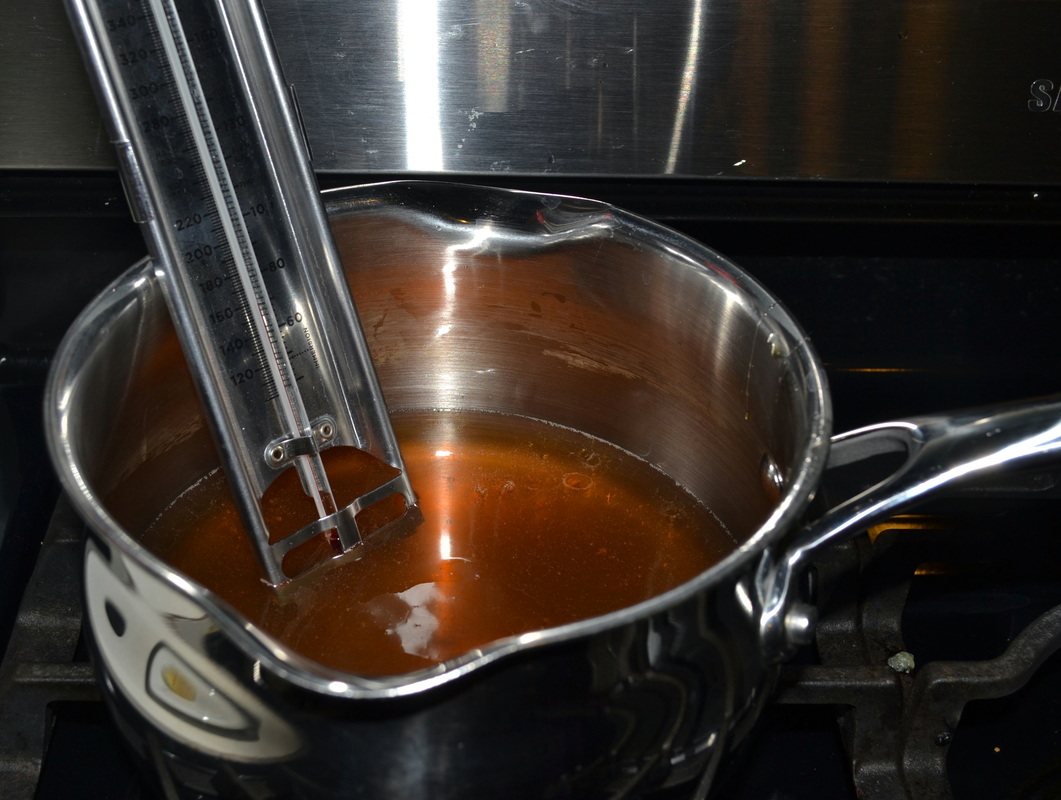
With the mixer running on low, very slowly pour the honey/water mixture into the gelatin mixture. Once the mix is incorporated, turn the mixer on high. Whisk on high for several minutes (5-10) until the mixture turns white and fluffy. Do not overmix. 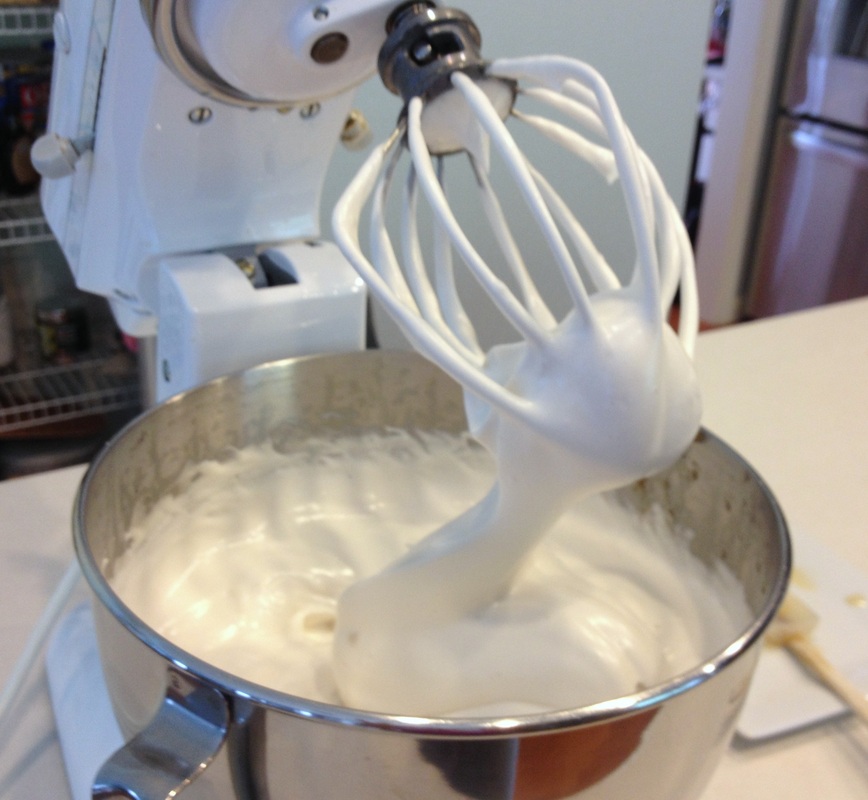
Pour the mixture into an 8x11 pan lined with parchment paper. For thinner marshmallows, use a 9x13 pan. These come out pretty thick and were great for roasting over the campfire! Tap the pan on the counter a few times to release any air bubbles. 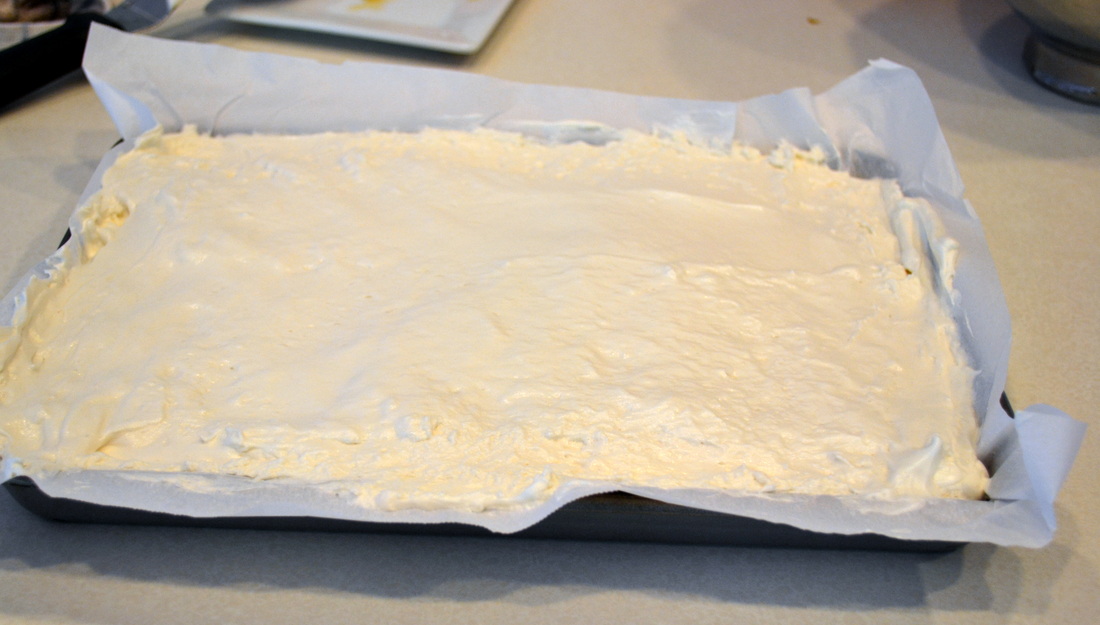
Allow the marshmallows to set in a dry place (not the refrigerator) for at least 8 hours before cutting. Cut into squares about 1x1 inches big. A pizza cutter dipped in coconut oil would work well here. Place them on a cutting board and cover with a dry, clean dishtowel overnight so that they dry out a little more. This step allows them to become easier to handle. 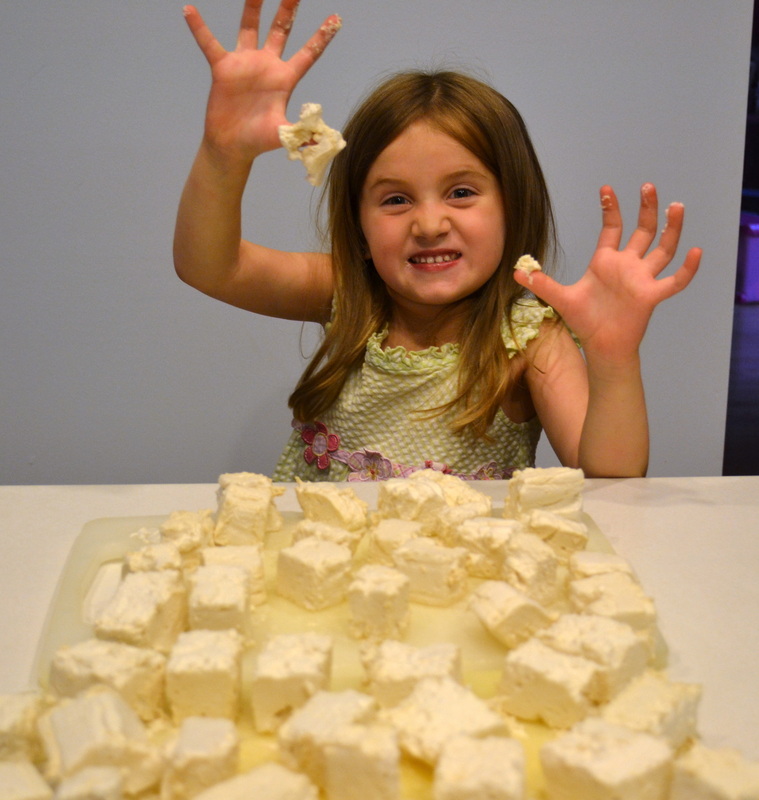
Store the marshmallows in an airtight container for 1-2 weeks. If you are planning on toasting them on the campfire, try to make them at least 2 days beforehand so that are sufficiently dry to the touch. I see endless possibilities of the fun we can have with these marshmallows! I'm planning on experimenting with all sorts of flavors of honey...maybe adding some cocoa powder to the honey mixture....maybe some fresh mint leaves around Christmastime.... let your imagination go crazy! Source:
Adapted from An Organic Wife In less than one week I will start the 10 Days of Real Food Pledge and I'm really excited! We've been on several mini-trips over the past month and eating clean has been challenging at times. My body is so ready for a little detox! If you haven't read about the pledge, you can read about it on 100 Days of Real Food. I plan on starting the pledge on August 12 (the day after my daughter's birthday which will surely be filled with NON-real foods!) and I'd LOVE for you to join me! I'm getting ready for the pledge by prepping some of my favorite foods like almond butter, whole wheat sandwich bread and whole wheat flour tortillas. I'm also stocking up on fruits and veggies and local dairy/meat from the farmer's market. Here is a picture of some local tomatoes and peppers as well as some whole wheat, homemade hamburger buns from my freezer - I adapted this recipe. 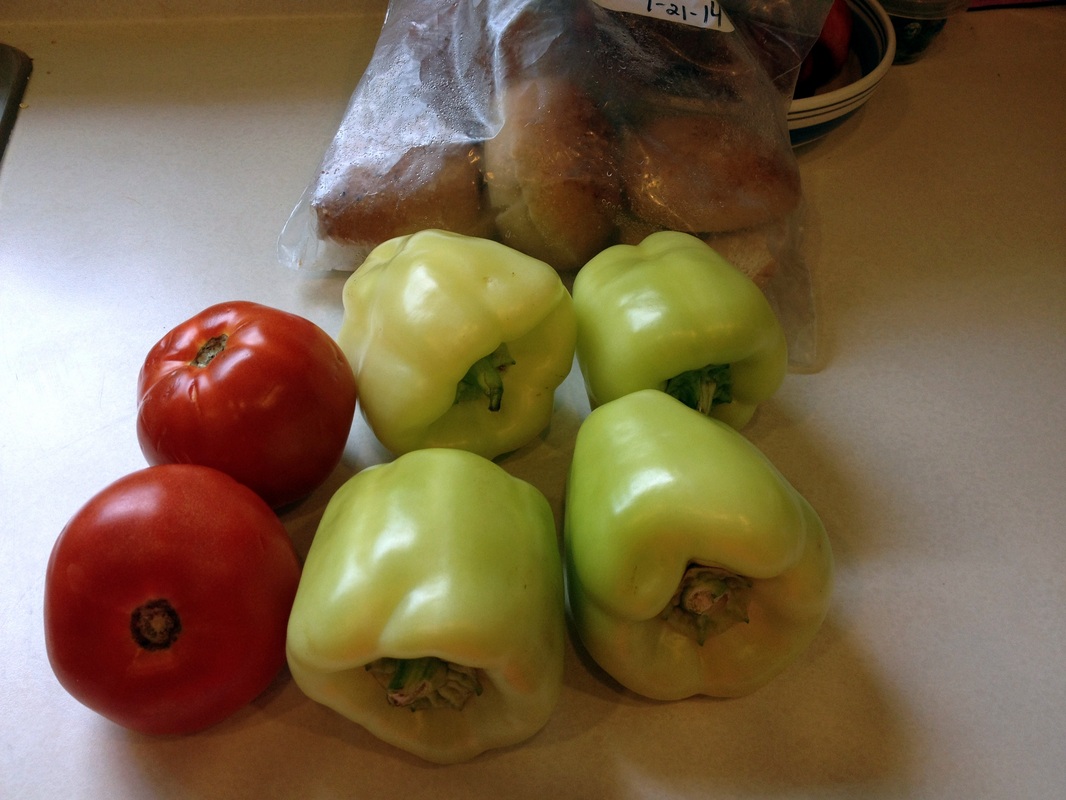
My menu plan for the 10 days on the pledge is:
Tuesday, August 12 - Pizza Stuffed Peppers Wednesday, August 13 - Quiche & Salad Thursday, August 14 - Baked Fish (hopefully from my husband's upcoming fishing trip!) & Carrot Fritters Friday, August 15 - Cheeseburgers (using rolls from the freezer and local, grass-fed ground beef) Saturday, August 16 - Whole Wheat Pizza (using this DIY Pizza Sauce recipe) Sunday, August 17 - Eggplant Parmesan Monday, August 18 - Salmon Salad Tuesday, August 19 - Grilled Cheese (using homemade whole wheat bread) & Tomato Salad Wednesday, August 20 - Baked Fish & Sauteed Kale Thursday, August 21 - Mexican Quinoa with Poached Eggs Will you take the pledge with me? I'd love to have some company along for the ride!! I picked up a very good habit back in January when my family started "Clean Eating": Label Reading. Before I became a faithful reader of 100 Days of Real Food I would haphazardly look at a label, maybe frown at it, then buy it anyways. I never completely understood the effect of putting all those synthetic, man-made ingredients into our bodies, not to mention the abundance of sugar. Some form of sugar is in nearly every processed food we eat! After reading Michael Pollan's In Defense of Food my eyes were WIDE open to it! Some of the physical/medical results after decades of ingesting these 'non-food' foods (chemicals, additives, preservatives) and excessive sugar include: **
The link between the highly processed foods in this country (aka, The Western Diet) and our declining health is truly astounding. If you haven't read In Defense of Food, I highly suggest you do! An easier read, with the same message is Food Rules. The science and research behind what we are eating is so complex. I don't know if I'll ever really know it all, but I'm still reading and learning every day! One thing I have learned is to always ignore any labeling/advertising on the FRONT of a packaged product. Most of the time, it's just that: Advertising. Turn it over and read the ingredients on the back. Some basics about label-reading are:
Since label-reading is such a big part of how I shop I thought I would periodically share some common labels with you and offer a healthier alternative. Today I wanted to talk about marshmallows since we're smack in the middle of campfire season and s'mores. We're actually going camping this weekend and s'mores are a MUST! A few weeks ago we went on a hiking trip with friends and the kids wanted s'mores. Out of desperation and lack of time, I bought a bag of marshmallows from the grocery store. The kids didn't mind them, but I took one bite and I was overwhelmed by the pure sweetness of them (and not in a good way!) According to Fooducate, these marshmallows contain: corn syrup, sugar, dextrose, modified food starch (corn), water, gelatin, natural and artificial flavor, tetrasodium pyrophosphate. Basically we have sugar, more sugar, a thickener, gelatin (ok, that's fine), natural and artificial flavors and....hmm...tetra-something! These are definitely not ingredients I want to put into my body or the bodies of my little ones! I'm working very hard to teach my daughters that there are better options out there! I've actually made my own marshmallows for years now but they, too, are laden with sugar and corn syrup. In an effort to "clean up the s'more" I looked for a marshmallow sweetened with something other than sugar. I finally found a recipe that is sweetened with honey instead of sugar! I just whipped up a batch yesterday and I'll be sure to put the recipe up on the blog very soon! Until then, take a peek at what we are packing for camping this weekend! 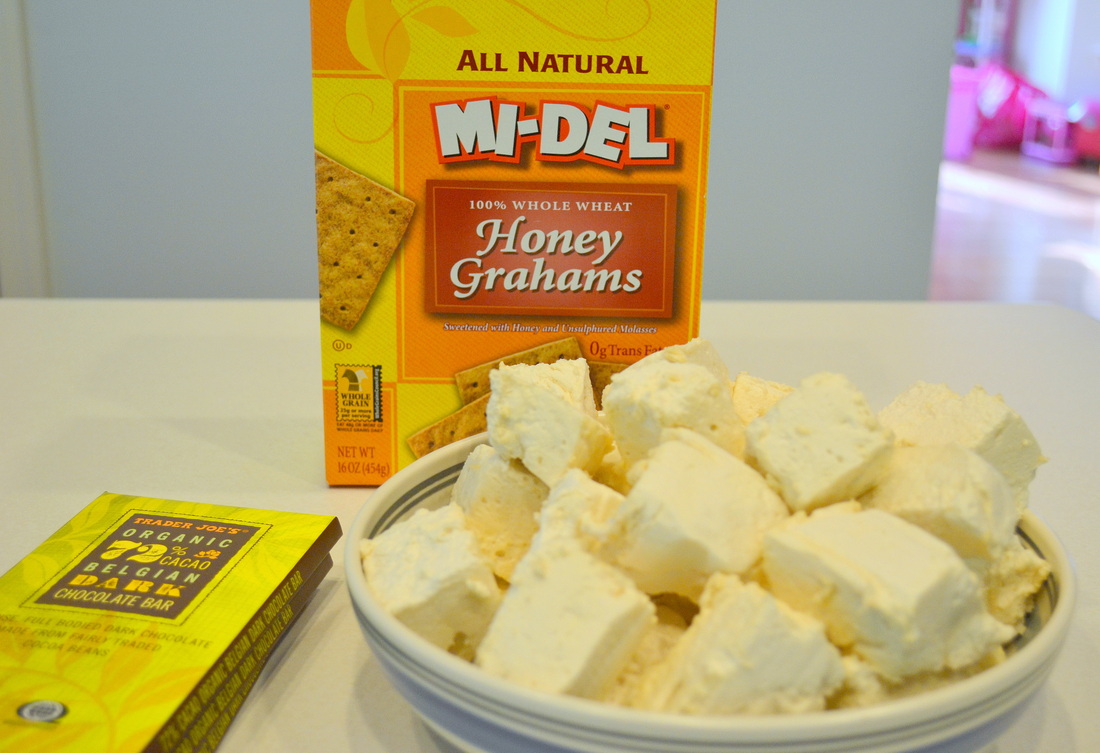
When I started learning about 'Clean Eating' earlier this year I quickly realized that the phrase can be interpreted many different ways. For some people it means no gluten, for others it means no sugar and for others it means all organic foods. The definition that made the most sense for me and my family is the one that Lisa Leake used during her 100 Days of Real Food pledge. Here is a quick summary of the 'rules' she followed:
Now, these are the rules the Leakes used during their pledge and though I'd LOVE to live this way 100% of the time, I realize that it's not realistic for me. However, I do try to eat by these rules most of the time. Rather than commit to 100 days of real food like the Leakes did, they offer a different challenge to their readers - A 10 Day Pledge! For as much as I've learned about and talked about Clean Eating over the past 8 months I've yet to take this pledge myself. That's all about to change! I'm excited to announce that I am going to take the 10 Day Pledge beginning August 12, 2014! ( We have this little event coming up known as my daughter's 9th birthday...so I thought I should wait til after that!) I invite YOU to join me and sign up for the pledge yourself so we can do it together! So, now that we've defined what Clean Eating means to me, I'd like to share a recipe with you. I thought that a great way to start off the blog would be with dessert, of course! Brownies! I first tried these brownies a few months ago when my friend made them for her diabetic daughter. Only after my non-diabetic kids devoured these brownies she told me that they were gluten free AND sugar free! Since my older daughter has a major sweet tooth and has never met a carb she didn't love, I thought these would be a fantastic addition to her lunchbox in a few weeks. These are made with a high quality almond flour (I find mine at Costco) and honey which my kids love! The original recipe calls for chocolate chunks and orange zest. Though I really enjoyed the orange zest, it got mixed reviews in my house so I omitted it. Also, in an effort to make these completely sugar free I omitted the chocolate chunks as well. If I were making these for a special occasion I would totally use them, but for an everyday lunchbox treat I think they are just fine without them. Also, to add a little extra depth to them, I topped them with a little fleur de sal when they were done baking. 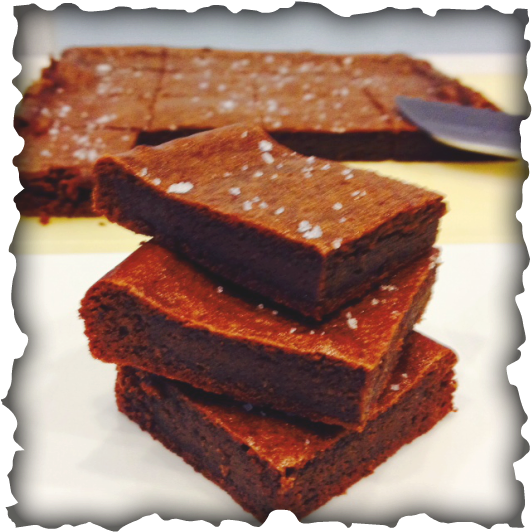
Fudgy Brownies (Gluten Free and Sugar Free) Makes 16 1/2 cup blanched almond flour 1/4 cup cocoa powder 1/2 teaspoon fleur de sel (or other flaky sea salt) 3 eggs 1/2 cup honey 1/2 cup coconut oil Pinch of fleur de sel (for garnish) Preheat oven to 350° F. Line an 8x8 inch square baking pan with parchment paper. Butter the parchment or spray with extra virgin olive oil. Place almond flour in the bowl of a food processor and process until smooth and any chunks have broken down. Pulse in cocoa powder and fleur de sel until mixture is well blended, about 10 seconds. Add eggs, one at a time, and process until mixture is smooth. Add honey and coconut oil and continue blending until the mixture is smooth and all ingredients are fully incorporated. Pour mixture into prepared pan. Bake for 25-30 minutes or until a toothpick inserted into the middle comes out clean. Allow to cool about 15 minutes before removing from the pan using the parchment to lift it out. When brownies are completely cooled, sprinkle with additional fleur de sel and cut into 16 squares. 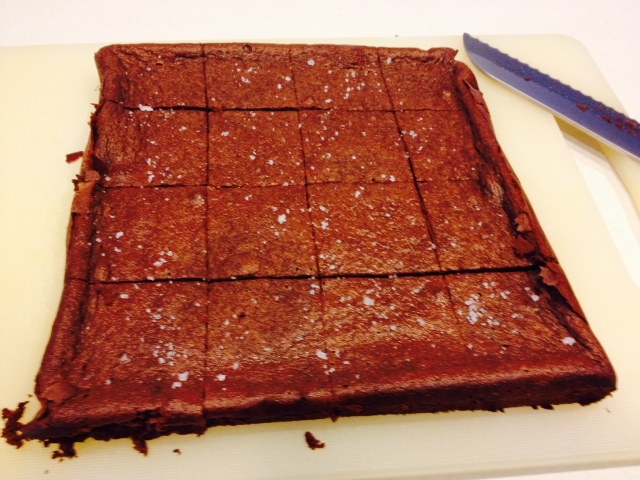
Welcome to the new and improved Butter Blog! I've taken a long absence from blogging but I've recently decided to start again! For those of you who are used to seeing cupcakes, cakes and other unhealthy recipes, you'll notice a shift in the types of food I showcase on here. I've decided to use Butter is Better as my way of sharing my new food philosophy - a focus on whole, real, unprocessed food - also known as 'Clean Eating'. I've switched over 90% of my cooking and baking to be 'clean' so I'll still have plenty of recipes to share with you! I'm also hoping to share my daily challenges and successes with you as well as share information I've learned in the past year about our food sources and Western diet. What prompted this change? In late 2013 I really started to take notice to the way our food is processed, where it comes from and the effects it has on our health and our bodies over the long term. In January 2014 I found the blog, 100 Days of Real Food and read Michael Pollan's book, In Defense of Food. Only then did I realize just how many chemicals and preservatives we were putting into our bodies every single day with every single meal. I was truly shocked! My food philosophy was forever changed. After that, my kitchen pantry received a major update! I wanted to revive this blog to reflect on my new way of eating in the hopes of sharing some information you all may find valuable. What will you find on this blog? My goal in reviving Butter is Better is to share with you all of the information I've learned during my real food journey. I have been reading, reading, reading and I want to share my findings with you! I also want to share with you delicious recipes, menu planning tips, budgeting ideas, school lunch inspiration and more! Please keep in mind that I am NOT a dietitian, nutritionist or doctor. I am formally educated in business with a background in purchasing but I've always had a passion for cooking (and eating!) I'm just a girl trying to eat as healthy as I can and raise my two daughters on the highest quality food I can possibly provide. I'm not perfect and I don't eat clean 100% of the time. Sometimes the best laid plans go awry and we end up with a take-out pizza for dinner. It happens. We eat it and feel gross and vow to try harder the next day! Getting Started I have a whole slew of topics and recipes to talk about over the next few months, but to get you started I wanted to share with you a few of my old blog recipes that are already clean! These are two of my summer staples that I'm enjoying right now as I type :)
Stop Back Often!
Please stop by often! I plan on updating this blog several times a week so please stop by and let me know what you think of the new direction I've taken. Also, if you have any specific topics you are wondering about, please ask! I may have an answer for you and if I don't, I'd be happy to find one for you and learn along with you! Enjoy the new and improved clean version of Butter is Better! 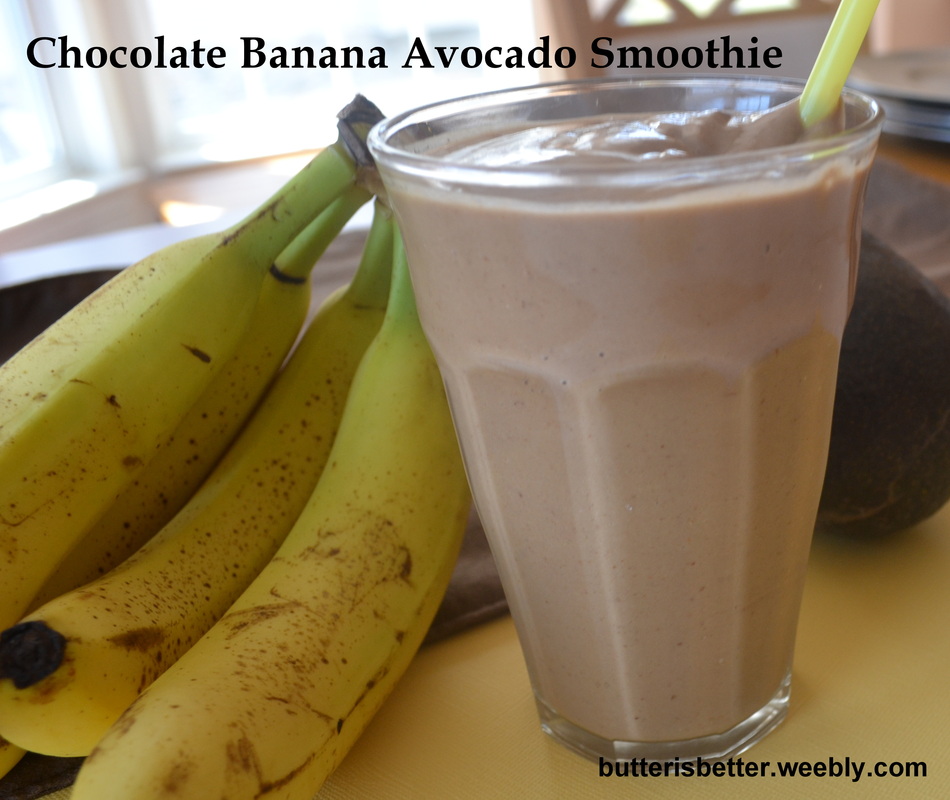
Happy Monday! I hope everyone had a great weekend! If you overindulged a bit (and don't we all?) I have the perfect recipe for you! This is another recipe that features my very favorite fruit: the avocado. Over the past few years I have developed a lower and lower tolerance to milk (and sadly, milkshakes), so I've been enjoying less and less smoothies and milkshakes. I had read many times that avocados are a great addition to shakes and smoothies to get the creaminess that is missing from non-dairy versions. I had never actively searched for a recipe but once I came across this recipe on Pinterest and knew this was one to try! Lots of smoothies look healthy but are secretly filled with tons of sugar and calories. What I like about this smoothie is that it is dairy-free (yaaay!), contains 1 1/2 servings of fruit, is sweetened with honey, not sugar and has tons of protein. This drink totally disguised itself as a chocolate milkshake to my two princesses! JP liked it and Bean loved it. My little Bean definitely acquired Mommy's avocado obsession :) It's chocolate-y and creamy and sweet, but not too sweet. The avocado is there, but I swear you can barely taste it. It's a great way to sneak a lot of healthy things into your kids! 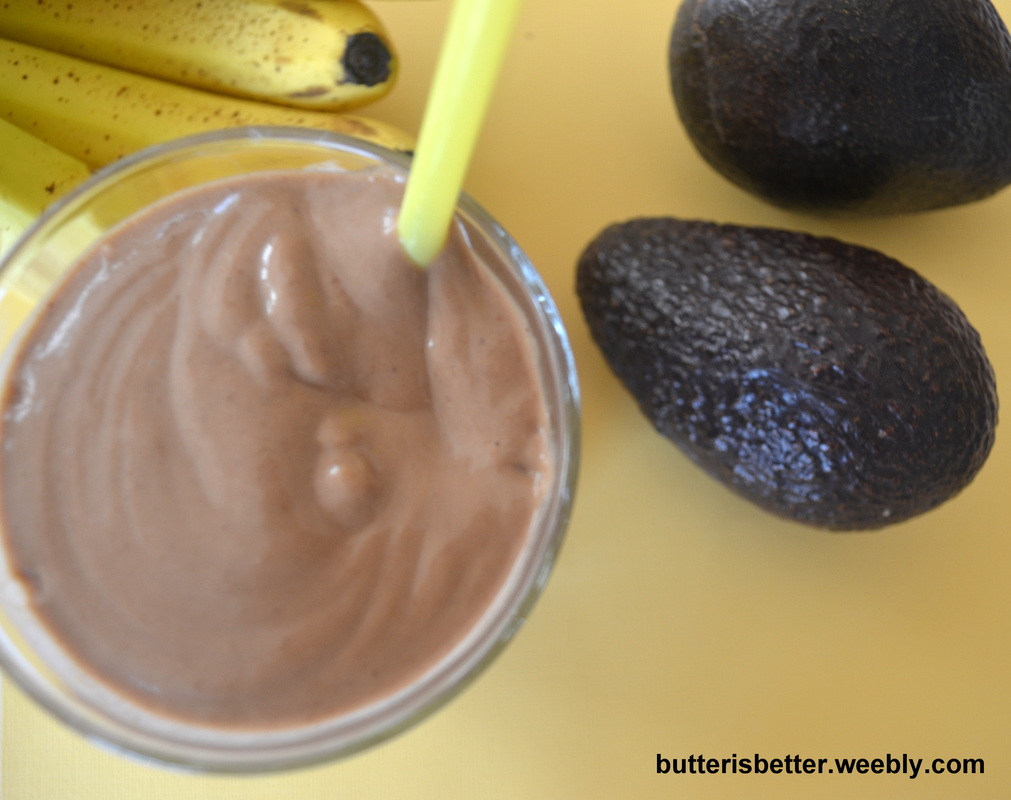
Chocolate Banana Avocado Smoothie Serves 2 1 cup unsweetened almond milk 1/2 cup crushed ice 1 ripe banana 1 tablespoon honey (you can use dates if you want to make this vegan) 1/2 ripe avocado 2 tablespoons natural cocoa powder 2 tablespoons almond butter (make your own here!) 1 1/2 teaspoons ground flax seed Combine all ingredients in a blender until smooth, about 30 seconds. Source:
Adapted from Against All Grain 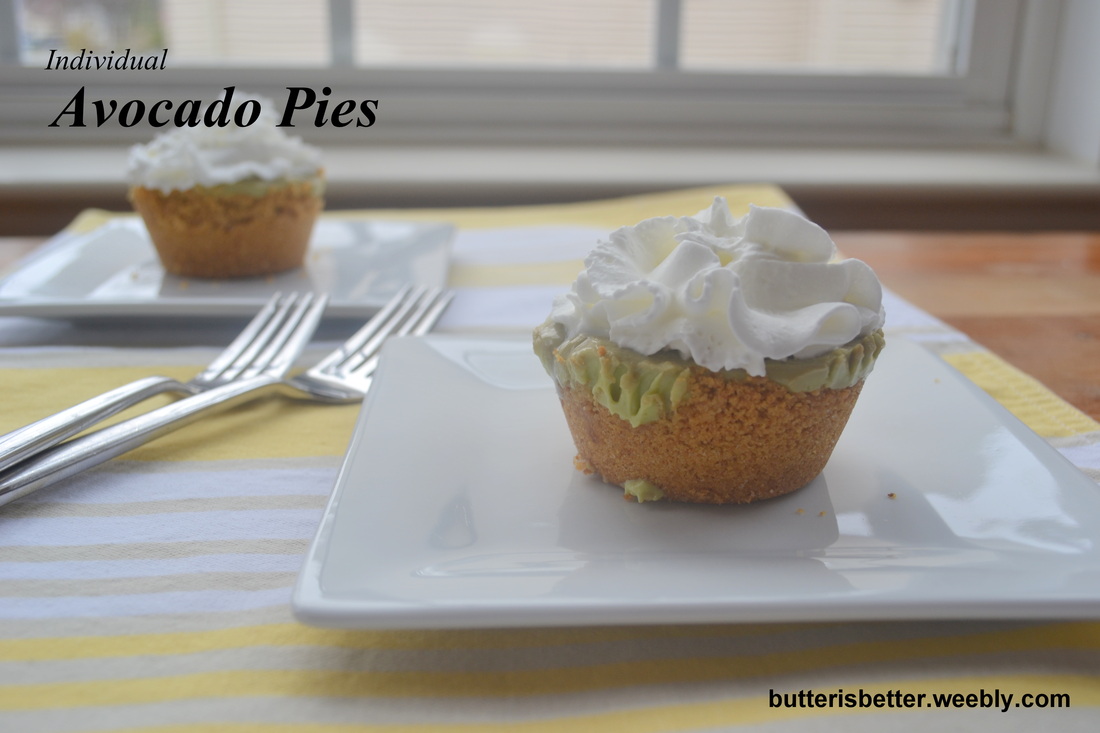
Have you ever tried an avocado? Do you love avocados? No, I mean love avocados? I do! I'm kind of obsessed with them lately, especially since I can get them for $.79 at Aldi! Even if you think you don't like avocados, I'm asking you to hear me out. I actually have two pretty unconventional avocado recipes to share with you. Both of them have the avocado flavor neatly disguised within the recipe (pretty sneaky, huh?) With the weekend coming up I decided today's selection would be a sweet and sinful dessert. On Monday I'll give you something healthy to start your week off right. :) I have been eating avocados in guacamole and on salads and sandwiches for years. When I was pregnant with Princess #1 I never had much of an appetite in the morning, but I always craved cottage cheese with diced avocado (so yummy!) for breakfast. A few years ago I was on a play date and another mom (from India, I believe) told me that she grew up eating avocados in sweet, dessert foods, never savory as we know it here in America. As I sat there eating guacamole I couldn't even imagine the flavor in something sweet. Hmmm...intriguing. Being the foodie that I am I started to be on the lookout for a dessert that consisted of avocados. About a year later I found it in Food Network Magazine. The recipe seemed simple enough so I gave it a try. I figured I'd like it but wasn't sure about my family. To my surprise it was very well received! The avocado flavor was mild and blended well with the sweetness of the sweetened condensed milk and the citrus juice in it gave it the tangy feel of a key lime pie. Other than baking the pie crust, this is basically a no-bake recipe, which makes it perfect for hot summer months. I knew I would be making this one again! It took a few years but I finally got around to whipping this up again with a few small improvements. The original recipe is to be made in a springform pan and serve 8. I found the pieces tended to fall apart when it was cut and 1/8 of the pie was just a bit too rich for anyone to finish their piece. I adapted the recipe to make individual pies using a 12-cup muffin tin which did a few things: 1) the crust to filling ratio is a higher so you taste a bit of crunchy graham cracker in nearly every creamy bite. 2) the serving size is smaller so everyone could finish their portion and there was no waste. 3) the presentation is adorable on little square plates with a generous amount of whipped cream on top! If you've ever work with avocados before you know that they oxidize rather quickly. The addition of citrus slows down the oxidation (browning) but doesn't eliminate it altogether. I found that these tasted best the first day I made them and the following day. By Day #3 they were still ok, but not as tasty as the first two days. Also, don't plan on taking these to an outside event in the summer where they will sit on a dessert table for a few hours...trust me on this...just don't! 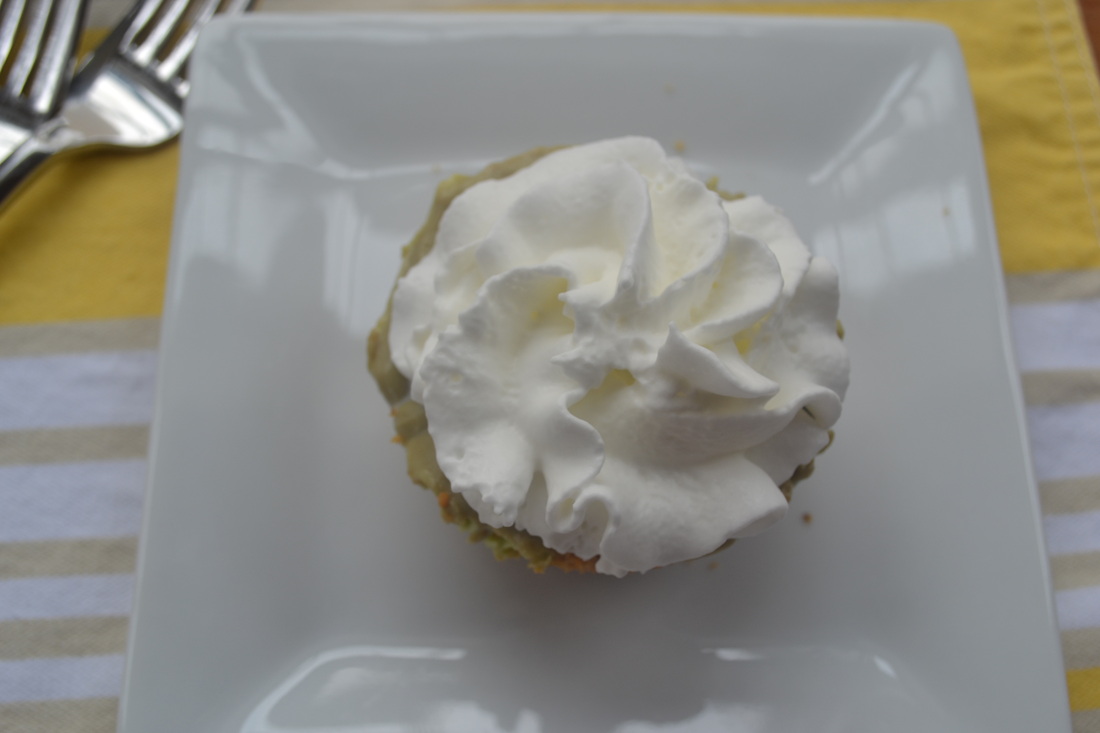
Individual Avocado Pies Serves 12 For the crust 5 tablespoons unsalted butter, melted 1 1/2 cups graham cracker crumbs 1 tablespoon granulated sugar 1/8 teaspoon kosher salt For the filling 2 medium, ripe Haas avocados 1 8-ounce package cream cheese, at room temperature 1 14-ounce can sweetened condensed milk 2 1/2 tablespoons fresh lime juice 1 1/2 tablespoons fresh lemon juice 1/8 teaspoon kosher salt Preheat oven to 350° F. Spray 12-cup muffin tin with cooking spray. Combine melted butter, graham cracker crumbs, sugar and salt in a medium bowl. Press the graham cracker crumb mixture into the bottom and up the sides of each cup in the muffin tin. Bake until golden brown, about 9-10 minutes. Allow to cool completely on a wire rack. Once the crust has cooled completely, make the filling. Halve and pit the avocado and roughly chop the flesh. Add to the bowl of a stand mixer (a hand mixer can also be used) with the softened cream cheese and beat until combined and smooth. Add the sweetened condensed milk, lime juice, lemon juice and salt. Beat until smooth and fluffy, scraping the sides of the bowl as needed. Divide the filling evenly among the 12 prepared crusts. Cover pies completely with a piece of plastic wrap, making sure to press it down directly on top of the pie filling (this helps reduce oxidation). Chill thoroughly, about 4 hours. To serve, loosen pies from muffin tin with a fork. Add whipped cream, if desired. 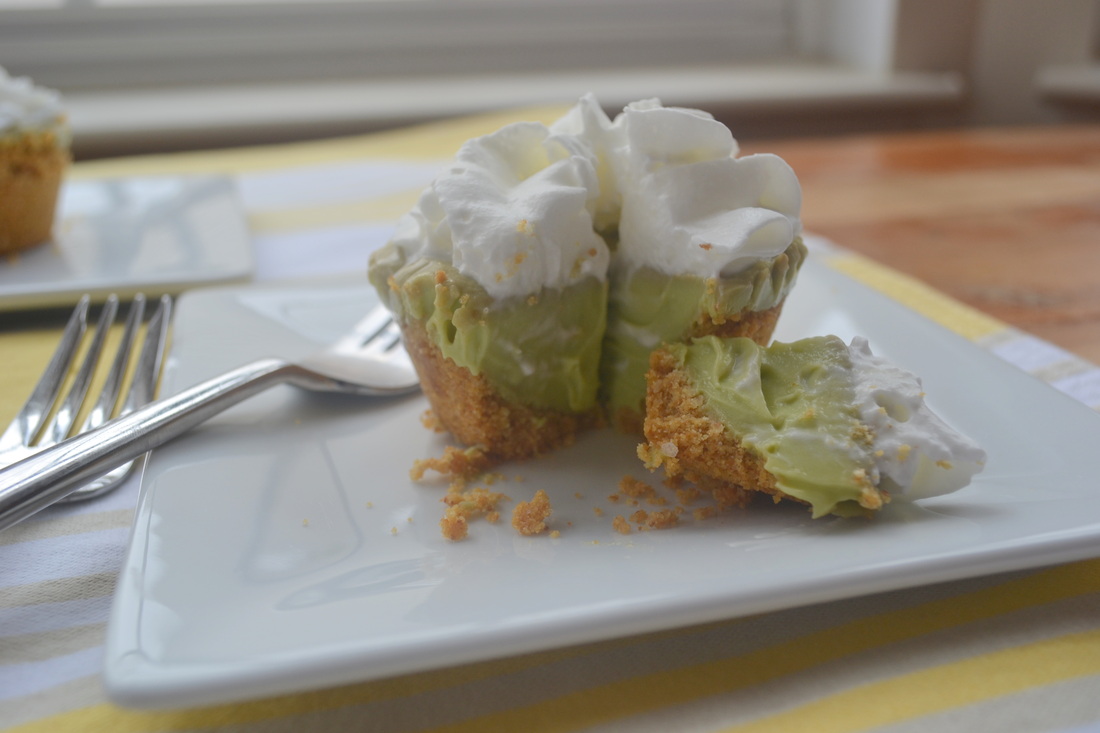
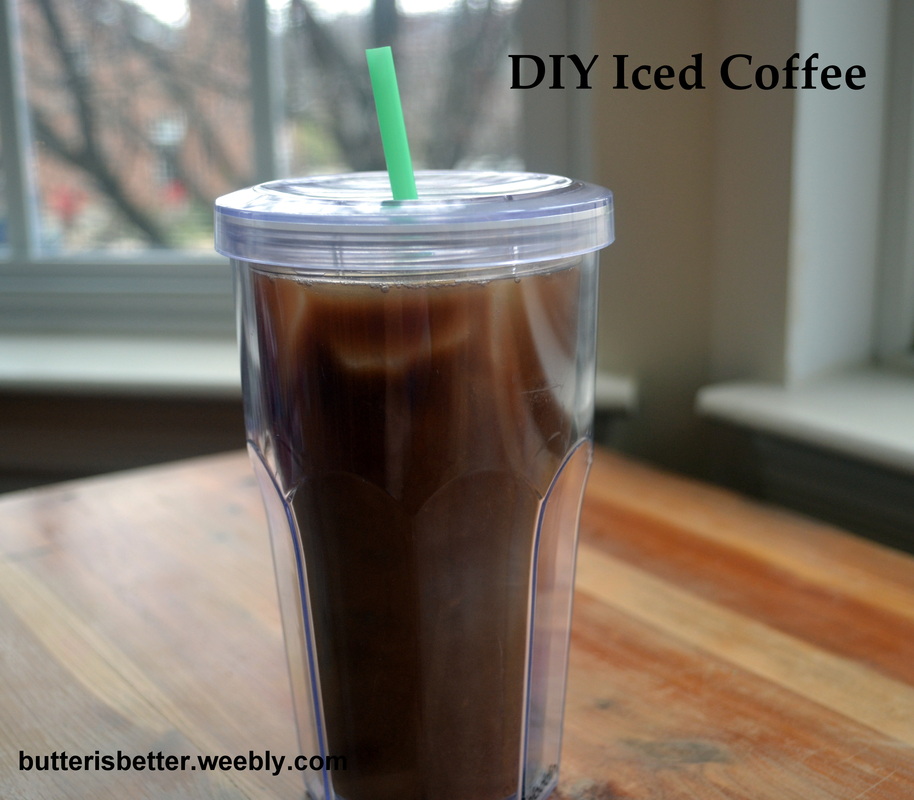
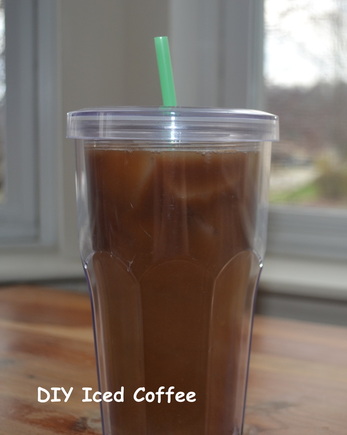
Do you see the picture above? Do you know what that is a picture of? Freedom! Er...Iced Coffee! But, iced coffee that I made by myself, at home, for a fraction of what it costs at a coffee shop! To me, that is sweet coffee freedom! I am a coffee drinker in that I have to have a cup (sometimes 2) of coffee every day or else I end up with a dreaded caffeine-induced headache. I hate that I'm a slave to coffee, but I accept it. I've tried a few times to give coffee up over the summers because, quite honestly, who wants a hot cup of coffee when it's 80 degrees at 10:00 am? Giving up coffee never really worked for me. A few years ago I discovered iced coffees at the coffee shops around town. Genius! It's coffee. It's cold. It's refreshing. It's perfect for summer! This great find came with a few problems - 1) Buying an iced coffee every day is not budget-friendly 2) Getting to a coffee shop every day is not convenient AT ALL and 3) Doesn't it seem like they put way too much ice in those drinks and not enough coffee? So, why not make it at home???? And I tried.... My first attempt was making a full pot of coffee in the morning and only drinking what my hubby and I wanted for the day, then dumping the leftover into a pitcher in the fridge. Then, the next day, then the next day...eh. I was still drinking warm coffee from the initial brew and the stuff in the fridge just tasted stale and nasty. Fail #1! My second attempt was to make espresso and get out the blender and make a sweet, frozen coffee concoction. Messy, too sweet, too many calories, too much work and just tasted off. Fail #2. My third attempt came when I purchase my beloved Keurig. One of the reasons I bought the Keurig was because I read about how you could make iced coffee by using them. Intriguing. How this was achieved was by brewing a strong blend of K-Cup using only 6 ounces of water. Once you had this potent little concoction in your coffee mug, you simply dumped it over a FULL cup of ice in an insulated cold beverage tumbler. Ok, let's try it. It worked....sort of. The taste was ok, but since you are pouring piping hot coffee over ice the ice melted instantly and left you with almost-cold coffee. Probably my best attempt up to that point, so we went with it for a while. I'm still comfortable calling this Fail #3. Then, along came this brand new technique I saw on Annie's Eats. I've never really heard of cold brewing coffee before. Looks complicated....or does it? The originally recipe makes quite a bit so I quartered the recipe down to yield just one pitcher and suddenly this was the easiest thing I'd ever done in the kitchen! It takes just a few minutes of planning and very minimal kitchen supplies (I think a kitchen scale is extremely helpful in this recipe). I usually throw a batch together at night and let it sit on the counter overnight. The next morning I strain it through a colander lined with a heavy-duty paper towel (I like Bounty) or a cheesecloth. Once it's strained I pop it in the fridge until I'm ready for it. You can add any kind of syrup or sweetener to your drink if you like, but I usually just add some almond milk to balance mine out. It keeps in the fridge for quite a while too - I've had my current batch in there for 3 weeks now (I'm blaming Mother Nature on her late arrival of spring here in PA). So, if you've been looking for a perfect recipe to make iced coffee at home, look no further - you have found it! 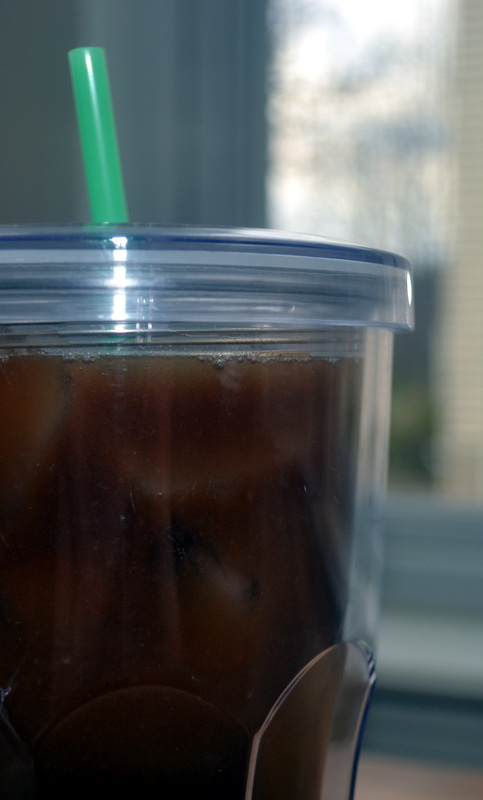
DIY Iced Coffee Makes about 2 quarts 4 ounces bold/dark roast coffee, ground (this is where the kitchen scales comes in handy) 2 quarts cold, filtered water Add coffee grounds to a 2 quart pitcher. Fill about halfway with cold water. Stir to moisten grounds. Continue filling pitcher with water until it is full (this may be slightly less than 2 quarts). Cover and let sit at room temperature for 8 hours or overnight. 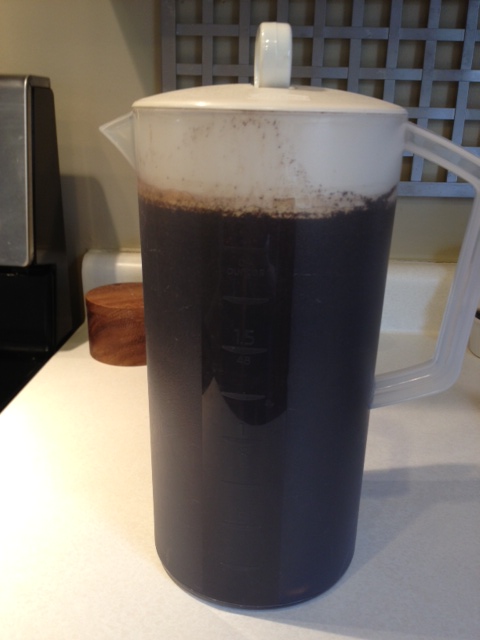
After 8 hours, pour coffee and grounds through a fine mesh sieve lined with a strong paper towel or cheesecloth. Push gently on the coffee grounds to extract all the liquid. Discard coffee grounds. Place coffee in a pitcher and store in the refrigerator until ready to use. Enjoy! Source:
Adapted from Annie's Eats, which was adapted from Pioneer Woman, who originally saw it on Imbibe Magazine |
AuthorPittsburgh area mom striving to provide clean, healthy, REAL food for her family! Categories
All
Archives
September 2014
|
 RSS Feed
